
User Manual

5
GETTING STARTED
You may want to perform the telescope assembly indoors in the light so that you become familiar with the parts and
operation before moving the telescope outside into the dark for observing. This Getting Started Guide provides a
brief overview so you can use your new telescope as quickly as possible. Just follow the simple steps below and
you will be up and running before you know it.
1 Set the telescope in a large open area where
you can see lots of sky. Don’t setup right next to a
building or a wall. Make sure the ground is stable and
is approximately level. It is best to set up the scope
away from bright nighttime lighting. Bright lights will
spoil your night vision and impede your ability to see
the sky.
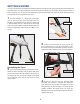
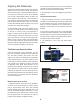
Assembling the Tripod
2Removetheeldtripodfromtheshippingcarton.
Stand the tripod vertically with the tripod feet down
and with the tripod still fully collapsed. Grasp two of
the tripod legs and, with the full weight of the tripod
on the third leg, gently pull the legs apart to a fully
open position.
3 Thread in the lock-knobs on each leg near the
foot of each tripod leg. Use the lock-knobs to vary
the height of the inner, extendible tripod leg sections.
Tightenthelockstoarmfeelonly;donotovertighten.
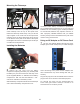
4 Remove the end nut from the spreader shaft
and slide the spreader in between the telescope
legs. Attach the end nut and hand tighten until the
telescope legs are held snuggly in the most spread
position. Position the tripod where you want the
telescope to be and check that the top of the tripod is
approximately level.
Spreader Bar
End Nut
Lock-Knob
Spreader Shaft