Instruction Manual Meade Model 4504 4.
WARNING NEVER USE A MEADE® TELESCOPE TO LOOK AT THE SUN! LOOKING AT OR NEAR THE SUN WILL CAUSE INSTANT AND IRREVERSIBLE DAMAGE TO YOUR EYE. EYE DAMAGE IS OFTEN PAINLESS, SO THERE IS NO WARNING TO THE OBSERVER THAT DAMAGE HAS OCCURRED UNTIL IT IS TOO LATE. DO NOT POINT THE TELESCOPE OR ITS VIEWFINDER AT OR NEAR THE SUN. DO NOT LOOK THROUGH THE TELESCOPE OR ITS VIEWFINDER AS IT IS MOVING. CHILDREN SHOULD ALWAYS HAVE ADULT SUPERVISION WHILE OBSERVING.
TABLE OF CONTENTS PART ONE: The Basics Lesson 1: Unpacking and Assembly ....................................................................5 How to Assemble Your Telescope ......................................................................8 Lesson 2: Balancing the Telescope ....................................................................10 Lesson 3: Aligning the Viewfinder ......................................................................10 Lesson 4: Observing by Moving the Telescope Manually ..
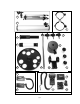
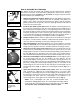
1 2 3 7 4 5 6 8 9 11 10 12 15 13 14 Fig. 1: Parts included in the Meade Model 4504 Giftbox.
PART ONE: The Basics LESSON 1: Unpacking and Assembly As you unpack your telescope, carefully note the following parts. The bolded numbers in parentheses on this page refer to the photos on page 4. Telescope Assembly • Equatorial mount (1) with a pre-attached heavy duty, continuously adjustable aluminum tripod with leg braces • 3 tripod leg lock knobs (7) • Complete optical tube assembly (2) including a 4.5" (114mm) diameter primary mirror with dust cover and a 0.
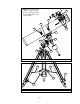
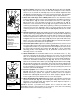
7 6 8 5 4 3 2 9 15 10 1 14 11 16 12 13 Fig. 2a: The Meade Model 4504 4.5" Equatorial Reflecting Telescope. Key to Figures 2a, 2b, and 2c 1. Equatorial mount 16. Latitude adjustment knob 2. Optical tube assembly 17. Focuser, Focus knobs 3. Cradle rings 18. Eyepiece thumbscrew 4. Viewfinder bracket 19. Eyepiece 5. Viewfinder rubber eyepiece 20. Cradle ring lock knobs 6. 5 x 24 viewfinder 21. Optical tube saddle plate 7. Viewfinder bracket thumbscrews 22. Dec motor drive assembly 8.
19 NOTE: The coiled cord that connects to the two motor drives has been omitted from the illustration for the sake of clarity. 18 20 21 17 20 27 26 22 23 25 24 Fig. 2b: The Meade Model 4504 4.5" Equatorial Reflecting Telescope. 28 28 29 30 29 Fig. 2c: The Meade Model 4504 4.5" Equatorial Reflecting Telescope.
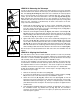
How to Assemble Your Telescope The giftbox contains the optical tube assembly and the tripod with the equatorial mount. The accessories are located within compartments custom-cut into the styrofoam block inserts. Refer to Figures 1, 2a, 2b, and 2c for images of the parts and the overall assembly of the 4504 telescope. Leg lock knob Threaded hole Sliding inner leg Fig. 3: Tripod leg lock knob. 1. Remove the components from the giftbox: Remove and identify the telescope’s standard equipment.
1 2 1 3 4 5 Fig. 7: Attach cradle rings to the saddle plate with attachment screws. 1. Threaded screw hole (saddle plate) 2. Saddle plate 3. Cradle ring 4. Threaded screw hole (cradle ring) 5. Attachment screw Eyepiece Focuser Thumbscrew 8. Tilt the assembly: Unlock the R.A. lock (26, Fig. 2b) and the Dec lock (27, Fig. 2b) so that the telescope turns freely on both axes. Tilting these axes makes it easier for you to perform the following steps. Turn the latitude adjustment knob (16, Fig.
LESSON 2: Balancing the Telescope Dec Lock R.A. Lock Fig. 9a: Balancing the telescope: the axes locks. Counterweight shaft parallel to floor In order for the telescope to be stable on the tripod and also for it to move smoothly, it must be balanced. To balance the telescope, you will unlock the Right Ascension or R.A. lock (26, Fig. 2b and Fig. 9a). When this axis is unlocked, the telescope pivots more or less horizontally on the mount. This is called the R.A. axis.
NEVER point the telescope directly at or near the Sun at any time! Observing the Sun, even for the smallest fraction of a second, will result in instant and irreversible eye damage, as well as physical damage to the telescope itself. 5. Check this alignment on a celestial object, such as a bright star or the Moon, and make any necessary refinements, using the method outlined above in steps 3 and 4.
13 12 9 10 5 11 4 6 1 2 3 7 8 Fig. 11: Motor drive system assembly. Key to Figure 11 1. R.A. Worm Shaft 7. LED 2. (R.A. Axis) Plastic Adapter 8. R.A. Motor Drive 3. Aluminum Shaft 9. Handbox (HBX) Port 4. Set Screw 10. Dec Motor Drive 5. Circular Housing containing 11. R.A. Lock 12. Dec Worm Shaft notched plastic shaft 13. Set Screws 6.
Observe the World Around You Practice observing during the day, when it is easier to become familiar with the controls of your telescope. 1. Loosen the telescope’s R.A. lock (26, Fig. 2b) and Dec lock (27, Fig. 2b). 2. Move your telescope to observe distant street signs, mountains, trees, and other structures. Use your viewfinder to to help site-in an object. 3. When the object is centered in the viewfinder’s crosshairs, remember to re-tighten the R.A. and Dec locks. 4. Center the object in your eyepiece.
Activate the Arrow Keys NOTE: Press and hold the Up Arrow key to speed up the scroll speed of the display or press and hold the Down Arrow key to slow down the scroll speed. When the display is scrolling at a speed that is comfortable for reading, release the key. This procedure describes how to activate Starfinder's Arrow keys: 1. After Starfinder's cord is plugged in and the batteries are installed, a copyright message lights on the Starfinder LCD display (1, Fig. 13). 2.
Speed 1: Fastest speed to move the telescope from one point in the sky to another. Speeds 2 or 3: Best used for the rough centering of an object in the eyepiece. Speeds 4 or 5: Enables the centering an object in the field of a low-to-moderate power eyepiece such as the standard H 25mm Speeds 6 or 7: Best used for the fine centering of an object in the field of view of a high-power eyepiece such as the standard SR 4mm.
Observe a Star using the Automatic Tracking Feature In this example, Starfinder's Arrow keys are used to find a star, and then Starfinder's tracking capability automatically keeps the star centered in your telescope's eyepiece. 1. If you have just completed Lesson 5, Starfinder's display now reads "Align: One Star." Go to Step 2. If you have not used Starfinder yet or have just plugged it into the HBX port, perform the procedure described in "ACTIVATE THE ARROW KEYS," page 14.
Initializing Starfinder This exercise describes how to initialize Starfinder. Initialization is a procedure that enables Starfinder to operate correctly. When you first use Starfinder, it doesn't yet "know" the location of the observing site or the time or date of the observation session. During the Initialization procedure, you will enter this information.
7. Starfinder then prompts you to enter the status of Daylight Savings Time. Press one of the Scroll keys to toggle between the YES/NO settings. Select the desired setting by pressing ENTER. NOTE: Daylight Savings Time may be referred to by a different name in various areas of the world. 8. If you have previously entered the Country/State and City of your observing site (as described in "ACTIVATE THE ARROW KEYS," page 14), go to step 9.
Training the Drive Next, train the drive using Starfinder. Perform this procedure the first time you use Starfinder with your telescope, after a Reset, or if you are experiencing any pointing accuracy problems. Training the drive gives your telescope a higher degree of pointing accuracy. NOTE: Use a terrestrial object, such as a telephone pole or lamp post, to train the drive. It is best to perform this procedure during the daytime.
Align Your Telescope Using Starfinder After completing the "Train the Drive" procedure, align your telescope using Starfinder. The fastest and easiest way to start observing with Starfinder's Go To capabilities is to align your telescope using One-Star (Polar) Alignment. An alternate method, Two-Star alignment, is described later in this manual. 1. With "Train Drive: Dec Train" displayed (or scroll to this menu, if necessary), keep pressing MODE until "Select Item: Setup" is displayed. Press ENTER. 2.
Which One’s the Alignment Star? If Starfinder has chosen an alignment star that you are unfamiliar with, how can you be sure if the star in your eyepiece is really the alignment star? The rule of thumb is that an alignment star is usually the brightest star in that area of the sky. When you view an alignment star in an eyepiece, it will standout dramatically from the rest of the stars in that portion of the sky.
4. “Tonight’s Best: Searching...” displays. After calculating, “Tonight’s Best: Jupiter” displays. NOTE: Different objects may be displayed on a tour list on any given night. Press ENTER and then use the Scroll keys to display information about the object. Press Mode to exit the information display. Press GO TO to move the telescope to the object. 5. Press MODE to return to the Tour list. Press the Scroll keys to scroll through the list. Press ENTER when you find the next object you wish to observe. 6.
PART TWO: Starfinder Controls and Menus This section describes how Starfinder operates, including: • Starfinder's controls • How to move through Starfinder's menus • Alignment setups • Starfinder's Menus Control of the 4504 is through the operation of the standard-equipment Starfinder handbox (Fig. 17). Nearly all functions of the telescope are accomplished with just a few pushes of Starfinder’s buttons.
3 MODE Key: Returns to the previous menu or data level in the Starfinder database until the top level, “Select Item," is reached. The MODE key is similar to the ESCAPE key on a computer. NOTE: Pressing MODE while in the Select Item level moves Starfinder to the topmost screen: "Select Item: Object." NOTE: If MODE is pressed and held for two seconds or more, the following information is then available using the Scroll keys (6 and 7, Fig.
8 Speed/? Key: Briefly pressing the Speed/? key cycles through the seven slew speeds that move the telescope (see “Slew Speeds,” page 14). NOTE: Pressing the Speed/? key briefly changes the slew speed. Holding down the Speed/? key longer (one to two seconds) accesses the Help function. The Speed/? key also accesses the "Help" file. "Help" provides on-screen information on how to accomplish whatever task is currently active.
OBJECT Select from over 1400 database objects and press GO TO to move the telescope automatically to the object and place it in the telescopic field of view. SETUP Quick, easy alignment permits all telescope operations with only a 2-minute setup. Select Item: Object Select Item: Setup UTILITIES Calculate eyepiece magnifications; set the timer for an observing session; or survey user landmarks in 30-second intervals.
NOTE: To perform an accurate calculation, Starfinder must be properly initialized with the current date, time, and location of the observing site. To enter the current date, time, and location information of your observing site, see “ INITIALIZE STARFINDER” page 17, before proceeding with this exercise. To Calculate Sunset time: 1. Press the MODE key several times, until "Select Item: Object" displays. 2. Press the Scroll Down key once to display the Event option in the Select Item menu. 3.
Starfinder Menus Object Menu Almost all observing with Starfinder is performed using the Object menu. (Note: Exceptions include Guided Tour and Landmark Survey.) See “GO TO SATURN,” page 20, for an example of observing using the Object menu. Also see “USING THE GUIDED TOUR,” page 21. Many Starfinder menu categories contain databases. A Starfinder database is a list of viewable objects.
1. When a desired object is visible in the eyepiece, press MODE until the "Select Item: Object" menu is displayed. 2. Scroll through the Object menu options until "Object: Identify" displays. 3. Press ENTER to search the database for the identity of the object being observed. 4. If the telescope is not directly on a Starfinder database object, the nearest database object is located and displayed on the screen. Press GO TO and the telescope slews to that object.
To access a hypertext word directly from the Glossary menu, use the Scroll keys to scroll through the alphabet. Press ENTER on the desired letter. Scroll to the desired entry, then press ENTER to read the description. Utilities Menu The Utilities menu provides access to several extra features within Starfinder, including a countdown timer and an alarm. The Utilities functions include: Timer selects a countdown timer. This feature is useful for functions such as astrophotography.
Park Scope is designed for a telescope that is not moved between observing sessions. Align the telescope one time, then use this function to park the telescope. Next time it is powered up, enter the correct date and time – and no alignment is required. Pressing ENTER causes the telescope to move to its pre-determined Park position. Once parked, the screen prompts you to turn off the power (i.e., unplugging the battery pack).
• Calibrate Motor: If the telescope motors appear to have a problem, use this option to retest the motors before doing a Reset. This option is also used if a Starfinder unit is moved between telescopes to match Starfinder to the telescope. • High Precision: If High Precision is turned on when looking for a faint celestial object (i.e., a nebula or galaxy), Starfinder first slews to a nearby bright star and requests "ENTER to Sync." Center the star in the eyepiece, then press ENTER.
PART 3: Caring for Your Telescope Cleaning The lens or mirror surfaces should be cleaned as infrequently as possible. Front surface aluminized mirrors, in particular, should be cleaned only when absolutely necessary. In all cases, avoid touching any mirror surface. A little dust on the surface of a mirror or lens causes negligible loss of performance and should not be considered reason to clean the surface.
3 2 1 2 3 Fig. 24: Primary mirror cell. Fig. 23: Diagonal assembly. Collimation (Alignment) of the Optics Your telescope is optically aligned at the factory prior to shipment. It is unlikely that you will need to align, or collimate, the optics after receipt of the instrument. However, if the telescope received unusually rough handling in shipment, it is possible that the optics must be re-aligned for best optical performance.
refine the tilt-angle of the diagonal mirror until the entire primary mirror can be seen centered within the diagonal mirror reflection. When the diagonal mirror is correctly aligned, it will look like Fig. 28 (the primary mirror is shown out of alignment). Primary mirror adjustments If the diagonal mirror (1, Fig. 28) and the reflection of the primary mirror (2, Fig. 28) appear centered within the drawtube (3, Fig. 28), but the reflection of your eye and the reflection of the diagonal mirror (4, Fig.
Star testing the collimation With the collimation performed, you will want to test the accuracy of the alignment on a star. Use the H 25mm eyepiece and point the telescope at a moderately bright (second or third magnitude) star, then center the star image in the telescope’s field-of-view. With the star centered, follow the method below: • Bring the star image slowly out of focus until one or more rings are visible around the central disc.
MODEL 4504 TELESCOPE SPECIFICATIONS Optical design ................................................................Newtonian Reflector Clear aperture ..............................................................114mm (4.5”) Focal length ....................................................................910mm Focal ratio (photographic speed) ..................................f/8 Resolving power ............................................................1.0 arc secs Multi-coatings on objective lens .......
APPENDIX A: Calculating Eyepiece Power The power, or magnification of the telescope depends on two optical characteristics: the focal length of the main telescope and the focal length of the eyepiece used during a particular observation. The focal length of the 4504 telescope is fixed at 910mm. To calculate the power in use with a particular eyepiece, divide the focal length of the eyepiece into the focal length of the main telescope. E.g.
APPENDIX B: Terrestrial Viewing, Celestial Movement, and Polar Alignment Terrestrial Viewing The 4504 is an excellent, high-resolution terrestrial (land) telescope. Viewing terrestrial objects requires looking along the Earth's surface through heat waves. These heat waves often cause degradation of image quality. Low power eyepieces, like the H 25mm eyepiece, magnify these heat waves less than higher power eyepieces. Therefore, low power eyepieces provide a steadier, higher quality image.
ation clin De On the surface of the Earth, North “lines of longitude” are drawn Celestial +90 Dec. between the North and South Pole Star (Vicinity Poles. Similarly, “lines of latitude” of Polaris) are drawn in an East-West direc1 tion, parallel to the Earth's equa11 13 12 tor. The celestial equator is sim10 15 14 9 16 8 17 7 ply a projection of the Earth's Earth’s 18 6 5 Rotation 19 equator onto the celestial 4 20 21 3 Celestial 2 22 23 1 0 sphere.
Using Setting Circles The setting circles of the Polar aligned equatorial mount can be used to locate faint celestial objects not easily found by direct visual observation. To use the setting circles, follow this procedure: • Use a star chart or star atlas, and look up the celestial coordinates, Right Ascension and Declination (R.A. and Dec), of an easy-to-find bright star that is within the general vicinity of the faint object you wish to locate.
APPENDIX C: Using Starfinder to Enter Celestial Coordinates Although Starfinder's database contains more than 1400 objects (stars, nebulae, planets, etc.) that you can observe, you may eventually want to view objects that are not part of the database. Starfinder provides a feature that allows you to enter an object's R.A and Dec coordinates in the "User: Objects" option of Starfinder's Object menu, and then will automatically slew the telescope to the user-entered coordinates.
APPENDIX D: Helpful Charts Latitude Chart for Major Cities of the World To aid in the Polar Alignment procedure (see "TO POLAR ALIGN THE TELESCOPE," page 15), latitudes of major cities around the world are listed below. To determine the latitude of an observing site not listed on the chart, locate the city closest to your site. Then follow the procedure below: Northern Hemisphere observers (N): If the site is over 70 miles (110 km) North of the listed city, add one degree for every 70 miles.
APPENDIX E: Basic Astronomy In the early 17th century, an Italian Scientist named Galileo, using a crude telescope considerably smaller than your 4504, turned it to look towards the sky instead of distant trees and mountains. What he saw, and what he realized about what he saw, forever changed the way mankind thought of the universe.
Planets Planets change positions in the sky as they orbit around the Sun. To locate the planets on a given day or month, consult a monthly astronomy magazine, such as Sky and Telescope or Astronomy. Listed below are the best planets for viewing through the 4504. Venus is about nine-tenths the diameter of Earth. As Venus orbits the Sun, observers can see it go through phases (crescent, half, and full) much like those of the Moon.
A Roadmap to the Stars The night sky is filled with wonder and intrigue. You too can enjoy exploring the universe simply by following a few pointers on a roadmap to the stars. Rigel Orion Betelgeuse Andromeda Gemini Pollux First, find the Big Dipper which is part of the constellation Ursa Major. The Big Dipper is usually easy to locate year round in North America. Extending directly out from the far side of the Big Dipper’s cup is the constellation Orion.
Meade Limited Warranty Every Meade telescope, spotting scope, and binocular is warranted by Meade Instruments Corp. (MIC) to be free of defects in materials and workmanship for a period of ONE YEAR from date of original retail purchase in the U.S.A. MIC will repair or replace the product, or part thereof, found upon inspection by MIC to be defective, provided the defective part or product is returned to MIC, freight prepaid, with proof of purchase.
ADVANCED PRODUCTS DIVISION Meade Instruments Corporation World’s Leading Manufacturer of Astronomical Telescopes for the Serious Amateur 6001 Oak Canyon, Irvine, California 92618 ■ (949) 451-1450 FAX: (949) 451-1460 ■ www.meade.