Instruction Manual #497 AutoStar Handbox for use with the DS-2090AT-TC and DS-2102AT-TC MEADE.
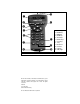
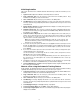
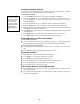
1 B L 4 3 5 1 LCD Display 2 ENTER Key 6 7 3 MODE Key 4 GO TO Key K Fig. 1: AutoStar keys ® The name “Meade,” “AutoStar,” and the Meade logo are trademarks registered with the U.S. Patent Office and in principal countries throughout the world. All rights reserved. Patents: US 6,392,799 Other Patent Pending © 2005 Meade Instruments Corporation.
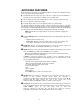
AUTOSTAR FEATURES Nearly all telescope operations are accomplished with just a few pushes of AutoStar’s buttons. Some of the major features of AutoStar are: N Automatically move the telescope to any of the 30,000 objects stored in the database or manually enter the astronomical coordinates of any celestial object. N Take a guided tour of the best celestial objects to view on any given night of the year. N Access a glossary of astronomical terms.
Additionally, use the Arrow keys to to move the cursor across the display: Use the Right or Left Arrow key to move the cursor from one number to the next in the display. g h Number Keys: Press to input digits 0 to 9. To change the speed at which the telescope moves (known as the “slew” speed) press a NUMBER KEY from 1 through 9. 1 is the slowest speed and 9 is the fastest. Scroll Keys: Press to access options within a selected menu. The menu is displayed on the first line of the screen.
Initializing AutoStar This section describes how to initialize AutoStar. Perform this procedure the first time you use AutoStar. 1. Tighten Locks: Tighten the Altitude lock and tripod base lock knob. 2. Plug in AutoStar: Make sure the telescope power switch is in the OFF position. Plug AutoStar into the HBX port of the Control Panel. 3. Turn on AutoStar: Flip the telescope power switch to the ON position. 4. Sun Warning: A message displays that warns you not to look at the Sun.
8. Select Targets: Astronomical Option: "Targets: Terrestrial" displays. Press either of the Scroll keys once. "Targets: Astronomical" now displays. 9. Locate a Bright Star: Use the Arrow keys to locate a bright star in the night sky. You may choose any unobstructed, bright star for the purposes of this example. Use AutoStar's Arrow keys to center the star in the eyepiece. 10. To Start Tracking: Once the star is centered, press ENTER to select "Astronomical." The telescope's tracking motors then engage.
When the procedure is performed correctly, "Alignment Successful" displays. If Autostar does not display this message, perform this procedure again. NOTE: Autostar locates alignment stars based on the date, time, and location entered. The alignment stars may change from night to night. All that is required is for the observer to center the selected stars in the eyepiece when prompted. NOTE: The GO TO key also allows you to perform a "spiral search.
Slew Speeds AutoStar has nine slew speeds that are directly proportional to the sidereal rate (this is the speed at which stars move) and have been calculated to accomplish specific functions. Pressing the SPEED/? key changes the slew speed, which is then shown for about two seconds on AutoStar’s display. The nine available speeds are: Number Number Number Number Number Number Number Key Key Key Key Key Key Key 1 2 3 4 5 6 7 = 1x = = 2x = = 8x = = 16x = = 64x = = 128x = = 1.
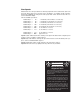
BASIC AUTOSTAR OPERATION SETUP MENU Automatic alignment permits all telescope operations with only minimal setup. Select Item: Object Select Item: Setup UTILITIES MENU Calculate eyepiece magnifications; set timer alerts; create your own landmark survey. OBJECT MENU Want to see Mars? The Orion nebula? The Andromeda galaxy? Select from over 30,000 objects and press GO TO to move the telescope automatically to an object.
AutoStar Navigation Exercise To demonstrate how the AutoStar menu structure works, the following exercise calculates Sunset time so an evening observing session can be planned. TIP: When multiple choices are available within a menu option, the option that is currently selected is usually displayed first and highlighted by a right pointing arrow (>). To Calculate Sunset time: 1. Press the MODE key several times, until “Select Item: Object” is displayed. 2.
Sunrise Sunset Moonrise Moonset Moon Phases Next Full Moon Next New Moon Next 1st Qtr Next 3rd Qtr Meteor Showers Quadrantids Lyrids Eta Aquarids Delta Aquarids Perseids Orionids Taurids Leonids Geminids Ursids Solar Eclipses Lunar Eclipses Autumn Equinox Vernal Equinox Winter Solstice Summer Solstice Select Item: Event Fig. 4: The Complete AutoStar Menu Structure. Solar System Mercury Etc. Moon Asteroids Comets Constellations Andromeda Etc. Deep Sky Named Object Galaxies Nebulae Messier Etc.
Object Menu Almost all observing with AutoStar is performed using the Object menu category. (NOTE: Exceptions include Guided Tour and Landmark Survey.) Many AutoStar menu categories contain databases. An AutoStar database is a list of viewable objects, such as stars, planets, comets, nebulae, and so forth. When one of these objects is selected from a database, AutoStar moves your telescope (if properly aligned) and points it at the selected object.
Event Menu The Event menu provides access to dates and times of astronomical events. The Event database includes: Sunrise and Sunset calculates the time that the Sun rises or sets on the current date. Find rise and set times for other dates by entering a new date into the “Setup: Date” menu. See DATE, page 11. Moonrise and Moonset calculates the time that the Moon rises or sets on the current date. Find rise and set times for other dates by entering a new date into the “Setup: Date” menu. See DATE, page 11.
Alarm selects a time for an alarm signal as a reminder. To use the Alarm, press ENTER, then choose "Set" or "Start/Stop." N Set: Enter the time of day for the alarm to sound, in hours, minutes, and seconds, then press ENTER. N Start/Stop: Activates the alarm set previously. Use the Scroll keys to toggle between ON and OFF. When ON is displayed, press ENTER to activate the alarm. When the alarm time arrives, AutoStar beeps. Press ENTER to deactivate the alarm.
4. Point the telescope North. Use a compass or the North Star, Polaris as a guide to locating North. During EASY TWO-STAR ALIGN, AutoStar automatically chooses two bright stars from its database. The user is then requested to center the stars in the eyepiece and press ENTER. Two-Star Alignment requires some knowledge of the night sky. AutoStar displays a database of bright stars and two stars are chosen by the observer from the database for alignment.
N Quiet Slew: Sets the maximum slew rate to 1.5° for quieter operation. N Max Elevation: Allows you to enter a value in degrees that sets a limit as to how far the optical tube can swing upward during a programmed slew. (Note that it does not prevent you from performing a manual slew past this limit.) This is useful when you have a camera or other peripheral attached to the telescope—you can prevent it from striking the telescope base.
and allows automatic slewing of the telescope to the user-entered coordinates. R.A (Right Ascension) and Dec. (Declination) are similar to latitude and longitude, except that they are used to find objects in sky. In order to use this menu option, you first need to look up the R.A and Dec. coordinates of the object or objects you wish to observe.
5. Use the Scroll keys to display data about the pass: aos – acquisition of signal and los – loss of signal. If you subtract the aos from the los, you can calculate how long the satellite will be visible. Location information also displays. 6. "Alarm" displays after the location information. Press ENTER and AutoStar automatically sets the alarm to sound a minute before the satellite's scheduled appearance. You may return to regular observations until the alarm goes off. 7.
MEADE LIMITED WARRANTY Every Meade AutoStar accessory is warranted by Meade Instruments Corporation (“Meade”) to be free of defects in materials and workmanship for a period of ONE YEAR from the date of original purchase in the U.S.A. and Canada. Meade will repair or replace a product, or part thereof, found by Meade to be defective, provided the defective part is returned to Meade, freightprepaid, with proof of purchase. This warranty applies to the original purchaser only and is non-transferable.