Flat Panel TV USER’S MANUAL © 2005 All rights reserved. Trademarks: Manufactured under license by Dolby Laboratories. ‘Dolby’, ‘Pro Logic’ and the Double D symbol are trademarks of Dolby Laboratories. The “HD ready” Logo is a trademark of EICTA. Additional trademarks are the property of their respective owners. We make no warranty of any kind with regard to this material, including, but not limited to, the implied warranties of merchantability and fitness for a particular purpose.
CONTENT 1. SAFETY AND PRECAUTIONS 1 Operating Safety .................................................................................................. 1 Repair........................................................................................................... 1 Notes for Service Engineers ............................................................................. 1 Point of use ...................................................................................................
9. TELETEXT 23 To operate Teletext ............................................................................................ 23 English Teletext Page Selection ....................................................................................... 23 Select Teletext display functions ........................................................................... 23 Useful features for Teletext.................................................................................. 24 10.
Device At the end of its life, the appliance must not be disposed of in household rubbish. Enquire about the options for environmentally-friendly disposal Batteries Do not dispose of used batteries in the household rubbish! They must be deposited at a collection point for used batteries.
English 1. SAFETY AND PRECAUTIONS Please read through this section carefully and follow the instructions to maximize the reliable operation and lifetime of your display. Always keep these instructions handy and close by your display. Keep the instructions and the packaging so that if you sell or give away your display you can supply them to the new owner.
POINT OF USE • Keep your display and all units connected to it away from moisture and avoid dust, heat and direct sunlight. Failure to observe these instructions can lead to malfunctions or damage to the display. • Do not place any containers filled with liquid (vases or similar) on the TV. The container could tip over and the liquid could impair electrical safety. • Do not place any open sources of fire (candles or similar objects) onto the TV device.
STANDARDS/ELECTRO-MAGNETIC COMPATIBILITY English Your display fulfils the requirements for electro-magnetic compatibility and electrical safety specified in the following standards: EN 55013, EN 55020, EN 60065, EN 61000-3-2, EN 61000-3-3 • Provide a space of at least three feet from high-frequency and magnetic sources of interference (television sets, loudspeakers, mobile telephones, etc.) in order to avoid malfunctions.
RECYCLING AND DISPOSAL This device and its packaging have manufactured from materials that can be disposed of in an environmentally-friendly way and sent to correct recycling to a great extent. The device will be taken back after use, in order to send it to reutilization or exploitation of the materials, as far as is it is returned in a state that corresponds to use in accordance with regulations. Parts of the device that cannot be made use of will be disposed of correctly.
English 2. INTRODUCTION Thank you for purchasing our Multi-display. We thank you for your confidence in our products and are pleased to greet you as a new customer. We focused on great features, ease of use and reliability in manufacturing your display. SERVICE Deutsch Service and support will be available every time you use your new monitor. Contact us, we will be glad to help you. This manual contains a separate chapter on the subject of Troubleshooting on page 35.
3. CONTROL ELEMENTS AND SIDE CONNECTIONS The Buttons on the device control the basic functioning of the TV, including the On-Screen Menu. You will reach the advanced functions through the remote. Operating display A yellow light indicates that the device is switched on but is in Readiness Mode. The light shines blue if the device is switched on. Sensor window Point the remote to this region of the screen.
English 4. BACK OF THE DEVICE AND CONNECTIONS Français Deutsch • View from diagonally below Scart/AV1 Mains switch Scart/AV2 DVI-I Service Italiano Mains plug Aerial connection PC Audio IN Dansk Português Nederlands Español Information: The service socket is exclusively intended for our authorized service partners. Improper use can lead to damage to your TV device. Note: Please read chapter „10.
5.
SUMMARY OF CONTROL BUTTONS English Device on or switch to Readiness Mode POWER Switches the device on or into Operating Mode alternately Switches to PC mode (VGA or DVI) AV.SV Switches to video mode or S-video mode (See “AV Menu settings” from Page 26) SCART 1 Switches to SCART 1. Switches between video, S-video, RGB and Auto if pressed several times. SCART 2 Switches to SCART 2. Switches between video, S-video Auto if pressed several times. 0 Switches between PC, AV.
6. APSAS FIRST TIME INSTALLATION Your TV device has the APSAS (Automatic Program Search And Sort) automatic installation system and a graphic OSD (On Screen Display) operating surface. Both systems will make the initial installation and the operation of your device in future easier for you. 1. After removing the display packaging, ensure the product is installed in a safe and well ventilated position. 2. Insert two AAA type batteries into battery compartment on the rear of the remote control. 3.
Please go to the Start Menu Point with the assistance of the P+/P- setting Buttons, after you have selected your preferred language. English 9. Deutsch The automatic initial setting is started by selecting ‘Further’ by means of MENU and the P+/P- buttons. During this, the device will automatically search for all the television channels that can be received at your location, and sort them and store them according to your entries concerning the location and the language.
7. GENERAL CONTROLS & ADJUSTMENT TURNING THE DISPLAY ON AND OFF The mains switch of the TV is located on the back of the device. The device moves to Readiness Mode if this switch is switched on. The operating display shines yellow in Readiness Mode. It is possible to switch the device to the normal Operating Mode by means of the POWER Button on the remote or on the device. The operating display shines blue in the normal Operating Mode.
CONTINUE SWITCHING CHANNELS English You have three different possibilities to switch through the channels available: 1. Through direct entry of the channel number: You will call up the channel directly through the 0-9 Buttons. You can enter the following digit within 2 seconds after entering the first digit, in order to call up multi-digit channel numbers. 2. You switch through the channels running by pressing the P+/P- Buttons briefly.
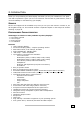
Variation 1: Press the RED Button to reach the Picture Menu directly. Variation 2: Press the MENU Button to call up the Main Menu, set the cursor on PICTURE by means of the P+/P- Buttons and call up the appropriate Menu by means of the MENU Button. 1. 2. 3. 4. 5. 6. 7. 8. Picture Preset Contrast Colour Brightness Format Tint PC settings Continue Picture 1. Preset: Here, you can choose between the optimal factory presets or manual contrast and brightness setting.
ADDITIONAL PICTURE SETTINGS Continue Picture Noise reduction Sharpness Comb filter Colour registration Backlight White balance Perfect Clear Antiflicker Deutsch 1. 2. 3. 4. 5. 6. 7. 8. English Move the cursor to ADDITIONAL PICTURE SETTINGS with the P+/P- Buttons and press the MENU Button. Français Further fine adjustments in relation to the impression made by the picture can be carried out in this Menu. 1.
8. Antiflicker (only active in the case of Plasma-TVs– not in the case of LCD-TV-devices): Disruptive, large-surface flickering can be reduced by activating this function. However, quick movements will become less sharp and jerky through this. SOUND (BALANCE, EQUALIZER, ETC.) Different settings in relation to the sound reproduction of your TV can be made in this Menu. Variation 1: Press the BLUE Button to reach the Sound Menu directly.
English You will be able to set the sound reproduction of your TV for the frequencies given according to your personal perceptions, if the MANUAL setting under PRESET is selected. Move the Selection Bar to the relevant frequency with the P+/P- Buttons and carry out the setting by means of the VOL+/VOL- Buttons. You can return to the preset basic values by calling up the basic settings, if you are not satisfied with your changes.
8. TV MODE ADJUSTMENT ADJUSTING TV SETTINGS 1. Select "TV" mode as signal source using the TV key on the remote control. 2. Press the Menu key and select TV on the screen menu. Main Menu 1. 2. 3. 4. 5. 6. 7. 8. Picture Sound Program table Installation Child lock Sleeptimer Swap function Games 3. Select the PROGRAM TABLE Menu Point with the P+/P- Buttons and press the MENU Button. PROGRAM TABLE The program table indicates the names and numbers of the channels.
MOVING AND SORTING CHANNELS English 1. Go to the channel slot in the program table that you would like to move or sort with the assistance of the P+/P-/Vol+/Vol- Buttons. 2. Press the GREEN Button to call up the sorting function directly or call up an Edit Functions Menu with the MENU function and select MOVE. 4. Move the channel to the channel slot that you require with the assistance of the P+/P/Vol+/Vol- Buttons. 5.
SETTING CHANNELS MANUALLY 1. Go to the channel slot in the program table that you would like to edit with the assistance of the P+/P-/Vol+/Vol- Buttons. 2. Either press the YELLOW Button to call up the processing function directly or call up an Edit Functions Menu with the MENU function and select EDIT. 3. Now the screen will display the PROGRAM EDIT or AV EDIT Menu: Program edit 1. Frequency input 2. Tuning 3. Channel grid 4. Channel type 5. Channel number 6. Change name 7. TV-standard 8.
9. Colour Standard: The colour standard can be changed with the MENU Button (menu) or the VOL+/VOLButtons. Changes to the colour norm of a station can be made here. Deutsch English 10. Audio channel: The preferred audio channel can be selected with the MENU Button (Menu) or the VOL+/VOL- Buttons. The device selects the optimum sound setting in accordance with the NICAM priority (a digital sound norm used by some stations) before stereo or mono, independently the AUTOMATIC position.
MANUAL ADDITION OF CHANNELS 1. Go to the first empty channel slot following the channel slots already stored in the program table with the P+/P-/Vol+/Vol- Buttons. Press the MENU Button and select the NEW TV signal source. 2. Now enter the channel type and subsequently the channel number or the relevant frequency. Check the remaining settings for correctness in relation to the required station(see chapter „Setting channels manually“from page 20). 3.
English 9. TELETEXT Teletext is a free service that is broadcast by the majority of television stations and offers current information in relation to news, the weather, television programs, share prices, subtitles and other subjects. Your TV offers many useful functions for operating Teletext and multi-page text, storing sub-pages or fast navigation. Deutsch TO OPERATE TELETEXT 1. Select a TV station on which Teletext is being transmitted. 2. Press the TELETEXT button once to appear the Teletext screen.
2. Split Screen: Press the PIP ON/OFF Button (= divided screen), to display the current television picture as split screen, in addition to Teletext. 3. Television picture in Multi-Page Text: The television picture in the upper field of the two small Teletext pictures will be presented in Multi-Page Mode by pressing the PIP ON/OFF Button again. 4.
English 10. CONNECTING EXTERNAL DEVICES CONNECTION OF AN EXTERNAL DEVICE TO THE SCART SOCKET Please connect the SCART/AV1 or the SCART/AV2 socket of the TV to the device to be connected with a EURO AV cable (Scart cable), to connect a video recorder, a DVD player, a SAT receiver or similar to one of the two Scart sockets of your TV, for example. Deutsch Note: Please pay attention to the instruction for use of the device to be connected.
SETTINGS FOR EXTERNAL DEVICES (PICTURE, SOUND, NAME, ETC.) Please refer to the Chapters „Picture (Contrast, Colour, Brightness, etc.)“ on Page 13 and „Additional picture settings“ on Page 15, to change the picture for AV settings. The functions described in these Chapters also apply to the AV positions. You will find more precise descriptions in chapter „Sound (Balance, Equalizer, etc.)“ on page 16, if you want to adjust the sound. The points described there also apply to the AV settings.
English YCrCb: A YcrCb signal that is the output of a many DVD players can be represented at this setting. It will be recognized automatically whether the pictures are transmitted in the line interlaced or full picture (progressive) process. YPrPb: A YprPb signal that is the output of a many DVD players can be represented at this setting. It will be recognized automatically whether the pictures are transmitted in the line interlaced or full picture (progressive) process. Deutsch 5.
11. PC MODE CONNECTION Your TV device offers you the possibility of connecting a PC or a source of video with VGA, DVI or components output (a DVD player, for example). Your TV device can represent both analog and digital input signals. Connect the DVI-I socket of the TV device to the video card of your PC or to your source of video.
English 3. Input: With the VOL+/VOL Buttons or by means of a list of selections that can be reached by pressing the MENU Button; it is possible to choose between the AUTO/ANALOG PC/ANALOG VIDEO/DVI PC/DVI VIDEO Settings. AUTO: Your TV will recognize the type of signal (analog or digital) at the DVI-I socket automatically. Deutsch ANALOG PC / ANALOG VIDEO: In this setting, your TV will expect an analog input signal at the DVI-I socket.
12. COMFORT FUNCTIONS PICTURE IN PICTURE (PIP) You can use the PIP function to display two programs at the same time. 1. Press the PIP ON/OFF Button on the remote. Channel slot 1 will be displayed as a small picture when you call up the PIP function for the first time, after switching the TV on. 2. You will now be able to have the required channel slot or AV setting (SCART 1, PC, AV, SV, etc.) displayed in the small picture with the PIP SOURCE / -Buttons.
1. Press the MENU Button. The Main Menu will be displayed. Picture Sound Program table Installation Child lock Sleeptimer Swap function Games Deutsch 1. 2. 3. 4. 5. 6. 7. 8. English Main Menu 1. PIN 2. Child lock Français 2. Move the Selection Bar to the CHILD LOCK Menu Point with the P+/P-Buttons and press the MENU Button to call up the sub-menu. Child lock xxxx On/Off The CHILD LOCK can be switched on under the relevant Menu Point after entering your PIN number.
SWAP FUNCTION The Swap Function enables you to change between two channels positioned separately or to switch back to a preferred channel fast. For example, if you want to switch channels during an advertising break, you can switch back quickly at any time, by pressing the RTN Button, to see whether the advertising break has already finished and your desired program is continuing.
SWITCHING ON MODE English You can establish your preferred Operating Mode of the TV after switching it on with this setting. 1. Press the MENU Button to reach the Main Menu. 2. Select the INSTALLATION Menu Point with the P+/P- Buttons and press the MENU Button again. Deutsch 3. Move the Selection Bar to the SWITCH ON WITH Menu Point with the P+/P- Buttons.
TIME DISPLAY TIME In TV Mode, the time will be displayed by pressing this Button. Press the TIME Button while your TV is transmitting a television channel with Teletext transmission. The current time will be displayed in the form of a digital clock in the right upper corner of the screen. The display will switch to an analog clock if the TIME Button is pressed again. The time display will disappear as soon as the TIME Button is pressed a third time.
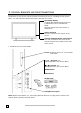
English 13. WALL INSTALLATION Your TV device is ready for wall installation by means of a standard wall unit. Your TV device must only be installed on vertical walls. • Test whether the carrying capacity of the wall is suitable for 4 times the weight of the TV device (see the technical data) before the installation. • Make sure that the TV device is switched off and that the mains cable and all other connection cables are detached before the installation.
14. TROUBLESHOOTING Many times, problems have simple causes. We would like to give you some tips to solve some common problems. Should these tips not help, please call us! There is no picture or sound. Make sure the AC adapter is properly inserted in the power outlet. Make sure the input mode is set to correctly. Make sure the main power switch of the main unit is on. There is no picture. There is no picture from AV. Make sure the Contrast/Brightness is properly adjusted.
English 15. OTHER QUESTIONS DO YOU REQUIRE ADDITIONAL SUPPORT? - What messages are appearing on the screen? - During which operational step did the problem arise? - How does your computer configuration look, if you have connected a PC to the device? - What software were you using when the error occurred, if you have connected a PC to the device? - What steps have you already taken to solve the problem? - Give us your Customer Number, if you have already received one.
WARRANTY We warrant to our customers that this product is free from defects in materials and workmanship as follows: for a determined period from the date of original purchase, defective parts or a defective product returned to a repair facility or an Authorized Service Facility ("ASF") for such product, as applicable, and proven to be defective upon inspection, will be exchanged for new or comparable rebuilt parts, or a refurbished product, as determined by the repair facility or the ASF.