
User manual


4
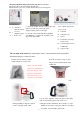
Distillation Process
1.
Pour water into the boiling chamber until the water level reaches the full line.
To shorten the distillation cycle time, use hot water.
2.
Make sure the activated charcoal sachet and the nozzle are attached correctly to the upper cover
(see page 5), then place the top unit on the base of the distiller.
For the very first distillation, pour only 2-liter of water in the boiling chamber and start
distillation process. This is to clean the boiling chamber and the cooling duct; DO NOT drink
this first 2-liter of distilled water.
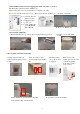
3.
Plug the the short cord from the upper cover into the distiller body. Make sure the cord is aligned
and straight up and down. Next plug the power cord into the distiller body. It is very important that you
verify the power plugs are fully inserted. To do this insert the plugs until the white lines are no longer
visible.
If the power cords are not properly plugged in, or fully inserted, the unit will not operate properly
and you could cause damage to the power cords or distiller.
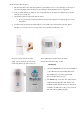
Cleaning and maintenance (See the instructions located on residue cleaner bottle)
Unplug and remove the upper cover from the distiller body during cleaning. Fill the boiling chamber with water
to cover the residue left from distillation. Add 1-2 tablespoons of residue cleaner to the water, plug in the power
cord to the base, and then the wall. Press the reset button and allow the base to heat the water for approximately
20 minutes. Unplug the cord from the wall and let the water sit and cool down.
You then should be able to simply rinse out any residue still in the tank.
Perform cleaning as needed, which varies greatly depending on your water and the amount of impurities removed
in distillation.
Please Note: Do not use abrasives or harsh chemicals to clean the boil chamber as this could shorten the life of
the distiller or void your warranty.
Fill to the full line inside chamber
Top with filter nozzle attached Base and top assembled