
User's Manual

Installing Drums and Cymbals
There are as many ways to configure your drum set as there are drummers. Our HARTWARE or
ULTILITE rack and mounting system will allow you to position each drum and cymbal to suit your
taste. The information below should be used with the Features and Set-up sheet supplied with
each instrument for best results.
1. Start with the HART PRO SNARE drum. Position your drum throne to the height at which you
are most comfortable, then install the Snare drum on to the Snare stand (Studio Master only uses
ACUPAD mounted to rack with HW-TMA tom arm).
2. Locate the Bass drum ( PRO BD, ACUPAD BD or HAMMER KICK).
3. Install Bass drum pedal and clamp pedal to Bass drum. Adjust position.
4. Locate the HH pedal (EPEDAL) and adjust position.
5. Install Hi-Hat cymbals (ECYMBAL II or ECYMBAL S) and adjust position.
6. Install Ride cymbal (ECYMBAL II or ECYMBAL S) and adjust position.
7. Install Toms ( HART PRO or ACUPAD) and adjust position.
8. Install Crash/Splash/China(s) cymbals (ECYMBAL II or ECYMBAL S) and adjust position.
9. Adjust the drum head tension. All drums are pre-tensioned from the factory, but you may adjust
them to your taste and playing style. Snare drums usually have the tightest tension, high tom
next , then down to loosest on floor tom(s) and Bass Drum. It is important to adjust head tensions
BEFORE setting up module as different tensions will affect triggering characteristics slightly. Adjust
using any standard drum key (supplied).
IMPORTANT! Hart Dynamics KONTROL SCREEN drum heads are extremely durable and will typi
-
cally last much longer than their acoustic conterparts. BASS DRUM HEADS MUST BE TREATED
AS YOU WOULD AN ACOUSTIC BASS DRUM HEAD. Felt beaters are recommended and you
should not have to replace the bass drum head for a very long time, if ever. If you choose to use a
plastic or wooden beater, you should take the same precautions that you would normally take on an
acoustic bass drum. We recommend using a protective patch just as you would on an acoustic kick.
Hart Dynamics does not guarantee drum heads.
Cable Installation
Your Hart Dynamics Electracoustic® Drumset is supplied with 10’ stereo (TRS) cables. TRS cables
are used for dual trigger instruments and cymbals with choke capability. TRS cables can always be
used whenever a mono cable is required.
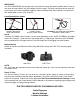
Start with input #1 and work your way around the set. You may use cable ties, velcro, or black elec
-
trical tape to secure cables to rack hardware (Figure 2b next page). You may also make a “snake” by
securing cables together once you determine the optimum position for each component.
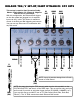
Sound Source Connection
Plug cables into sound source. Most modules come with pre-programmed drumset settings, so
check the inputs for ease of set-up (tom>tom, snare>snare, etc...). You may also program any sound
to any input. Please review Hart Recommended Module
Settings and Cable Reference Guides
and/or your Module Owners Manual to determine which inputs to use to correspond with the drums
and cymbals on your Hart Dynamics Electracoustic Drumset.
NOTE: These are basic global tips for connecting HDI Electracoustic Percussion Products to all
manufacturers sound modules. Our products are the finest products available in the world, and
go through extensive testing to insure compatability, but you will only acheive optimum results by
using optimum settings. For best results, adjust each instrument individually by unplugging all inputs
except the one you are adjusting (Not necessary for users who are familiar with X-talk settings).