530.PROD.GB.3 : 530.PROD.FPAGE.NONE.NONE.GB.
530.PROD.GB.3 : 530.PROD.FPAGE.NONE.NONE.GB.1 Black,White,Blue ii CashFlow 530 Changegiver Product Maintenance Handbook Published by : MEI Internet: http://www.meigroup.com For information on translations in your country, please write to the Technical Communications Manager at the above address. CashFlow 530 Changegiver Product Maintenance Handbook ©, MEI UK International Ltd., 1994. All rights reserved.
530.PROD.GB.3 : 530.PROD.GB.3.TOC Black iii CashFlow 530 Changegiver Product Maintenance Handbook TABLE OF CONTENTS SAFETY ....................................................................................... 1 OVERVIEW ................................................................................. 2 INSTALLATION .......................................................................... 4 FIXING THE CHANGER IN POSITION ................................ 5 REJECT LEVER CLEARANCE .......................
530.PROD.GB.3 : 530.PROD.GB.3.TOC Black iv CashFlow 530 Changegiver Product Maintenance Handbook REPLACING MODULES........................................................ 28 REMOVING THE COIN STORAGE CASSETTE................ 28 REFITTING THE COIN STORAGE CASSETTE ................ 29 REMOVING THE COIN FILL FLAP........................... 30 REMOVING COIN TUBES ........................................ 31 Removing the Designators ............................... 33 TUBE POSITIONS.............................
30.PROD.GB.3 : 530.PROD.GB.3.TOC Black v CashFlow 530 Changegiver Product Maintenance Handbook CLEANING THE ACCEPTOR .............................................. 67 CLEANING (General)......................................................... 68 COMPATIBILITY ...................................................................... 71 MEI BINDER ............................................................................. 73 MEI OFFICES .....................................................................
530.PROD.GB.3 : 530.PROD.GB.3.TOC Black vi CashFlow 530 Changegiver Product Maintenance Handbook vi ©, MEI., 1994.
530.PROD.GB.3 : 560.INST.SAF_INST.NONE.NONE.GB.5 Black 1 CashFlow 530 Changegiver Product Maintenance Handbook SAFETY International & Conformance National Standards When installed and operated according to the instructions for the particular unit, CashFlow 530 products are designed to meet the applicable Safety and Electro Mechanical Conformance standards for any country in which they are used. CashFlow 530 products are of class II construction. No safety earth connection is necessary or provided.
530.PROD.GB.3 : 530.APPS.OVIEW.NONE.NONE.GB.1 Black,White 2 CashFlow 530 Changegiver Product Maintenance Handbook OVERVIEW The CashFlow 530 changegivers have been designed to address a wide range of market needs that are compatible with the majority of modern vending machines. The flexible approach allows easy matching of modules for all types of applications. They have been designed to work with a wide range of coinsets and can be upgraded in the field to accept new coins.
530.PROD.GB.3 : 530.APPS.OVIEW.NONE.NONE.GB.
530.PROD.GB.3 : 530.INST.INST.NONE.NONE.GB.1 Black,White 4 CashFlow 530 Changegiver Product Maintenance Handbook INSTALLATION All changers have a keypad mounted on the front face. To install and set the product up you should understand how the keypad works and how to use it. If in doubt the section on Configuration shows you in more detail how the keypad works.
530.PROD.GB.3 : 530.INST.INST.NONE.NONE.GB.1 Black,White 5 CashFlow 530 Changegiver Product Maintenance Handbook FIXING THE CHANGER IN POSITION 1 There are 3 keyhole fixing points on the rear of each changegiver. It is recommended that only the top right hand fixing point is used with a screw, the two fixing points on the left hand side should be placed on studs.
530.PROD.GB.3 : 530.INST.INST.NONE.NONE.GB.1 Black,White 6 CashFlow 530 Changegiver Product Maintenance Handbook To gain access and fit the changer into the machine: Remove the coin storage cassette by squeezing the blue tabs together and unhook the cassette with a careful outwards and upwards pull. Cover Flap Blue Tabs Coin Storage Cassette Press down at the back of the cover flap until it latches in the open position. The top right hand fixing point is now accessible.
530.PROD.GB.3 : 530.INST.INST.NONE.NONE.GB.1 Black,White 7 CashFlow 530 Changegiver Product Maintenance Handbook Unlatch the acceptor by pressing down on the blue acceptor release catch. You may find it easier to use a small screwdriver. Lower the acceptor forwards until it rests on the channel pins. The two left hand keyholes are now accessible Cover Flap Acceptor Release Catch Acceptor Place the changegiver in the machine using all three keyholes.
530.PROD.GB.3 : 530.INST.INST.NONE.NONE.GB.1 Black,White 8 CashFlow 530 Changegiver Product Maintenance Handbook It is important that before fitting the cassette back into place you make sure the dispense arms are in their parked positions i.e they are as far forward as possible. Switch the machine on, and press the yellow mode key on the keypad twice. This will park the arms automatically for you. (The dispense arms should protrude through the bottom of the cassette after refitting).
530.PROD.GB.3 : 530.INST.INST.NONE.NONE.GB.1 Black,White 9 CashFlow 530 Changegiver Product Maintenance Handbook CONNECTION & OPERATING VOLTAGE 4 One of the main causes of poor coin acceptance is insufficient power. Always check the voltage. Poor electrical connections can also lead to poor coin acceptance. To obtain the correct performance from your changegiver, the connector should be fully plugged in and the power to the machine switched on.
530.PROD.GB.3 : 530.INST.INST.NONE.NONE.GB.1 Black,White 10 CashFlow 530 Changegiver Product Maintenance Handbook or remove the coin storage cassette to achieve this. This ensures the changegiver maintains an accurate count of the coins in each tube. COIN QUALITY Do not use bent or damaged coins in this product as they are unlikely to be accepted and may cause a jam, either in the machine entry chute or the product itself.
530.PROD.GB.3 : 530.INST.INST.NONE.NONE.GB.1 Black,White 11 CashFlow 530 Changegiver Product Maintenance Handbook INSTALLATION CHECK LIST 1 Check that the operating voltage is correct for the changegiver and the machine. 2 Check that the connector on the changegiver matches that on the machine. 3 Fix the changegiver inside the machine and connect the looms. Make sure that looms are placed tidily so that when the machine door is closed they don’t get trapped.
530.PROD.GB.3 : 530.INST.CONFIG.KEYPAD.NONE.GB.1 Black 12 CashFlow 530 Changegiver Product Maintenance Handbook CONFIGURATION VIA KEYPAD All products have a keypad mounted on the front face. It can be used to perform the following functions; • Dispense coins • Set price(s). See Note below.
530.PROD.GB.3 : 530.INST.CONFIG.KEYPAD.NONE.GB.1 Black 13 CashFlow 530 Changegiver Product Maintenance Handbook The keypad can be in either of two possible modes at any time normal or shifted. The keypad in normal mode allows you to dispense coins while in shifted mode it allows you to change some of the settings of the product. The yellow LED is used to indicate what status the keypad is in. If the LED is off then the keypad is in normal mode.
530.PROD.GB.3 : 530.INST.CONFIG.KEYPAD.NONE.GB.1 Black 14 CashFlow 530 Changegiver Product Maintenance Handbook coins from the selected tubes in the same way as described above. Latched dispense will continue on each tube until each tube reaches its safe coin level. Setting Prices The main principle of price teach is that selections will have their prices set to the accumulated credit value. To use this mode: 1 Press the mode key on the keypad 2 Press key C.
530.PROD.GB.3 : 530.INST.CONFIG.KEYPAD.NONE.GB.1 Black 15 CashFlow 530 Changegiver Product Maintenance Handbook Automatic Tube Float To refill the coin tubes (float up) to their pre-programmed float levels follow the instructions below. 1 Press the mode key on the keypad. 2 Press key A. Any stored credit will be cleared and a time-out period of 45 seconds will start. The time-out period restarts after every accepted coin. 3 Enter coins through the acceptor.
530.PROD.GB.3 : 530.INST.CONFIG.KEYPAD.NONE.GB.1 Black 16 CashFlow 530 Changegiver Product Maintenance Handbook Resetting the Tube Counts You can force the tube counts to be set to their pre-programmed float levels. This should be done if the coin storage cassette has been manually filled to the preset float levels and then fitted to the changer. To avoid inadvertent resetting of the tube counts this function can only be enabled if the changegiver is in the float mode. 1 Press the mode key.
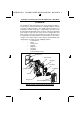
530.PROD.GB.3 : 530.INST.CONFIG.CF_850.NONE.GB.2 Black,White 17 CashFlow 530 Changegiver Product Maintenance Handbook VIA MEI ROUTE ALPHA 250 TERMINAL If you have access to a MEI Route Alpha 250 terminal you can reconfigure any of the functions available for a particular product. The terminal is connected to the acceptor via a six way connector which plugs into the front of the acceptor. C B The terminal is used to check or change certain data which affects the way the changer operates.
530.PROD.GB.3 : 530.INST.CONFIG.CF_850.NONE.GB.2 Black,White 18 CashFlow 530 Changegiver Product Maintenance Handbook KEY FUNCTIONS RESET DISPLAY ENTER UP RIGHT LEFT DOWN Reset Key: used to reset all modes and to initialise any settings that you have changed. If the reset key is pressed while an address is being updated then the address may not be updated. The reset key must be pressed to store the changes that you have made. Up Key: used to increase the value displayed on the screen.
530.PROD.GB.3 : 530.INST.CONFIG.CF_850.NONE.GB.2 Black,White 19 CashFlow 530 Changegiver Product Maintenance Handbook Auto Repeating Keys If either the UP or DOWN keys are kept pressed they automatically repeat. The repeat speed of the key increases the longer the key is held down. Double Click Hotkeying If a key is doubled clicked (pressed twice in quick succession) then this causes the address number to increment by a larger amount. e.g.
530.PROD.GB.3 : 530.INST.CONFIG.CF_850.NONE.GB.2 Black,White 20 CashFlow 530 Changegiver Product Maintenance Handbook The basic operation to alter the information held in an address is: 1 Connect the terminal to the CashFlow product. 2 Wait for the terminal to power up correctly. 3 Select the address by using the UP and DOWN keys. 4 Examine the data by pressing the ENTER key. 5 Alter the data value by pressing the UP or DOWN keys until the new value has been reached.
530.PROD.GB.3 : 530.INST.CONFIG.CF_850.NONE.GB.
530.PROD.GB.3 : 530.INST.CONFIG.CF_850.NONE.GB.
530.PROD.GB.3 : 530.INST.CONFIG.CF_850.NONE.GB.
530.PROD.GB.3 : 530.INST.CONFIG.CF_850.NONE.GB.
530.PROD.GB.3 : 530.INST.CONFIG.CF_850.NONE.GB.
530.PROD.GB.3 : 530.INST.CONFIG.CF_850.NONE.GB.
530.PROD.GB.3 : 530.INST.CONFIG.CF_850.NONE.GB.2 Black,White 27 CashFlow 530 Changegiver Product Maintenance Handbook TESTING THE TERMINAL It is possible to test all the features of the terminal itself by putting the unit into a special test mode. To enter the test mode hold the ENTER key pressed when powering the unit up. The display will initially show three digits indicating the result of an automatic on board test.
530.PROD.GB.3 : 530.GEN.MOD_XCHNG.STORE.NONE.GB.1 Black,White 28 CashFlow 530 Changegiver Product Maintenance Handbook REPLACING MODULES Before removing any module from the changegiver make sure the machine is switched off. Take care when dis-assembling the product as there are some parts containing static sensitive devices. REMOVING THE COIN STORAGE CASSETTE 1 Squeeze together the blue tabs between the thumb and forefinger.
530.PROD.GB.3 : 530.GEN.MOD_XCHNG.STORE.NONE.GB.1 Black,White 29 CashFlow 530 Changegiver Product Maintenance Handbook REFITTING THE COIN STORAGE CASSETTE Before refitting the cassette it is recommended that the machine is switched on and the mode button on the keypad pressed twice. This will ‘park’ the dispense arms to their correct positions automatically for you. If the machine is switched off, position the dispense arms manually by carefully pulling them forwards.
530.PROD.GB.3 : 530.GEN.MOD_XCHNG.STORE.NONE.GB.1 Black,White 30 CashFlow 530 Changegiver Product Maintenance Handbook REMOVING THE COIN FILL FLAP The coin fill flap is used for manually filling coins to the tube in position A on the coin cassette. Coin Fill Flap Front View 30 1 Remove the coin storage cassette. 2 With the cassette facing you, push the coin fill flap at the bottom and hold in that position (open).
530.PROD.GB.3 : 530.GEN.MOD_XCHNG.STORE.NONE.GB.1 Black,White 31 CashFlow 530 Changegiver Product Maintenance Handbook REMOVING COIN TUBES You can replace any of the coin tubes. NOTE: If you are changing the tube type or the tube positions then you must check and change if necessary the data in addresses 251253, 261-263, 271-273, 281-283, 291-293. This can be done using the MEI Route Alpha 250 terminal. 1 Remove the coin storage cassette.
530.PROD.GB.3 : 530.GEN.MOD_XCHNG.STORE.NONE.GB.1 Black,White 32 CashFlow 530 Changegiver Product Maintenance Handbook The coin tubes are now accessible and can be removed. There are eight different size of tube available. A list of the coin sizes that will fit into each tube is shown at the end of this section. The tubes can be identified by a number on each one in the range 0 - 7. The larger the tube the lower the number i.e. 0 is the largest, 7 is the smallest.
530.PROD.GB.3 : 530.GEN.MOD_XCHNG.STORE.NONE.GB.1 Black,White 33 CashFlow 530 Changegiver Product Maintenance Handbook Removing the Designators There are eight different size of designator. One designator is fitted at the bottom of each tube in the cassette. They are colour coded and identified by a letter on each one in the range A - H. The size of designator fitted is determined by the thickness of the coin which is to be routed to that tube.
530.PROD.GB.3 : 530.GEN.MOD_XCHNG.STORE.NONE.GB.1 Black,White 34 CashFlow 530 Changegiver Product Maintenance Handbook TUBE POSITIONS Possible tube combinations in the cassette. Tube 34 Position A Position B Position C 0 ✘ ✔ ✘ 1 ✘ ✔ ✘ 2 ✘ ✔ ✔ 2.5 ✘ ✔ ✔ 3 ✔ ✔ ✔ 3.5 ✔ ✔ ✔ 4 ✔ ✔ ✔ 4.5 ✔ ✔ ✔ 5 ✔ ✔ ✔ 5.5 ✔ ✔ ✔ 6 ✔ ✘ ✔ 6.5 ✔ ✘ ✔ 7 ✔ ✘ ✔ ©, MEI., 1994.
530.PROD.GB.3 : 530.GEN.MOD_XCHNG.STORE.NONE.GB.1 Black,White 35 CashFlow 530 Changegiver Product Maintenance Handbook COIN SIZES FOR EACH TUBE Tube No Part No Min Coin Diameter Max Coin Diameter 0 101812001 31.01 32.50 1 140164001 29.21 31.00 2 101825001 26.91 29.20 2.5 169494001 26.10 26.90 3 101838001 24.51 26.00 3.5 169509001 23.21 24.50 4 101841001 21.61 23.20 4.5 169512001 20.76 21.60 5 101854001 19.51 20.75 5.5 169525001 18.61 19.50 6 101867001 16.
530.PROD.GB.3 : 530.GEN.MOD_XCHNG.STORE.NONE.GB.1 Black,White 36 CashFlow 530 Changegiver Product Maintenance Handbook TUBE & DESIGNATOR COMBINATIONS FRENCH COINSET Coin 10c 20c 36 Tube No 5 4 Designator F F 50c 5.5 D IFR 3.5 E Positions Low Count Min Safe Count Full Count A 14 2 98 B 13 2 98 C 14 2 98 A 14 2 95 B 13 2 95 C 14 2 95 A 10 2 73 C 10 2 73 A 11 2 80 B 11 2 80 C 11 2 80 B 11 2 72 C 11 4 79 2FR 2.
530.PROD.GB.3 : 530.GEN.MOD_XCHNG.STORE.NONE.GB.1 Black,White 37 CashFlow 530 Changegiver Product Maintenance Handbook GERMAN COINSET Coin Tube No Designator 5PF 6 E 10PF 50PF IDM 4.5 5 4 E E E 2DM 2.
530.PROD.GB.3 : 530.GEN.MOD_XCHNG.STORE.NONE.GB.1 Black,White 38 CashFlow 530 Changegiver Product Maintenance Handbook UNITED KINGDOM COINSET Coin 1p Tube No 5 Designator 3 D 5p 6.5 E 3.5 Low Count Min Safe Count Full Count A 14 2 95 B 13 2 95 C 14 2 95 B 11 2 75 C 11 2 75 A 12 2 84 C 12 2 84 A 11 2 76 B 10 2 76 C 11 2 76 A 12 2 81 F 2p 10p new Positions D 20p 4.
530.PROD.GB.3 : 530.GEN.MOD_XCHNG.STORE.NONE.GB.1 Black,White 39 CashFlow 530 Changegiver Product Maintenance Handbook DESIGNATOR AND COIN THICKNESS Designator A (RED) Nominal Designator Thickness Minimum Coin Thickness Maximum Coin Thickness 1.0 3.16 3.60 B (ORANGE) 1.55 2.66 3.15 C (YELLOW) 2.05 2.18 2.65 D (GREEN) 2.48 1.81 2.17 E (BLUE) 2.80 1.56 1.80 F (VIOLET) 3.05 1.36 1.55 G (BLACK) 3.25 1.21 1.35 H (WHITE) 3.40 1.10 1.
530.PROD.GB.3 : 530.GEN.MOD_XCHNG.STORE.NONE.GB.1 Black,White 40 CashFlow 530 Changegiver Product Maintenance Handbook 7 Set the tube low count to 1 coin greater than the coins that remained in the tube in 6 above. To ensure the correct tube low count is reached steps 3 - 6 should be repeated several times. Note: Check that the float level set (address 251 - 253) is at least 5 coins greater than the number of coins actually in the tube.
530.PROD.GB.3 : 530.GEN.MOD_XCHNG.ACC.NONE.GB.1 Black,White 41 CashFlow 530 Changegiver Product Maintenance Handbook REMOVING THE ACCEPTOR 1 Remove the coin storage cassette as shown in the previous pages. 2 Unlatch the acceptor by pressing down on the blue acceptor release catch with a small screwdriver. 3 Disconnect the acceptor loom which is plugged in to the rear of the acceptor.
530.PROD.GB.3 : 530.GEN.MOD_XCHNG.ACC.NONE.GB.1 Black,White 42 CashFlow 530 Changegiver Product Maintenance Handbook REMOVING THE DISCRIMINATOR BACK COVER NOTE: After removing the back cover the discriminator PCB is exposed and normal anti static precautions should be taken to avoid damaging the PCB or any parts associated with it. Also, the lid of the discriminator is now free to open, and disengage the hinge spring.
530.PROD.GB.3 : 530.GEN.MOD_XCHNG.ACC.NONE.GB.1 Black,White 43 CashFlow 530 Changegiver Product Maintenance Handbook 3 Using a small screwdriver release each of the clips in the order shown below. Right Hand Clips Clip 1 Clip 2 Clip 4 Clip 3 Left Hand Clips The discriminator is held in the back cover by four clips. Because there are no screws to be undone the discriminator is held quite firmly in place by the four clips.
530.PROD.GB.3 : 530.GEN.MOD_XCHNG.ACC.NONE.GB.1 Black,White 44 CashFlow 530 Changegiver Product Maintenance Handbook REMOVING THE ACCEPT GATE 1 Remove the acceptor/separator. 2 Detach the separator from the acceptor. 3 Remove the back cover, observing the earlier instructions on removing the discriminator. 4 Dis-engage the PCB at the rear by releasing the retaining clip on the upper left hand side of it.
530.PROD.GB.3 : 530.GEN.MOD_XCHNG.ACC.NONE.GB.1 Black,White 45 CashFlow 530 Changegiver Product Maintenance Handbook To replace the accept gate the discriminator lid must be opened. Great care must be taken because the spring will become disengaged if the lid, (which is normally restrained by the back cover), is taken further back than 100˚. When replacing the accept gate make sure that all three clips are correctly aligned before pushing back into place.
530.PROD.GB.3 : 560.GEN.MOD_XCHNG.SEP.NONE.GB.2 Black 46 CashFlow 530 Changegiver Product Maintenance Handbook REMOVING THE SEPARATOR 1 Remove the coin storage cassette and the acceptor / separator as shown in the previous pages. 2 Carefully disconnect the two looms which are attached to the back of the acceptor. (When removing the looms be careful not to pull any wires out of their housings.) 3 Gently release the bottom left hand clip and then the top left hand clip.
0.PROD.GB.3 : 560.GEN.MOD_XCHNG.SEP.NONE.GB.2 Black 47 CashFlow 530 Changegiver Product Maintenance Handbook When refitting the separator, position the right hand clip first, then the left hand clips. Make sure that all three clips are seated correctly as it is possible to snap the separator into place without the clips being fitted correctly. If this happens you may get coin jams. REMOVING THE SEPARATOR SOLENOID BANK 1 Remove the separator from the acceptor.
530.PROD.GB.3 : 560.GEN.MOD_XCHNG.SEP.NONE.GB.2 Black 48 CashFlow 530 Changegiver Product Maintenance Handbook Removing the Top Level Sensor Assembly 1 Remove the separator from the acceptor. 2 The sensor assembly is held in position by two push in clips. To release these clips push the assembly out from the underside as shown in the diagram below. You will need a fine screw driver or similar tool to fit the access holes. Top Level Sensor Assembly Access Points 48 ©, MEI., 1994.
530.PROD.GB.3 : 530.GEN.MOD_XCHNG.DISP.NONE.GB.1 Black,White 49 CashFlow 530 Changegiver Product Maintenance Handbook REMOVING THE DISPENSER 1 Remove the coin storage cassette as shown in the previous pages. 2 Remove the Function Expansion Module (FEM) cover by releasing the retaining clip (located in the lower right hand corner of the cover) and lifting off. 3 Unplug the dispenser loom which you can now access. 4 Release the clips holding the dispenser to either side of the spine.
530.PROD.GB.3 : 530.GEN.MOD_XCHNG.DISP.NONE.GB.1 Black,White 50 CashFlow 530 Changegiver Product Maintenance Handbook REMOVING THE DISPENSE ARMS 1 Remove the dispenser from the spine. 2 Remove the dispenser base plate by releasing the two retaining clips. Push the clips towards the back of the dispenser and the base plate will drop down. Dispense Arms Baseplate Release Clips The dispense arms are marked A to C and correspond to the three tube positions A to C.
530.PROD.GB.3 : 560.GEN.MOD_XCHNG.KEYPAD.NONE.GB.3 Black 51 CashFlow 530 Changegiver Product Maintenance Handbook REMOVING THE KEYPAD AND TRANSFORMER Remember to switch off the machine. The keypad and its housing also provides protection for the transformer assembly. 1 Remove the coin storage cassette and the acceptor as shown in the previous pages. 2 Push the back of the cover flap downwards until it latches in the open position.
530.PROD.GB.3 : 560.GEN.MOD_XCHNG.KEYPAD.NONE.GB.3 Black 52 CashFlow 530 Changegiver Product Maintenance Handbook REPLACING FUSES The fuses are located on the control board, to access and replace follow these instructions: Make sure that all power has been switched off. 1 Remove the coin storage cassette and the acceptor as shown earlier. 2 The fuse cover is on the left hand side. Push the cover down and it will rest in an open position. 3 The fuses are now accessible Fuses Fuse Cover 52 ©, MEI.
530.PROD.GB.3 : 530.GEN.MOD_XCHNG.CONTROL_B.NONE.GB.1 Black 53 CashFlow 530 Changegiver Product Maintenance Handbook REMOVING THE CONTROL BOARD In order to remove the control board all other modules need to be removed first. When removing those modules connected to the control board via looms or cables, make a note of the positions of the connectors that each module is attached to. This will help when re-assembling. When all modules have been removed you can access the control board itself.
530.PROD.GB.3 : 530.GEN.MOD_XCHNG.CONTROL_B.NONE.GB.
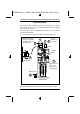
530.PROD.GB.3 : 530.GEN.MOD_XCHNG.CONTROL_B.NONE.GB.1 Black 55 CashFlow 530 Changegiver Product Maintenance Handbook CONNECTORS (EXECUITIVE, MDB & BDV) CON 15 CON 16 CON 8 CON 3 CON 7 CON 1 CON 4 CON 5 CON 6 Con 1 = Machine Interface/ Power Con 3 = Transformer (primary). Applies to Executive only Con 4 = Transformer (secondary). Replaced by a capacitor in BDV and MDB applications Con 5 = FEM (Function Expansion Module) Con 6 = Acceptor.
530.PROD.GB.3 : 530.INST.FFIND.NONE.NONE.GB.1 Black 56 CashFlow 530 Changegiver Product Maintenance Handbook FAULT-FINDING The red LED on the keypad can be used as a helpful aid in diagnosing reported faults on a changegiver. When the changegiver is switched on the red LED should be permanently on.
530.PROD.GB.3 : 530.INST.FFIND.NONE.NONE.GB.1 Black 57 CashFlow 530 Changegiver Product Maintenance Handbook Address 341 Disabled tube at position A, B, C or D Range = 0 - 31 Range value = the sum of the codes, where: 1 / 2 / 4 / 8 = tube A / B / C / D If necessary, use the Route Alpha 250 terminal to enable the tube. Address 342 EEPROM Errors (i) READ ONLY Range = 0 - 15 .Range value = the sum of the codes, where: 1 = Page 0 EEPROM error. Fatal error. Contact your MEI distributor.
530.PROD.GB.3 : 530.INST.FFIND.NONE.NONE.GB.1 Black 58 CashFlow 530 Changegiver Product Maintenance Handbook Address 344.......Operational Errors (i) READ ONLY. Range = 0 - 15 1 = Not used. 2 = Acceptor initialisation error. Switch off power to the machine.Open the lid of the acceptor then close it again firmly. Wait for 15 seconds, then power up the unit. Contact your MEI distributor if the error persists 4 = HI2 hardware error. Set Route Alpha address 349 to 1.
530.PROD.GB.3 : 530.INST.FFIND.NONE.NONE.GB.1 Black 59 CashFlow 530 Changegiver Product Maintenance Handbook Address 346.......BDV Errors (i) (BDV only) Range = 0 -15 1 = Audit timed out 2 = VMC timed out 4 = CPC timed out Address 347.......BDV Errors (ii) (BDV only) Range = 0 - 15 1 = Audit incompatible 2 = VMC incompatible 4 = CPCincompatible Address 349.......
60 ©, MEI., 1994. Coins are accepted but no credit is given Power loom is not inserted correctly. Coin jam in the separator module (post gate strobes are covered). Accept gate strobes mechanism blocked or dirty. Refer to the Product Maintenance Handbook before attempting to clean the strobes or the opto’s. Switch off power to the machine, and check the separator for jams. Switch off power to the machine, and check the loom.
Coins are not routing correctly Actions Check the coin/token is in the coin set, and has been enabled. Use the Route Alpha 250 terminal to enable the coin. ©, MEI., 1994. A tube is disabled. Wrong acceptor separator is fitted. Use the Route Alpha 250 terminal to enable the tube. or Check that the acceptor and separator are the correct versions. Refer to your authorised MEI distributor. The top-level sensor Switch off the power, remove the cassette and release the acceptor.
62 ©, MEI., 1994. Insufficient change coins are available. Incorrect coin values are set. Incorrect prices are set for selections. Levels of coins in the tubes are below the safe count. Dispenser loom not connected, or loose. Incorrect change is dispensed No coins are dispensed Red LED is Normal operation. ON, except when a vend is made Faulty dispenser module. Re-float the coin tubes through the acceptor until the low-level sensor mirrors are covered.
©, MEI., 1994. Red LED is OFF, but change coins are routed to the cashbox and not to the tubes Red LED stays OFF Red LED is ON but coins are not accepted Problem Press and hold down A, B, C and D for at least three seconds each to dispense coins down to the tube safe counts. Press Mode + A + B, and insert change coins through the acceptor until tubes reach their pre-set levels.
64 Problem Red LED stays OFF and all coins are rejected Red LED is FLASHING Switch off the power to the machine, remove the cassette and check the dispenser for jams. Clear any blockages and check for damaged coins. Check the Route Alpha 250 audit addresses. Return the unit to your MEI distributor for repair if necessary. Press coin cassette into place firmly, ensure clips snap shut. Restock machine if necessary. If an Executive version machine, check the communications cable.
Faulty LED or keypad module. Causes ©, MEI., 1994. Normal operation Normal operation Yellow LED is OFF Yellow LED flashes when coins are accepted The acceptor loom is not connected. The coin path in the acceptor is dirty. Red LED is Check Route Alpha 250 flashing and addresses 340 to 349 for no coins are a description of the error. accepted The lid of the acceptor is not closed firmly. Red LED permanently OFF. No other problems.
66 Faulty LED or faulty keypad module Faulty unit, or faulty modules Yellow LED is OFF permanently. No other problems. Problems in handling coins persist after all solutions have been tried The changegiver is in shifted mode because the Mode button has been pressed Yellow LED is flashing Causes No power supply to the vending machine Problem Yellow LED remains OFF when Mode button is pressed Actions ©, MEI., 1994. Contact your MEI distributor.
530.PROD.GB.3 : 560.GEN.CLEAN.ACC.NONE.GB.1 Black 67 CashFlow 530 Changegiver Product Maintenance Handbook CLEANING THE ACCEPTOR In order to ensure maximum efficiency from this product it is essential to pay regular attention to the cleaning of the coin pathway. Before attempting to clean or remove the Acceptor the machine must be switched off. The shaded areas shown in the diagram below should always be kept free from dirt, grease, etc. Any cleaning should be carried out by using a soft damp cloth.
530.PROD.GB.3 : 530.GEN.CLEAN.NONE.NONE.GB.1 Black,White 68 CashFlow 530 Changegiver Product Maintenance Handbook CLEANING (General) In order to ensure the changer continues performing at its best it is important that other parts as well as the acceptor itself are kept clean. Details showing how to dis-assemble modules are shown in earlier sections of the book. If you are cleaning the optos or prisms in a module you should use a cotton bud or a soft cloth.
530.PROD.GB.3 : 530.GEN.CLEAN.NONE.NONE.GB.1 Black,White 69 CashFlow 530 Changegiver Product Maintenance Handbook Separator The separator is a sealed unit. If it looks particularly dirty then remove the prism housing and solenoid bank. You can then immerse the remaining plastic part in hot soapy water. Rinse, and leave to dry thoroughly before refitting. Prism Housing Solenoid Bank ©, MEI., 1994.
530.PROD.GB.3 : 530.GEN.CLEAN.NONE.NONE.GB.1 Black,White 70 CashFlow 530 Changegiver Product Maintenance Handbook Dispense Arms Dispenser Prisms Designators Coin Tubes Coin Tubes & Designators 70 ©, MEI., 1994.
530.PROD.GB.3 : 530.INST.COMP.NONE.NONE.GB.2 Black 71 CashFlow 530 Changegiver Product Maintenance Handbook COMPATIBILITY The CashFlow 530 product range is compatible with the majority of modern vending machines requiring a changegiver. The options currently available are; • CashFlow 530 - 4 price - A four price electromechanical changegiver Interfaces are provided for a credit display if required on the above.
530.PROD.GB.3 : 530.INST.COMP.NONE.NONE.GB.2 Black 72 CashFlow 530 Changegiver Product Maintenance Handbook CashFlow® Machine Loom No. Replaces T11 Electro mechanical No. of Price Lines FE,F12 ✓ 4 T12 FG,F44 ✓ 4 Machine Loom ❋ 165972002 FF, F26 Adaptor ✓ 4 Machine Loom ❋ 165974001 FM, F75 Adaptor ✓ 6 Serial (PA) BDV ❋ Requires T7 Adaptor Loom to effect interface. 72 ©, MEI., 1994.
530.PROD.GB.3 : GEN.PROD.PACK_KIT.NONE.NONE.GB.5 Black 73 CashFlow 530 Changegiver Product Maintenance Handbook MEI BINDER You can protect your documentation with an MEI binder. This binder has been specifically designed to hold your A5 documentation. It has six rings and is manufactured from top quality materials. It is finished in a stylish black hessian weave with dark grey suede lining and protective metal corners. Your MEI binder will hold several CashFlow books if required.
530.PROD.GB.3 : GEN.GEN.OFF.NONE.NONE.GB.11 Black 74 CashFlow 530 Changegiver Product Maintenance Handbook MEI OFFICES WWW.MEIGROUP.COM 74 ©, MEI., 1994.
530.PROD.GB.3 : GEN.GEN.OFF_DIST.NONE.NONE.GB.11 Black 75 CashFlow 530 Changegiver Product Maintenance Handbook MEI DISTRIBUTORS The Following Distributors Offer A Comprehensive Sales And Replacement Service For New Product And Spare Parts. WWW.MEIGROUP.COM ©, MEI., 1994.
530.PROD.GB.3 : GEN.GEN.OFF_DIST.NONE.NONE.GB.11 Black 76 CashFlow 530 Changegiver Product Maintenance Handbook 76 ©, MEI., 1994.
530.PROD.GB.3 : GEN.GEN.OFF_DIST.NONE.NONE.GB.11 Black 77 CashFlow 530 Changegiver Product Maintenance Handbook ©, MEI., 1994.
530.PROD.GB.3 : GEN.GEN.OFF_DIST.NONE.NONE.GB.11 Black 78 CashFlow 530 Changegiver Product Maintenance Handbook 78 ©, MEI., 1994.
530.PROD.GB.3 : GEN.GEN.OFF_DIST.NONE.NONE.GB.11 Black 79 CashFlow 530 Changegiver Product Maintenance Handbook ©, MEI., 1994.
530.PROD.GB.3 : GEN.GEN.OFF_DIST.NONE.NONE.GB.11 Black 80 CashFlow 530 Changegiver Product Maintenance Handbook 80 ©, MEI., 1994.
530.PROD.GB.3 : 530.PROD.GB.3.
530.PROD.GB.3 : 530.PROD.GB.3.
530.PROD.GB.3 : 530.PROD.GB.3.
530.PROD.GB.3 : 530.PROD.GB.3.IX Black 84 CashFlow 530 Changegiver Product Maintenance Handbook Time-Out Top Level Sensor Assembly Transformer Assembly Transformer Cover Flap Transformer Looms Tube Full Count Tube Low Count 14, 15 48 2, 51 6 51 40 39, 40 U Up Key 18, 20 V Vend Price 84 3 ©, MEI., 1994.
530.PROD.GB.3 : GEN.PROD.BPAGE.NONE.NONE.GB.