MPH2410.O/M.QXD 3/7/03 9:35 AM Page 37 CORDLESS TELEPHONE WITH CALLER ID MODEL: MPH2410 BEFORE OPERATING THIS PRODUCT, PLEASE READ THESE INSTRUCTIONS COMPLETELY.
MPH2410.O/M.QXD 3/7/03 9:35 AM Page 1 IMPORTANT SAFETY PRECAUTIONS CAUTION RISK OF ELECTRIC SHOCK DO NOT OPEN CAUTION: TO REDUCE THE RISK OF ELECTRIC SHOCK, DO NOT REMOVE COVER (OR BACK). NO USER-SERVICEABLE PARTS INSIDE. REFER SERVICING TO QUALIFIED SERVICE PERSONNEL. ATTENTION The Owner’s Manual contains important operating and maintenance instructions. For your safety, it is necessary to refer to the manual.
MPH2410.O/M.QXD 3/7/03 9:35 AM Page 2 IMPORTANT SAFETY PRECAUTIONS (CONTINUED) When using your telephone equipment, basic safety precautions should always be followed to reduce the risk of fire, electric shock and injury to persons, including the following: 1. Read and understand all instructions. 2. Follow all warnings and instructions marked on this product. 3.
MPH2410.O/M.QXD 3/7/03 9:35 AM Page 3 IMPORTANT SAFETY PRECAUTIONS (CONTINUED) 1. If your local telephone exchange only accepts Pulse dialing, you may have to switch the Tone/Pulse switch to Tone to access certain services that require Tone signalling (such as home banking). After the initial line is connected to the number you are calling, switch the Tone/Pulse switch to Tone to access Tone signalling. When you have completed your call, please switch the Tone/Pulse switch back to Pulse. 2.
MPH2410.O/M.QXD 3/7/03 9:35 AM Page 4 CONTENTS Important Safety Precautions ........................1 Contents ........................................................4 Location of Controls and Indicators ...............5 Installation Instructions ..................................6 Wall Mounting the Unit (Standard Wall Jack) ..................................................7 Wall Mounting the Unit (No Standard Wall Jack) ..................................................
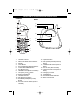
MPH2410.O/M.QXD 3/7/03 9:35 AM Page 5 LOCATION OF CONTROLS AND INDICATORS HANDSET BASE 1 17 18 19 2 23 11 3 20 4 12 5 6 21 13 22 7 8 9 14 10 16 15 1. 2. 3. 4. 5. 6. 7. 8. 9. 10. 11. 12. 13. Handset Antenna NEW CALL/MSG WTG Indicator Display TALK Button Scroll Up/Down/Left/Right Buttons VOICE MAIL/MENU Button Key Buttons (0-9) HEADSET Jack (Side of Handset) Temporary Tone/ Button EDIT/FLASH Button Handset Receiver DIR (Directory) Button SAVE/RE (Redial)/PA (Pause) Button 14.
MPH2410.O/M.QXD 3/7/03 9:35 AM Page 6 INSTALLATION INSTRUCTIONS 1. Carefully unpack and remove your unit from the box. 2. Make sure all of the following items have been included: • • • • Base Unit Handset Unit Rechargeable Ni-Cd Battery Pack (3.6V, 600mAH) AC Adapter • • • (AC120V, 60Hz/DC9V, 300mA) 2 Telephone Cords (Short and Long) Belt Clip Mounting Bracket with Screws 3. Make sure the Rechargeable Battery is installed or install the Rechargeable Battery as described on page 9.
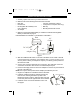
MPH2410.O/M.QXD 3/7/03 9:35 AM Page 7 INSTALLATION INSTRUCTIONS (CONTINUED) WALL MOUNTING THE UNIT (STANDARD WALL JACK) Follow the instructions below to install the base onto a standard telephone wall jack: 1. Connect the short telephone line cord to the TEL LINE jack on the rear of the base unit. 2. Insert the free end of the short line cord through the hole of the mounting bracket. 3. Insert the hooks of the mounting bracket into the matching slots on the back of the unit as shown in Figure 3.
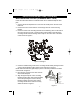
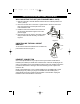
MPH2410.O/M.QXD 3/7/03 9:35 AM Page 8 INSTALLATION INSTRUCTIONS (CONTINUED) WALL MOUNTING THE UNIT (NO STANDARD WALL JACK) 1. Drill two holes with a vertical distance between the two marked positions of 3 15/16" (100mm). 2. Drive a screw into each of the holes. Tighten them to the end of the screw lines, only leaving the smooth part of the screw head outside the wall. 3. Install the wall mount bracket into the base unit as previously discussed in Figures 3-6 on the previous page. Screws 4.
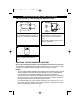
MPH2410.O/M.QXD 3/7/03 9:35 AM Page 9 INSTALLATION INSTRUCTIONS (CONTINUED) INSTALLATION OF THE RECHARGEABLE BATTERY 1 2 Remove the battery cover located on the rear of the handset by pressing on the top cover and sliding it downward. Connect the Ni-Cd battery pack plug into the battery connector; the LCD display will turn on in the Standby mode. Insert the Ni-Cd battery pack into the battery compartment.
MPH2410.O/M.QXD 3/7/03 9:35 AM Page 10 SET-UP INSTRUCTIONS SETTING THE RINGER VOLUME Set the ringer volume (HI, LOW, OFF) while in the Standby mode as follows: 1 2 Press and hold the VOICE MAIL/ MENU button for more than two seconds; the Ringer Volume setting will appear in the display. Press the EDIT/FLASH button to change the setting; the Ringer Volume setting will blink. 3 4 1 2 Press the Scroll Up ❶ or Down ❷ button to select a desired ringer volume (HI, LOW or OFF).
MPH2410.O/M.QXD 3/7/03 9:35 AM Page 11 SET-UP INSTRUCTIONS (CONTINUED) SETTING THE LANGUAGE Set the language (ENGLISH, SPANISH, FRENCH) while in the Standby mode as follows: 1 2 1 2 Press and hold the VOICE MAIL/ MENU button for more than two seconds; the Ringer Volume setting will appear in the display. Press the Scroll Down button ❶ once or the 2 key button ❷ once; the Language setting will appear. 3 4 1 2 Press the EDIT/FLASH button to change the setting; the Language setting will blink.
MPH2410.O/M.QXD 3/7/03 9:35 AM Page 12 SET-UP INSTRUCTIONS (CONTINUED) SETTING THE FIRST RING This feature will turn the first ring of the phone On or Off. Set to Off so the phone does not ring until the Caller ID information has been displayed. Turn the first ring option On or Off while in the Standby mode as follows: 1 2 1 2 Press and hold the VOICE MAIL/ MENU button for more than two seconds; the Ringer Volume setting will appear in the display.
MPH2410.O/M.QXD 3/7/03 9:35 AM Page 13 SET-UP INSTRUCTIONS (CONTINUED) SETTING THE TIME AND DATE Change the Time and Date while in the Standby mode as follows: 1 2 1 2 Press and hold the VOICE MAIL/ MENU button for more than two seconds; the Ringer Volume setting will appear in the display. Press the Scroll Down button ❶ three times or the 4 key button ❷; the Time Setting will appear. 3 4 Press the EDIT/FLASH button to change the setting; the month setting will blink.
MPH2410.O/M.QXD 3/7/03 9:35 AM Page 14 SET-UP INSTRUCTIONS (CONTINUED) SETTING THE LCD CONTRAST If you find the LCD screen difficult to read, set the contrast level while in the Standby mode as follows: 1 2 1 2 Press and hold the VOICE MAIL/ MENU button for more than two seconds; the Ringer Volume setting will appear in the display. Press the Scroll Down button ❶ four times or the 5 key button ❷; the Contrast setting will appear.
MPH2410.O/M.QXD 3/7/03 9:35 AM Page 15 SET-UP INSTRUCTIONS (CONTINUED) SETTING THE PBX NUMBER This feature will insert a number (0-9) before the outgoing number, if required. When a number is selected, the unit will automatically dial the preset PBX number and a pause before any speed dial or Caller ID callback. Set the PBX number while in the Standby mode as follows: 1 2 1 2 Press and hold the VOICE MAIL/ MENU button for more than two seconds; the Ringer Volume setting will appear in the display.
MPH2410.O/M.QXD 3/7/03 9:35 AM Page 16 SET-UP INSTRUCTIONS (CONTINUED) SETTING THE FLASH TIME This unit enables you to select the standard flash time applicable to your calling area, which is useful when “clicking” over to a call waiting call or for PBX systems. If you are not sure of the flash time, call your local telephone company.
MPH2410.O/M.QXD 3/7/03 9:35 AM Page 17 SET-UP INSTRUCTIONS (CONTINUED) SETTING THE PAUSE TIME This unit enables you to change the number of seconds that a pause lasts when using programmed pauses in your speed dial numbers or after your PBX number. Set the Pause Time while in the Standby mode as follows: 1 2 1 2 Press and hold the VOICE MAIL/ MENU button for more than two seconds; the Ringer Volume setting will appear in the display.
MPH2410.O/M.QXD 3/7/03 9:35 AM Page 18 SET-UP INSTRUCTIONS (CONTINUED) SETTING THE VOICE MAIL This unit enables you to store the Voice Mail Post Code number in your area. This will automatically connect you to the Voice mail server provider with one touch dialing. Set the Voice Mail setting while in the Standby mode as follows: 1 2 1 2 Press and hold the VOICE MAIL/ MENU button for more than two seconds; the Ringer Volume setting will appear in the display.
MPH2410.O/M.QXD 3/7/03 9:35 AM Page 19 SET-UP INSTRUCTIONS (CONTINUED) SETTING THE MESSAGE WAITING The unit’s Message Waiting setting is set to OFF by default. Message Waiting will turn on automatically only when your local phone company sends the signal provided that this optional service is available in your area. When all messages have been received, the local telephone company will send a signal to turn the Message Waiting off.
MPH2410.O/M.QXD 3/7/03 9:35 AM Page 20 SET-UP INSTRUCTIONS (CONTINUED) SETTING THE AREA CODE This unit does not require any programming of an area code. However, this setting could be used to add the local area code to numbers that were stored as 7 digits in the memory and/or 10 digit dialing if required by the local telephone company.
MPH2410.O/M.QXD 3/7/03 9:35 AM Page 21 TELEPHONE OPERATION TONE/PULSE SWITCH 1 Slide the TONE/PULSE switch on the side of the base to TONE or PULSE to match the service provided on your telephone line. If you are not sure of your service, please contact your telephone company. PLACING A CALL 1 2 2 1 Press the Key buttons (0-9) ❶ to dial the phone number you wish to call. When finished talking, press the TALK button ❷ again or place the handset on the base to hang up.
MPH2410.O/M.QXD 3/7/03 9:35 AM Page 22 TELEPHONE OPERATION (CONTINUED) RECEIVING A CALL Up to 80 incoming calls are saved in the Caller ID log. 1 Make sure that the Caller ID service is turned on by your phone company. When you receive a call, the display will show the name of the caller and number of the call. To answer the call, press the TALK button.The display will show the amount of time you have been on the phone.
MPH2410.O/M.QXD 3/7/03 9:35 AM Page 23 TELEPHONE OPERATION (CONTINUED) REDIALING A NUMBER 1 1 CHANNEL SELECTION 1 2 Press the TALK button ❶ (the display will light), followed by the SAVE/RE/ PA button ❷ to automatically redial the last number dialed on this handset (up to 32 digits). NOTE: Please note that only the last number you called on this handset can be stored in the Redial memory. The base unit will automatically search for the clearest channel in the Talking mode.
MPH2410.O/M.QXD 3/7/03 9:35 AM Page 24 TELEPHONE OPERATION (CONTINUED) USING THE TEMPORARY TONE CALL WAITING 1 1 If you are in a Pulse dialing area you may still take advantage of touch-tone services after dialing to respond to touch-tone prompts. To do this, press the Temporary Tone/ Button to temporarily change the dialing mode from Pulse to Tone after dialing in the Pulse mode. This will enable Pulse users to access touch-tone services. It will revert back to Pulse after hanging up.
MPH2410.O/M.QXD 3/7/03 9:35 AM Page 25 TELEPHONE OPERATION (CONTINUED) MESSAGE WAITING FUNCTION When a caller has recorded a message on a personal message service, “MSG WAITING” will appear in the display and the NEW CALL/MSG WAITING indicator will blink green. These will disappear when you retrieve your message. NOTE: This feature is only for subscribers of a voice mail message waiting service. Also, the local phone company must provide a type of voice mail signaling called ‘FSK” (Frequency Shift Key).
MPH2410.O/M.QXD 3/7/03 9:35 AM Page 26 TELEPHONE OPERATION (CONTINUED) CHECKING THE CALLER ID LOG 1 3 1 2 While the handset is in the Standby mode, press the Scroll Up ❶ or Down ❷ button; any unviewed (new) caller ID information will be displayed first. The information of the call, including name, number, date and time received will be displayed. Press the Scroll Down button to cycle through the calls from the last call received to the first Caller ID record.
MPH2410.O/M.QXD 3/7/03 9:35 AM Page 27 TELEPHONE OPERATION (CONTINUED) DELETING ALL NAME(S)/NUMBER(S) FROM THE CALLER ID LOG 1 1 2 2 Enter the caller ID display by pressing the Scroll Up ❶ or Down ❷ button. Press and hold the DEL/CHAN button; “ERASE ALL?” will appear in the display. Press the DEL/CHAN button again; the display will show “ALL ERASED” and then return to the Standby mode.
MPH2410.O/M.QXD 3/7/03 9:35 AM Page 28 TELEPHONE OPERATION (CONTINUED) STORING NAMES & TELEPHONE NUMBERS IN THE PHONEBOOK The memory can store up to 40 name/telephone numbers. 1 2 Press the DIR button while in the Standby mode. Press the EDIT/FLASH button to create a new directory entry. 3 See the Character Map Chart on the top of the next page and using the Key buttons (0-9,*,#) ❶, enter the name.
MPH2410.O/M.QXD 3/7/03 9:35 AM Page 29 TELEPHONE OPERATION (CONTINUED) CHARACTER MAP CHART Key 1 2 3 4 5 6 7 8 9 0 1 press Space A D G J M P T W 0 # # 2 press 1 B E H K N Q U X 3 press & C F I L O R V Y 4 press ‘ a d g j m S t Z 5 press ( b e h k n p u w 6 press ) c f i l o q v x 7 press 8 press 9 press . 2 3 4 5 6 r s 7 8 y z 9 VIEWING THE PHONEBOOK 1 2 Press the DIR button.
MPH2410.O/M.QXD 3/7/03 9:35 AM Page 30 TELEPHONE OPERATION (CONTINUED) SAVING CALLER ID INFORMATION TO THE PHONEBOOK The Phonebook can save the information directly from the caller ID. 1 1 2 2 Scroll through the calls to select a number using the Scroll Up ❶ or Down button ❷. Press and hold the SAVE/RE/PA button; “SAVED” will appear in the display.
MPH2410.O/M.QXD 3/7/03 9:35 AM Page 31 TELEPHONE OPERATION (CONTINUED) EDITING TELEPHONE NUMBERS/NAMES You can edit a phone number in the Phonebook as follows: 1 2 1 2 While in the Standby mode, press the DIR button Press the Scroll Up ❶ or Down button ❷ to locate the desired Phonebook entry. 3 4 Press the EDIT/FLASH button; the entry will display a blinking prompt over the first character. Move the cursor over the letter/number you want to edit using the Scroll buttons.
MPH2410.O/M.QXD 3/7/03 9:35 AM Page 32 TELEPHONE OPERATION (CONTINUED) DELETING A NUMBER FROM THE PHONEBOOK Delete a number from the Phonebook as follows: 1 2 2 1 3 Press the DIR button ❶ while in the Standby mode and locate the entry to be deleted using the Scroll Up ❷ or Down button ❸. Press the DEL/CHAN button ; “ERASE ITEM?” will appear in the display. Press the DEL/CHAN button again; the display will show “ERASED”.
MPH2410.O/M.QXD 3/7/03 9:35 AM Page 33 TROUBLESHOOTING GUIDE (TELEPHONE) SYMPTOM SOLUTION No dial tone Check that the telephone line cord connectors at both ends are pushed in firmly until they click. If you had a power failure or had unplugged the base unit, return the handset on the base unit for five to 10 seconds to reset the system. Does not ring Check to see if the RINGER switch is set to OFF.
MPH2410.O/M.QXD 3/7/03 9:35 AM Page 34 TROUBLESHOOTING GUIDE (CALLER ID) SYMPTOM SOLUTION The Caller ID LCD panel is blank Check the power connections. Check the telephone line cord connections. Check the batteries for proper installation. The handset LCD panel will only start displaying information after the first call is received.
MPH2410.O/M.QXD 3/7/03 9:35 AM Page 35 CARE AND MAINTENANCE 1. Clean your phone with a damp (never wet) cloth. Solvent or detergent should never be used. 2. Avoid operating your unit under direct sunlight or in hot, humid or dusty places. 3. Keep your unit away from heating appliances. FOR ADDITIONAL SET-UP OR OPERATING ASSISTANCE, PLEASE VISIT OUR WEBSITE AT WWW.MEMOREXELECTRONICS.
MPH2410.O/M.QXD 3/7/03 9:35 AM Page 36 Memcorp, Inc. Weston, FL Printed in Hong Kong Visit our website at www.memorexelectronics.