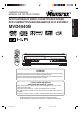
DVD PLAYER/Hi-Fi VIDEO CASSETTE RECORDER DVD COMPACTOS/VIDEOGRABADOR Hi-Fi ESTEREO MVD4540B ATTENTION ATENCION If you purchase a universal remote control from your local retailer, please contact the remote manufacturer for the required programming code. Si usted a comprado un control de remoto universal, por favor comunicace con el fabricante para el codico de programaccion requerido.
ENGLISH CAUTION RISK OF ELECTRIC SHOCK DO NOT OPEN The lightning flash with arrowhead symbol, within an equilateral triangle is intended to alert the user to the presence of uninsulated dangerous voltage within the product's enclosure that may be of sufficient magnitude to constitute a risk of electric shock to persons. CAUTION: TO REDUCE THE RISK OF ELECTRIC SHOCK, DO NOT REMOVE COVER (OR BACK). NO USER-SERVICEABLE PARTS INSIDE. REFER SERVICING TO QUALIFIED SERVICE PERSONNEL.
1. READ INSTRUCTIONS All the safety and operating instructions should be read before the unit is operated. 2. RETAIN INSTRUCTIONS The safety and operating instructions should be retained for future reference. 3. HEED WARNINGS All warnings on the unit and in the operating instructions should be adhered to. 4. FOLLOW INSTRUCTIONS All operating and use instructions should be followed. 5. CLEANING Unplug this unit from the wall outlet before cleaning. Do not use liquid cleaners or aerosol cleaners.
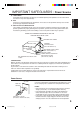
IMPORTANT SAFEGUARDS 13. LIGHTNING To protect your unit from a lightning storm, or when it is left unattended and unused for long periods of time, unplug it from the wall outlet and disconnect the antenna or cable system. This will prevent damage to the unit due to lightning and power line surges. 14. POWER LINES An outside antenna system should not be located in the vicinity of overhead power lines or other electric light or power circuits, or where it can fall into such power lines or circuits.
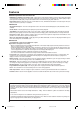
IMPORTANT SAFEGUARDS / Power Source ENGLISH 25. LASER BEAM Do not look into the opening of the disc tray or ventilation opening of the product to see the source of the laser beam. It may cause sight damage. 26. DISC Do not use a cracked, deformed, or repaired disc. These discs are easily broken and may cause serious personal injury and product malfunction. 27.
Features DVD/CD Player/Video Cassette Recorder • DVD/CD player with Video Cassette Recorder - Unique space saving design combines a DVD/CD player and a Hi-Fi Video cassette recorder. The DVD disc has much more capacity, but is the same size as the audio CD disc. Picture quality is higher than Super VHS. Audio quality is higher than audio CD. The DVD PLAYER can play back audio CDs. • High Quality Picture - More than 500 lines (VCR mode: 230 lines) of Horizontal Resolution.
Before using your unit Disc playback operation IMPORTANT SAFEGUARDS .......................... 3 Power Source ................................................... 5 Features ........................................................... 6 Contents ........................................................... 7 Parts and functions .......................................... 8 Display ............................................................. 9 Remote control ...............................................
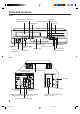
Parts and functions Front VCR/DVD mode selector button Cassette Loading Slot PLAY button OPEN/CLOSE button STOP button Disc tray EJECT button POWER Display window CHANNEL buttons POWER button AUDIO (L/R)/ VIDEO IN jacks / DVD indicator REW (Rewind) button Remote sensor REC/OTR button FF (Fast Forward) button VCR indicator Rear DVD COAXIAL DIGITAL AUDIO OUT jack AC power cord RF IN jack RF OUT jack DVD S-VIDEO OUT jack DVD AUDIO (L/R) OUT jacks S-VIDEO/COMPONENT Video selector switch DVD O
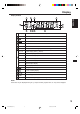
Display Display window 2 3 4 12 ENGLISH 1 5 6 11 No. 1 10 9 8 Display 7 Description VCR mode VCR 2 Playback (lights) / Auto resume (flashes) 3 Still picture 4 DVD DVD disc is inserted. 5 CD CD is inserted.
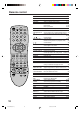
Remote control Page POWER EJECT OPEN/CLOSE VCR/DVD 0-9 POWER OPEN/ CLOSE EJECT 1 2 3 4 5 6 7 8 9 VCR/DVD DISPLAY/CALL INPUT SELECT/ PROGRESSIVE DISPLAY/CALL INPUT SELECT PROGRESSIVE CH / / TRACKING/SET –/+ 0 CH TRACKING/ SET – TRACKING/ SET / SELECT/ENTER + SELECT/ ENTER DVD MENU SETUP/VCR MENU CLEAR/CANCEL CH DVD MENU SETUP/ VCR MENU MARKER ZOOM CLEAR/ CANCEL RETURN TOP MENU REPEAT A-B AUDIO/ JUMP/ ANGLE/ CLOCK/ AUDIO SELECT ZERO RETURN COUNTER RESET COUNTER TIMER REC REW/S
Remote control 1 Open the battery compartment cover in the direction of the arrow. Install two “AAA” batteries (not 2 supplied), paying attention to the 3 Replace the compartment cover. polarity diagram in the battery compartment. Battery precautions The precautions below should be followed when using batteries in this device: 1. Use only the size and type of batteries specified. 2. Be sure to follow the correct polarity when installing the batteries as indicated in the battery compartment.
Basic connections If you are using an antenna system, follow these instructions. If you are a cable (CATV) subscriber, skip ahead to page 14 for the proper connections. ANTENNA TO DVD/VCR CONNECTION The DVD/VCR must be connected “between” the antenna and the TV. First, disconnect the antenna from the TV and connect it to the DVD/VCR. Then connect the DVD/VCR to the TV. Below are 3 common methods of connecting an antenna system to a DVD/VCR.
Basic connections After you have connected the antenna to the DVD/VCR, you must connect the DVD/VCR to the TV. Below are 3 common methods of connecting your DVD/VCR to a TV. Find the type of TV you are using and follow the connection diagram. This DVD/VCR has a single 75 ohm output for connection to a TV. If your TV has separate VHF and UHF antenna inputs (numbers 2 and 3 below), use a splitter to connect the DVD/VCR to the TV for VHF and UHF reception.
CATV (CABLE TV) connections Many cable companies offer services permitting reception of extra channels including pay or subscription channels. This DVD/VCR has an extended tuning range and can be tuned to most cable channels without using a cable company supplied converter box, except for those channels which are intentionally scrambled. If you subscribe to a special channel which is scrambled, you must have a descrambler box for proper reception.
CATV (CABLE TV) connections This DVD/VCR cannot receive scrambled programs since it does not contain a descrambler. In order to receive scrambled programs, your existing descrambler must be used. Descrambler boxes are available from cable companies. Consult your local cable company for more information concerning connection to their descrambler equipment. There are many ways to connect your DVD/VCR to a cable system. Below are six common methods of connection.
Playback connections The exact arrangement you use to interconnect various video and audio components to the DVD/VCR is dependent on the model and features of each component. Check the Owner's Manual provided with each component for the location of video and audio inputs and outputs. Connect to a TV with Audio/Video Output You can enjoy playback by connecting the unit to a TV. Connect the unit to a TV equipped with audio input (L/R) and video input jacks using the supplied audio/video cable.
Playback connections Connect to a Stereo Amplifier with Audio Output ENGLISH You can enjoy high quality audio by connecting the audio output to your amplifier. Connect the AUDIO OUT jacks to any line-level inputs (such as AUX, DVD, CD, etc.) of an audio amplifier.
Setting the video channel / Setting the language Setting the video channel To view playback of a recorded tape or DVD disc, or to watch a program selected by the VCR's channel selector, the TV must be set to channel 3 or 4 (video channel). When a TV is connected with the 75 ohm coaxial cable only. Press and hold 3 or 4 on the remote control for 3 seconds in the standby mode to select CH 3 or 4. The selected channel number will flash on the display for about 4 seconds.
You must set the date and time for timer recordings. Preparation: • Turn ON the TV and set to the video input mode. • Press VCR/DVD to select the VCR mode. (The VCR indicator will light.) EXAMPLE: Setting the clock to “8:30 AM” March, 27 (SAT), 2004. POWER OPEN/ CLOSE EJECT 1 2 3 4 5 6 VCR/DVD DISPLAY/CALL INPUT SELECT/ PROGRESSIVE 1 Press VCR MENU. The VCR menu screen will appear.
Tuner setting This DVD/VCR is equipped with a channel memory feature which allows channels to skip up or down to the next channel set into memory, skipping over unwanted channels. Before selecting channels, they must be programmed into the DVD/VCR’s memory. In addition to normal VHF and UHF channels, this DVD/ VCR can receive up to 113 Cable TV channels. To use this DVD/VCR with an antenna, set the TV/CATV menu option to the TV mode. When shipped from the factory, this menu option is in the CATV mode.
To ADD/DELETE channels / Noise elimination You can add the channels you want or delete the channels you do not want manually. POWER OPEN/ CLOSE EJECT 1 2 3 4 5 6 7 8 9 Preparation: • Turn ON the TV and set to the video input mode. • Press VCR/DVD to select the VCR mode. (The VCR indicator will light.) the step 1 on page 20.
Loading and Unloading a cassette tape Use only video cassette tapes marked . Loading Push the center of the tape until it is automatically inserted. Insert the cassette tape with its labeled side facing up and the erase prevention tab positioned at your left. An inverted cassette tape cannot be inserted. VCR Erase prevention tab Automatic power ON When you insert a cassette tape the VCR power will turn ON automatically.
Cassette tape playback POWER OPEN/ CLOSE EJECT 1 2 3 4 5 6 7 8 9 a prerecorded tape 1 Load (When loading a cassette tape VCR/DVD DISPLAY/CALL INPUT SELECT/ PROGRESSIVE without the erase prevention tab, playback will start automatically). start playback 2 To Press PLAY. 0 CH TRACKING/ SET – ENGLISH Preparation: • Turn ON the TV and set to the video input mode. • Press VCR/DVD to select the VCR mode. (The VCR indicator will light.) TRACKING/ SET Playback will start.
Special playback Picture Search Repeat playback Reverse picture search function Press REW x 1 or x 2 during the playback. Forward picture search function Press F.FWD x 1 or x 2 during the playback. To return to playback: Press PLAY. The entire video tape will be played until its end. The tape will then automatically rewind to the beginning and the playback will be repeated.
ZERO RETURN function / Video index search system This function makes tape-rewinding stop at the counter 00:00:00 position automatically. 1 2 3 DISPLAY/CALL INPUT SELECT/ PROGRESSIVE 4 5 6 7 8 9 Preparation: • Turn ON the TV and set it to the video input mode. • Press VCR/DVD to select the VCR mode. (The VCR indicator will light.) CALL. 1 Press The counter display shows the tape TRACKING/ SET – 8 : 47AM MON HI-FI running time during playback or recording.
Recording a TV program Recording and viewing the same TV program POWER 1 OPEN/ CLOSE EJECT 2 3 Preparation: • Turn ON the TV and set to the video input mode. • Press VCR/DVD to select the VCR mode. (The VCR indicator will light.) VCR/DVD DISPLAY/CALL a cassette tape with the erase 1 Load prevention tab intact. The VCR will automatically turn on. INPUT SELECT/ PROGRESSIVE 4 5 6 7 8 9 0 Press SPEED to select the desired tape 2 speed SP or SLP.
Recording a TV program To stop recording POWER OPEN/ CLOSE EJECT 1 2 3 4 5 6 7 8 9 To stop recording temporarily VCR/DVD DISPLAY/CALL INPUT SELECT/ PROGRESSIVE 0 TRACKING/ SET + SELECT/ ENTER Recording one program while watching another CH DVD MENU SETUP/ VCR MENU MARKER ZOOM CLEAR/ CANCEL RETURN While the VCR is recording, press TV/VCR to select the TV position. The “VCR” will go off and recording will continue.
One-touch Timer Recording (OTR) The One-touch Timer Recording feature provides a simple and convenient way to make a timed recording. POWER OPEN/ CLOSE EJECT 1 2 3 4 5 6 7 8 9 Example: One-touch Timer Recording for 30 minutes. VCR/DVD DISPLAY/CALL INPUT SELECT/ PROGRESSIVE TRACKING/ SET + SELECT/ ENTER ZOOM CLEAR/ CANCEL RETURN REW/SEARCH INDEX/SKIP REC/OTR SUB TITLE/ ATR PLAY MODE/ SPEED PLAY Number keys or CH / to 4 Press select the channel to be recorded.
Timer recording can be programmed on-screen with the remote control. The built-in timer allows automatic unattended recording of up to 8 programs within 1 month. POWER OPEN/ CLOSE EJECT 1 2 3 4 5 6 Preparation: • Press VCR/DVD to select the VCR mode. Load a cassette tape with the erase prevention tab intact. • Press the CALL button to verify that the time and date are correct (see page 27).
Timer recording Timer recording special case Weekly (e.g. WKL-TU: each Tuesday) or daily (e.g. MO-SA: Monday to Saturday) Timer recording Follow the procedure of timer recording on the previous page. At picture 3 press SET + or – repeatedly until the desired setting appears. Then press ENTER. When you press SET – repeatedly, the indicator at DATE will change as follows, in this case the day is Friday.
Stereo recording and playback / Second Audio Program (SAP) The VHS Hi-Fi audio system permits high fidelity recording of MTS STEREO TV broadcasts.
Duplicating a video tape Duplicating a video tape If you connect the VCR to another VCR or camcorder, you can duplicate a previously recorded tape. Make all connections before turning on the power. a blank cassette tape with the erase prevenREC/OTR on the recording VCR, then press 1 Load 4 Press tion tab intact into the recording VCR. PAUSE/STILL. Load a previously recorded tape into the playback VCR or CAMCORDER.
This unit applies to DVD discs from Region 1 only. The loaded Disc (DVD, Audio-CD and MP3-CD) will be recognized automatically. The suitable Disc-formats are: DVD, CD-R and CD-RW. Some CD-R/RW discs may be incompatible. Do not play DVD-ROM, DVD-Audio, CDV, Video-CD, CD-G or Photo CD to prevent accidental erasure of prerecorded material. This unit cannot record disc material in DVD, Audio CD etc. onto a video tape. " will appear on the screen for aprox.
Setting setup language The setup language can be selected. POWER OPEN/ CLOSE EJECT 1 2 3 4 5 6 7 8 9 Preparation: • Turn ON the TV and set to the video input mode. • When using an amplifier, switch on the amplifier. VCR/DVD to select the 1 Press DVD mode. (The DVD indicator VCR/DVD DISPLAY/CALL INPUT SELECT/ PROGRESSIVE No Disc will light) “No Disc” will appear on the screen. (If a DVD disc has already loaded, the playback will start automatically.) 0 SETUP in the stop mode.
Playback procedure OPEN/ CLOSE EJECT 1 2 3 4 5 6 7 8 9 VCR/DVD DISPLAY/CALL a disc onto the tray. 2 Place Hold the disc, position it with the 0 TRACKING/ SET – TRACKING/ SET PLAY or OPEN/CLOSE.
Special playback Note: There may be a slight delay between pressing the button and the function activation. Fast Forward Playback Press F.FWD during normal playback. Each press of F.FWD will increase the speed of the search (x4), (x8), (x20). (x2), • To resume normal playback, press PLAY. POWER OPEN/ CLOSE EJECT VCR/DVD Review Playback 1 2 4 3 5 DISPLAY/CALL INPUT SELECT/ PROGRESSIVE 6 Press REW during normal playback. Each press of REW will increase the speed of the search (x4), (x8), (x20).
Preparation: • Turn ON the TV and set to the video input mode. • Press VCR/DVD to select the DVD mode. (The DVD indicator will light.) POWER 1 Zooming OPEN/ CLOSE EJECT 2 3 4 5 6 7 8 9 VCR/DVD DISPLAY/CALL INPUT SELECT/ PROGRESSIVE This unit will allow you to zoom in on the frame image. You can then make selections by switching the position of the frame. ZOOM during playback. 1 Press The center part of the image will 1 be zoomed in. Each press of ZOOM will change 1 (x 1.
Repeat playback POWER OPEN/ CLOSE EJECT 1 2 3 4 5 6 7 8 9 Preparation: • Turn ON the TV and set to the video input mode. • Press VCR/DVD to select the DVD mode. (The DVD indicator will light.) VCR/DVD DISPLAY/CALL Title, Chapter, Track Playback INPUT SELECT/ PROGRESSIVE 1 Press PLAY MODE during playback or stop mode.
Program playback/Random playback (CD) POWER OPEN/ CLOSE EJECT 1 2 3 4 5 6 7 8 9 Program playback VCR/DVD You can arrange the order of tracks on the disc. DISPLAY/CALL INPUT SELECT/ PROGRESSIVE PLAY MODE in the stop 1 Press mode.
MP3 playback This player can play back the MP3-data which has been recorded on CD-R or CDRW. To produce the MP3-data, you need a Windows-PC with CD-ROM drive and a MP3encoding Software (not supplied). The Apple-HFS-System can not be played. MP3 CD Information Limitations on MP3 CD playback • MP3 CD is the disc that is standardized by ISO9660, its file name must include 3-digits extension letters, “mp3”. • The directory and file names of the MP3 CD must correspond to the ISO standardized files.
Marking desired scenes POWER Marking the Scenes OPEN/ CLOSE EJECT 1 2 3 4 5 6 7 8 9 VCR/DVD DISPLAY/CALL Marker 1 Marker 2 Marker 3 /Enter/Cancel/Marker 0 the blank Marker using 2 Select / . TRACKING/ SET Ð TRACKING/ SET + SELECT/ ENTER Then press ENTER at the desired scene. Marker 1 00 27 54 Marker 2 Marker 3 /Enter/Cancel/Marker • Repeat this procedure to set the other 2 scenes. CH SETUP/ DVD MENU VCR MENU ZOOM Press MARKER during 1 playback.
Changing soundtrack language / Subtitles / Karaoke playback POWER 1 OPEN/ CLOSE EJECT 2 3 4 5 6 7 8 9 VCR/DVD DISPLAY/CALL Preparation: • Turn ON the TV and set to the video input mode. • Press VCR/DVD to select the DVD mode. (The DVD indicator will light.) Changing soundtrack language INPUT SELECT/ PROGRESSIVE You can select the language when you play a multilingual disc. 0 AUDIO during playback. 1 Press The current soundtrack language 1/8 Eng DolbyDigital will appear.
Preparation: • Turn ON the TV and set to the video input mode. • Press VCR/DVD to select the DVD mode. (The DVD indicator will light.) POWER OPEN/ CLOSE EJECT 1 2 3 4 5 6 7 8 9 Changing Angles VCR/DVD DISPLAY/CALL INPUT SELECT/ PROGRESSIVE When playing back a disc recorded with multi-angle facility, you can change the angle that you are viewing the scene from. ANGLE during playback. 1 Press The current angle will appear.
Parental control Some discs are specified not suitable for children. Such discs can be prevented from play back with the unit. POWER Parental control setting OPEN/ CLOSE EJECT VCR/DVD 1 2 3 DISPLAY/CALL 4 5 6 INPUT SELECT/ PROGRESSIVE 7 8 9 0 INDEX/SKIP REC/OTR Password Parental once to select “Password 3 Press Then press Number keys to input a 4RETURN TOP MENU REPEAT A-B ZOOM SUB TITLE/ ATR PLAY MODE/ SPEED TV/VCR PLAY SEARCH/F.
Temporary disabling of rating level by DVD disc Preparation: • Turn ON the TV and set to the video input mode. • Press VCR/DVD to select the DVD mode. (The DVD indicator will light.) ENGLISH Depending on the DVD disc, the disc may try to temporarily cancel the rating level that you have set. It is up to you to decide whether to cancel the rating level or not. a DVD disc and press PLAY 1 Load or OPEN/CLOSE (see page 35).
Setting menu language You can select the language of the disc menu messages of DVDs. POWER OPEN/ CLOSE EJECT 1 2 3 4 5 6 7 8 9 Preparation: • Turn ON the TV and set to the video input mode. • Press VCR/DVD to select the DVD mode. (The DVD indicator will light.) SETUP in the stop mode. 1 Press Press or to select “Lan- VCR/DVD DISPLAY/CALL Language Picture Sound Parental Other guage”. INPUT SELECT/ PROGRESSIVE /Enter/Setup/Return 0 Press or ENTER.
The same subtitle language can always be selected even if you replace the disc or turn the power off. POWER OPEN/ CLOSE EJECT 1 2 3 4 5 6 7 8 9 Preparation: • Turn ON the TV and set to the video input mode. • Press VCR/DVD to select the DVD mode. (The DVD indicator will light.) Press SETUP in the stop mode.
Setting audio soundtrack language The same audio soundtrack language can always be selected by your unit even if you replace the disc or turn the power off. Preparation: • Turn ON the TV and set to the video input mode. • Press VCR/DVD to select the DVD mode. (The DVD indicator will light.) Press SETUP in the stop mode. 1 Press or to select “Language” POWER OPEN/ CLOSE EJECT 1 2 3 4 5 6 VCR/DVD /Enter/Setup/Return DISPLAY/CALL INPUT SELECT/ PROGRESSIVE Press or ENTER.
You can select the aspect ratio for your TV. POWER OPEN/ CLOSE EJECT 1 2 3 4 5 6 7 8 9 Preparation: • Turn ON the TV and set to the video input mode. • Press VCR/DVD to select the DVD mode. (The DVD indicator will light.) Press SETUP in the stop mode. 1 Press or to select “Pic- VCR/DVD DISPLAY/CALL Language Picture Sound Parental Other ture”. INPUT SELECT/ PROGRESSIVE /Enter/Setup/Return 0 2 Pressor CH TRACKING/ SET Ð or ENTER, then press to select “Tv Screen”.
Setting on screen display / Status display of disc On screen display can be switched on or off when you press the DISPLAY button. POWER OPEN/ CLOSE EJECT 1 2 3 4 5 6 7 8 9 Preparation: • Turn ON the TV and set to the video input mode. • Press VCR/DVD to select the DVD mode. (The DVD indicator will light.) Press SETUP in the stop mode.
DRC (Dynamic Range Control) enables you to control the dynamic range so as to achieve a suitable sound for your equipment. POWER OPEN/ CLOSE EJECT 1 2 3 4 5 6 7 8 9 Preparation: • Turn ON the TV and set to the video input mode. • Press VCR/DVD to select the DVD mode. (The DVD indicator will light.) SETUP in the stop 1 Press mode. VCR/DVD DISPLAY/CALL Press or “Sound”.
Progressive scan The unit supports the Progressive scanning system as well as the conventional interlaced scanning system. If your TV is equipped with component jacks which support the progressive video input, you can enjoy high quality picture by making the Progressive scanning mode active. Preparation: • Connect to a TV equipped with component jacks. • Turn ON the TV and set it to the corresponding video input mode.
Language code list Language Name Code Language Name Code Language Name Code Language Name Code Abkhazian 1112 Fiji 1620 Lingala 2224 Singhalese 2919 Afar 1111 Finnish 1619 Lithuanian 2230 Slovak 2921 Afrikaans 1116 French 1628 Macedonian 2321 Slovenian 2922 Albanian 2927 Frisian 1635 Malagasy 2317 Somali 2925 Amharic 1123 Galician 1722 Malay 2329 Spanish 1529 Arabic 1128 Georgian 2111 Malayalam 2322 Sundanese 2931 Armenian 1835 German 1415 Maltese 2330 Swahili 2933 Assame
Problems and troubleshooting Use the following check list for troubleshooting when you have problems with your unit. Consult your local dealer or service outlet if problems persist. Be sure all connections are properly made when using with other units. SYMPTOMS POSSIBLE SOLUTIONS PAGE DVD/VCR DVD/VCR does not operate. • Make sure the power cord is plugged in. • Try another AC outlet. • Power is off, check fuse or circuit breaker. • Unplug unit, then plug it back in.
Problems and troubleshooting / Video head cleaning POSSIBLE SOLUTIONS PAGE No picture, or the screen is blurred • The S-VIDEO/COMPONENT selector is not set correctly. • The progressive scanning mode is active through the unit is or divided into two parts. connected to a TV via the VIDEO OUT jack. 16 52 No 4:3 (16:9) picture. • The setup does not match your TV. 49 No on-screen display. • Select Display On. 50 No surround sound. • The setup does not match your stereo system.
Specifications GENERAL Power supply: Power consumption: Weight: Dimensions: Inputs/Outputs: Video: Audio: Antenna: Hi-Fi frequency response: Hi-Fi dynamic range: VCR section Video head: Audio track: Tuner: RF channel output: F.FWD/REW Time: DVD section Signal system: Applicable disc: Audio characteristics frequency response: S/N Ratio: Harmonic distortion: Wow and flutter: Dynamic range: Output: Pickup: ACCESSORIES: AC 120 V 60 Hz Operation: 18 W Stand by: 2 W 7.9 lbs (3.
○ ○ ○ ○ ○ ○ ○ ○ ○ ○ ○ ○ ○ ○ ○ ○ ○ ○ ○ ○ ○ ○ ○ ○ ○ ○ ○ ○ ○ ○ ○ ○ ○ ○ ○ ○ ○ ○ ○ ○ ○ ○ ○ ○ ○ ○ ○ ○ ○ ○ ○ ○ ○ ○ ○ ○ ○ ○ ○ ○ ○ ○ ○ ○ ○ ○ ○ ○ ○ ○ ○ ○ ○ ○ ○ ○ ○ ○ ○ ○ ○ ○ ○ ○ ○ ○ ○ ○ ○ ○ ○ ○ ○ ○ ○ ○ ○ ○ ○ ○ ○ ○ ○ ○ ○ ○ ○ ○ ○ ○ ○ ○ ○ ○ ○ ○ ○ ○ ○ ○ ○ ○ ○ ○ ○ ○ ○ ○ ○ ○ ○ ○ ○ ○ ○ ○ ○ ○ ○ ○ ○ ○ ○ ○ ○ ○ ○ ○ ○ ○ ○ ○ ○ ○ ○ ○ ○ ○ ○ ○ ○ ○ ○ ○ ○ ○ ○ ○ ○ ○ ○
ESPAÑOL PRECAUCION RIESGO DE DESCARGA ELECTRICA NO ABRIR El símbolo del rayo dentro de un triángulo equilátero tiene por finalidad alertar al usuario acerca de la presencia de tensión peligrosa (sin aislación) en el interior del producto, que puede tener la intensidad suficiente como para constituir un riesgo de descarga eléctrica. AVISO: PARA REDUCIR EL RIESGO DE DESCARGA ELECTRICA, NO RETIRE LA CUBIERTA (O POSTERIOR).
1. LEA LAS INSTRUCCIONES Antes de usar la unidad, lea detenidamente todas las instrucciones de seguridad y operación. 2. CONSERVE ESTE MANUAL DE INSTRUCCIONES Conserve las instrucciones de seguridad y operación para consultas futuras. 3. RESPETE LAS ADVERTENCIAS Observe estrictamente todas las advertencias impresas en la unidad y las incluidas en el manual de instrucciones. 4. SIGA LAS INSTRUCCIONES Siga todas las instrucciones de operación y uso. 5.
PARA SU SEGURIDAD 12. PROTECCION DEL CABLE DE ALIMENTACION Los cables de alimentación deberán ser tendidos de manera tal que la probabilidad de que sean pisados o aplastados por otros objetos sea mínima. Preste especial atención a las clavijas de los cables, a los receptáculos, y al punto por donde salen del aparato. 13.
25. RAYO LASER No mire por la ranura de la bandeja del disco por las salidas de circulación de aire del producto para ver la fuente del rayo láser. Puede dañar sus ojos. 26. DISCO No utilice un disco rayado, deformado o reparado. Estos discos se pueden romper fácilmente y provocar serias heridas o averías en el producto. 27.
Caracteristicas Reproductor de DVD/CD / Videograbador • Reproductor de DVD/CD con videograbador - Exclusivo diseño que combina un reproductor de DVD/CD y un videograbador Hi-Fi y ofrece un considerable ahorro de espacio. El disco DVD posee mucha más capacidad, aunque tiene el mismo tamaño que un CD. La calidad de imagen es superior a la Super VHS. La calidad de audio es superior a la de un CD de audio. El reproductor de DVD puede reproducir discos CD de audio.
Antes de utiliaear su aparato Reproducción de discos PARA SU SEGURIDAD ................................... 3 Fuente de alimentación .................................... 5 Caracteristicas ................................................. 6 Indice ................................................................ 7 Partes y sus funciones ..................................... 8 Visualizador ...................................................... 9 Control remoto ...............................................
Partes y sus funciones Delantera Botón selector de modo VCR/DVD Apertura para carga de la cinta Botón PLAY Botón OPEN/CLOSE Botón STOP Bandeja del disco Botón EJECT POWER Sensor de control remote Botón POWER Tomas AUDIO (L/R)/ VIDEO IN Botónes CHANNEL ▲ / ▼ Indicador DVD Botón REW Indicador VCR Botón REC/OTR Botón F.
Visualizador Ventana de la pantalla 1 2 3 4 12 5 11 10 9 8 No.
Control remoto Página Conexión/Desconexión 18 Expulsar videocassette 22 Abra o cierre la bandeja 35 Cambiar a funcionamiento de VCR o DVD 18,34 Dirigir selección de canales de la TV 21,26,28 Introducir ajuste 37,39 Entre una contraseña 44,45 DISPLAY/CALL Consultar información de la VCR 27 Consultar información del DVD 50 INPUT SELECT Cambiar entre TV/AV 32 PROGRESSIVE Activar el modo de exploración progresiva 52 Seleccionar canal de TV o VCR 26,28 CH / ▲/▼ Botones de cursor 34 TRACKING/SET –/+ Botones de aj
Control remoto Coloque las pilas Abrir la tapa del compartimento de las pilas siguiendo la dirección de la flecha. Coloque dos pilas “AAA”, (no 2 suministradas) 3 prestando atención Recoloque la tapa del compartimiento. a las marcas de polaridad en el compartimiento de las pilas. ESPAÑOL 1 PRECAUCION CON LAS PILAS Las precauciones a continuación deben ser cumplidas cuando se utilizan pilas en esta unidad: 1. Utilice solo un tipo especificado de pilas. 2.
Conexiones basicos Si está utilizando un sistema de antena, siga estos instrucciones. Si está suscrito a televisión por cable (CATV), pase a la página 14 para las conexiones apropiadas. CONEXION DE ANTENA A DVD/VCR El DVD/VCR debe conectarse “entre” la antena y el televisor. Primero, desconecte la antena del televisor y conéctela al DVD/VCR. Luego, conecte el DVD/VCR al televisor. A continuación se describen 3 métodos comunes para conectar un sistema de antena a un DVD/VCR.
Conexiones basicos CONEXION DEL DVD/VCR A UN TELEVISOR TV VHF/UHF IN ESPAÑOL Una vez que haya conectado la antena al DVD/VCR, usted tendrá que conectar el DVD/VCR al televisor. A continuación se describen 3 métodos comunes para conectar su DVD/VCR a un televisor. Identifique el tipo de televisor que esté utilizando y siga el diagrama de conexiones. Este DVD/VCR dispone de una única salida de 75 ohmios para conexión a un televisor.
Conexiones de TV cable (CATV) Muchas compañías de TV cable ofrecen servicios que permiten recibir canales adicionales, incluyendo canales pagados o por suscripción. Al tener una gama de sintonización ampliada, este DVD/VCR puede sintonizar la mayoría de los canales de TV cable sin necesidad de usar un caja convertidora proporcionada por la compañía de TV cable, salvo aquellos canales que han sido intencionalmente codificados.
Conexiones de TV cable (CATV) IMPORTANTE: ASEGURESE DE QUE EL DE MENU TV/CATV ESTE AJUSTADO AL MODO “CATV”. Este DVD/VCR no puede recibir programas codificados debido a que no está equipado con un descodificador. Para poder recibir programas codificados, usted deberá utilizar un decodificador. Las cajas decodificadoras pueden adquirirse en las compañías de TV cable. Para detalles acerca de la conexión a sus equipos decodificadores, consulte a la compañía de TV cable local.
Conexión para reproducción La opción que elija para la interconexión de los diversos componentes de video y de audio al DVD/VCR dependerá del modelo y de las funciones de cada uno de los componentes. Busque en los manuales o guías del usuario suministrados con cada uno de los componentes la ubicación exacta de las entradas y salidas de video y audio. Conexión a un TV con salida de audio/video Puede disfrutar de la reproducción conectando la unidad a un TV.
Conexión para reproducción Conexión a un amplificador estéreo con salida de audio Puede disfrutar de audio de alta calidad conectando la salida de audio a un amplificador. Conecte las tomas de SALIDA DE AUDIO a cualquier entrada de línea (como AUX, DVD, CD, etc.) de un amplificador de audio.
Ajuste del canal de video/Seleccion de idioma en pantalla AJUSTE DEL CANAL DE VIDEO Cuando se conecta el TV sólo con un cable de antena. Para vizualizar la reproducción de una cinta grabada, o para ver un programa seleccionado por el selector de canal del videograbador, el televisor deberá estar ajustado al canal 3 ó 4 (canal de video).
Ajuste del reloj manual Se debe haber ajustado la fecha y la hora para poder hacer grabaciones con temporizador. OPEN/ CLOSE EJECT 1 2 3 4 5 6 7 8 9 EJEMPLO: Ajuste del reloj a miércoles, 8:30 AM 27 (SAB) marzo, 2004. VCR/DVD DISPLAY/CALL INPUT SELECT/ PROGRESSIVE VCR MENU. Aparece la pantalla del menú de la 1 Presione VCR. SET + o – para 2 Presione seleccionar la option SYSTEM MENU TIMER REC SET AUTO REPEAT ON OFF ON OFF SAP CH SETUP SYSTEM SETUP SETUP, luego presione ENTER.
Ajuste del sintonizador Este DVD/VCR está equipado con una función de memorización de canales que permite avanzar o retroceder al siguiente canal almacenado en la memoria, pasando por alto los canales no deseados. Antes de seleccionar canales, éstos deberán ser programados en la memoria del DVD/VCR. Además de los canales normales de VHF y UHF, este DVD/VCR puede recibir hasta 113 canales de TV cable. Para usar el DVD/VCR con una antena, ajuste la opcion de MENU al mode TV.
Borrado de un canal de la memoria/Eliminacion de buido Puede añadir los canales que desee o borrar los que no desee manualmente. POWER OPEN/ CLOSE EJECT 1 2 3 4 5 6 7 8 9 Preparación: • ENCIENDA el TV y ajústelo en el modo de entrada de video. • Presione VCR/DVD para seleccionar el modo VCR. (El indicador VCR se iluminará.) el paso 1 de la página 20.
Colocación y extracción de videocassettes Use sólo videocassettes marcados . COLOCACION Presione en el centro del videocassette hasta que se retraiga automáticamente. Introduzca el videocassette con el lado que lleva la etiqueta hacia arriba y la lengüeta para evitar el borrado situada a su izquierda. No se puede introducir un videocassette si está invertido. VCR Lengüeta para evitar el borrado ENCENDIDO AUTOMATICO Al introducir un videocassette, el VCR se ENCENDERÁ automáticamente.
Reproducción de cintas de cassette Preparación: • ENCIENDA el TV y ajústelo en el modo de entrada de video. • Presione VCR/DVD para seleccionar el modo VCR. (El indicador VCR se iluminará.) OPEN/ CLOSE EJECT 1 2 3 4 5 6 7 8 9 una cinta pregrabada (Cuando 1 Coloque se carga una cinta de cassette sin la VCR/DVD DISPLAY/CALL INPUT SELECT/ PROGRESSIVE INICIAR LA REPRODUCCION 2 PARA Presione PLAY.
Reproduccion especial Búsqueda de imagen Reproducción repetida Función de búsqueda de imagen hacia atrás Presione REW una o dos veces durante la reproducción. Toda la cinta de vídeo se reproducirá hasta el final. La cinta será entonces rebobinada hasta el principio y se repetirá la reproducción. Función de búsqueda de imagen hacia delante Presione F.FWD una o dos veces durante la reproducción. Para volver a la reproducción: Presione PLAY.
Función VUELTA A CERO / Sistema de búsqueda de índices de vídeo Esta función hace que el rebobinado de la cinta se detenga automáticamente cuando el contador llega a la posición 00:00:00. 1 2 3 DISPLAY/CALL INPUT SELECT/ PROGRESSIVE 4 5 6 7 8 9 Preparación: • ENCIENDA el TV y ajústelo en el modo de entrada de video. • Presione VCR/DVD para seleccionar el modo VCR. (El indicador VCR se iluminará.) CALL.
Grabacion de un programa de TV Grabacion y visualizacion simultanea del mismo programa POWER 1 OPEN/ CLOSE EJECT 2 3 Preparación: • ENCIENDA el TV y ajústelo en el modo de entrada de video. • Presione VCR/DVD para seleccionar el modo VCR. (El indicador VCR se iluminará.) VCR/DVD DISPLAY/CALL INPUT SELECT/ PROGRESSIVE 4 5 6 7 8 9 selector SPEED para 2 Presione seleccionar la velocidad de cinta TRACKING/ SET – TRACKING/ SET + SELECT/ ENTER MARKER ZOOM deseada SP o SLP.
Grabacion de un programa de TV PARA DETENER LA GRABACION Presione de parada STOP para detener la grabacion. “ ” aparecerá en pantalla durante 4 segundos aproximadamente. OPEN/ CLOSE EJECT 1 2 3 4 5 6 7 8 9 PARA DETENER TEMPORALMENTE LA GRABACION VCR/DVD DISPLAY/CALL INPUT SELECT/ PROGRESSIVE 0 CH TRACKING/ SET – TRACKING/ SET + SELECT/ ENTER Presione PAUSE/STILL para evitar grabar material no deseado. “ ” aparecerá en pantalla durante 4 segundos aproximadamente.
Grebacion por temporizador de un solo toque (OTR) La prestación de grabación por temporizador de un solo toque proporciona una forma simple y conveniente de efectuar una grabación con temporizador. POWER OPEN/ CLOSE EJECT 1 2 3 4 5 6 7 8 9 EJEMPLO: Una grabación por temporizador de un solo toque para 30 minutos. VCR/DVD DISPLAY/CALL INPUT SELECT/ PROGRESSIVE TRACKING/ SET + SELECT/ ENTER ZOOM El contador y SP o SLP aparecerán en pantalla durante 4 segundos aproximadamente.
Grabacion por temporizador POWER OPEN/ CLOSE EJECT 1 2 3 4 5 6 Preparación: • Presione VCR/DVD para seleccionar el modo VCR. • Presione CALL que tanto la hora como la fecha son correctas (ver página 27). EJEMPLO: Programe una grabación con temporizador para el día 26, canal 125 (CATV), 11:00 - 11:30 hrs. PM en el programa de temporización número 1 (VELOCIDAD DE CINTA: SLP). VCR MENU. 1 Presione Seleccione la opción TIMER REC VCR/DVD DISPLAY/CALL SET y presione ENTER.
Grabacion por temporizador Caso especial de grabación por temporizador Semanal (ej.: WKL-TU: cada martes (Tuesday) o diaria (ej.: MO-SA: grabación por temporizador de lunes (Monday) a sábado (Saturday) Siga el procedimiento de grabación por temporizador de la página anterior. En la imagen 3 presione SET + o – varias veces hasta que aparezca el ajuste deseado. A continuación, presione ENTER.
Grabacion y reproduccion estereofonicas/ Segundo programa de sonido El sistema de audio de alta fidelidad VHS permite hacer grabaciones de alta fidelidad de emisoras MTS STEREO TV. POWER OPEN/ CLOSE EJECT 1 2 3 4 5 6 7 8 9 VCR/DVD DISPLAY/CALL INPUT SELECT/ PROGRESSIVE CH TRACKING/ SET + SELECT/ ENTER CH DVD MENU SETUP/ VCR MENU MARKER ZOOM CLEAR/ CANCEL NOTA: Cuando utilice un sistema CATV, los programas de TV en estero pueden transmitirse a un canal de cable monoaural.
Duplicacion de una cinta de video DUPLICACION DE UNA CINTA DE VIDEO Si usted conecta el VCR a otro VCR o cámara de video, usted puede duplicar una cinta previamente grabada. Haga todas las conexiones antes de encender la unidad. una cinta de cassette en blanco con las 1 Coloque lengüetas de prevención de borrado intactas REC/OTR en el grabador del VCR, 4 Presione luego presione PAUSE/STILL. dentro del grabador de VCR.
Disco Este aparato sólo funciona con discos DVD de la región 1. El disco cargado (DVD, CD de audio y CD MP3) se reconocerá automáticamente. Los formatos de disco apropiados son: DVD, CD-R y CD-RW. Algunos discos CD-R/RW pueden ser incompatibles. No reproduzca un DVD-ROM, DVD-Audio, CDV, Video-CD, CD-G, Video CD o Foto CD para evitar el borrado accidental del material pregrabado. Si presiona REC/OTR durante la reproducción de DVD, aparece en pantalla el símbolo " segundos.
Ajuste de la selección de idioma Permite seleccionar el idioma. Preparación: • ENCIENDA el TV y ajústelo en el modo de entrada de video. • Cuando utilice un amplificador, conecte el amplificador. VCR/DVD para 1 Presione seleccionar el modo DVD. POWER OPEN/ CLOSE EJECT 1 2 3 4 5 6 7 8 9 VCR/DVD DISPLAY/CALL INPUT SELECT/ PROGRESSIVE CH TRACKING/ SET – “Reading” cambia a “No Disc”. (El indicador DVD se iluminará) “No Disc” aparecerá en pantalla.
Procedimiento de reproducción OPEN/ CLOSE EJECT 1 2 3 4 5 6 7 8 9 VCR/DVD DISPLAY/CALL INPUT SELECT/ PROGRESSIVE CH TRACKING/ SET + SELECT/ ENTER CH DVD MENU SETUP/ VCR MENU MARKER ZOOM CLEAR/ CANCEL RETURN TOP MENU REPEAT A-B AUDIO/ JUMP/ ANGLE/ CLOCK/ AUDIO SELECT ZERO RETURN COUNTER RESET COUNTER TIMER REC REW/SEARCH INDEX/SKIP REC/OTR SUB TITLE/ ATR PLAY MODE/ SPEED PLAY TV/VCR SEARCH/F.FWD STOP SKIP/INDEX SLOW Se abrirá la bandeja del disco. un disco en la bandeja.
Reproducción especial Nota: Puede ocurrir una leve demora entre el momento en que presiona el botón y que se active la función. POWER OPEN/ CLOSE EJECT 1 2 3 4 5 6 7 8 9 Reproducción con avance rápido Presione F.FWD durante la reproducción normal. Cada vez que presione F.FWD, aumentará la velocidad de la búsqueda (x2), (x4), (x8), (x20). • Para seguir con la reproducción normal, presione PLAY.
Zoom/Búsqueda de la escena deseada Preparación: • ENCIENDA el TV y ajústelo en el modo de entrada de video. • Presione VCR/DVD para seleccionar el modo DVD. (El indicador DVD se iluminará.) POWER EJECT 1 2 3 4 5 6 7 8 VCR/DVD DISPLAY/CALL INPUT SELECT/ PROGRESSIVE 0 9 CH TRACKING/ SET Ð TRACKING/ SET ZOOM durante 1 Presione la reproducción. 1 La parte central de la imagen se agranda. Cada vez que presione el ZOOM cambiará el ZOOM 1 (x1.3), 2 (x1.5) y 3 (x2.0).
Reproducción repetida POWER OPEN/ CLOSE EJECT 1 2 3 4 5 6 7 8 9 Preparación: • ENCIENDA el TV y ajústelo en el modo de entrada de video. • Presione VCR/DVD para seleccionar el modo DVD. (El indicador DVD se iluminará.) VCR/DVD DISPLAY/CALL Reproducción de título, capítulo, canción INPUT SELECT/ PROGRESSIVE 1 Presione PLAY MODE durante la reproducción. DVD 0 Repeat : Off /Enter/Play Mode CH TRACKING/ SET Ð + ENTER una o dos veces para seleccionar el Capítulo 2 Presionar o Título.
Programacion de reproduccion/Reproducción aleatoria (disco compacto) Preparación: • ENCIENDA el TV y ajústelo en el modo de entrada de video. • Presione VCR/DVD para seleccionar el modo DVD. (El indicador DVD se iluminará.) OPEN/ CLOSE EJECT 1 2 3 4 5 6 7 8 9 Programación de reproducción VCR/DVD Se puede cambiar el orden de las canciones en el disco. DISPLAY/CALL INPUT SELECT/ PROGRESSIVE PLAY MODE en el 1 Presione modo de parada.
Reproducción de MP3 Esta unidad puede reproducir datos MP3 grabados en un CD-R o CD-RW. Para reproducir los datos MP3 se necesita un PC con Windows, unidad de CD-ROM y software codificador de MP3 (no incluido). No se puede reproducir el sistema AppleHFS. Información de CD MP3 Limitaciones de la reproducción de CD MP3 • El CD MP3 es un disco estandarizado por ISO9660, su nombre de archivo debe incluir la extensión de tres caracteres “mp3”.
Marcación de escenas deseadas El aparato memoriza los puntos que desea ver nuevamente. Puede continuar la reproducción desde dicha escena. Marcación de escenas OPEN/ CLOSE EJECT 1 2 3 4 5 6 7 8 9 VCR/DVD DISPLAY/CALL INPUT SELECT/ PROGRESSIVE el Marker en blanco 2 Seleccionar utilizando / , después TRACKING/ SET Ð TRACKING/ SET + SELECT/ ENTER presione ENTER en la escena deseada.
Cambio del idioma de la pista de sonido / Subtítulos / Reproducción de karaoke POWER 1 OPEN/ CLOSE EJECT 2 3 4 5 6 7 8 9 VCR/DVD DISPLAY/CALL Preparación: • ENCIENDA el TV y ajústelo en el modo de entrada de video. • Presione VCR/DVD para seleccionar el modo DVD. (El indicador DVD se iluminará.) CAMBIO DEL IDIOMA DE LA PISTA DE SONIDO INPUT SELECT/ PROGRESSIVE Se puede seleccionar el idioma cuando reproduce un disco en múltiples idiomas. 0 AUDIO durante la 1 Presione reproducción.
Cambio de ángulos / Selección de título / Menú DVD Preparación: • ENCIENDA el TV y ajústelo en el modo de entrada de video. • Presione VCR/DVD para seleccionar el modo DVD. (El indicador DVD se iluminará.) OPEN/ CLOSE EJECT 1 2 3 4 5 6 7 8 9 Cambio de ángulos VCR/DVD DISPLAY/CALL INPUT SELECT/ PROGRESSIVE Cuando reproduce un disco grabado en múltiples ángulos, puede cambiar el ángulo de visión de la escena. ANGLE durante la 1 Presione reproducción.
Ajuste de restricciones para menores Algunos discos están especificados como inapropiados para niños. Puede restringir la reproducción de tales discos en la unidad.
Deshabilitación temporal del nivel de rating (clasificación) del disco DVD Dependiendo del disco DVD, el disco puede tratar de cancelar temporalmente el nivel de rating que haya ajustado. Depende de usted si decide cancelar el nivel de la rating o no. Preparación: • ENCIENDA el TV y ajústelo en el modo de entrada de video. • Presione VCR/DVD para seleccionar el modo DVD. (El indicador DVD se iluminará.) el disco DVD y 1 Introduzca presione PLAY o OPEN/CLOSE OPEN/ CLOSE EJECT en la unidad (ver pág. 35).
Selección del idioma del menú Se puede seleccionar el idioma de los mensajes del menú de disco de los DVD. POWER OPEN/ CLOSE EJECT 1 2 3 4 5 6 7 8 9 Preparación: • ENCIENDA el TV y ajústelo en el modo de entrada de video. • Presione VCR/DVD para seleccionar el modo DVD. (El indicador DVD se iluminará.) SETUP en el modo de 1 Presione parada o no hay disco. VCR/DVD DISPLAY/CALL Presione o Language.
Selección del idioma de los subtítulos POWER OPEN/ CLOSE EJECT 1 2 3 4 5 6 7 8 9 Preparación: • ENCIENDA el TV y ajústelo en el modo de entrada de video. • Presione VCR/DVD para seleccionar el modo DVD. (El indicador DVD se iluminará.) SETUP en el modo de 1 Presione parada o no hay disco. VCR/DVD DISPLAY/CALL Language Picture Sound Parental Other Presione o para seleccionar Language.
Selección del idioma de la pista de sonido de audio Se puede seleccionar el mismo idioma de la pista de sonido de audio incluso aunque cambie de disco o desconecte el aparato. Preparación: • ENCIENDA el TV y ajústelo en el modo de entrada de video. • A continuación, presione VCR/DVD para seleccionar el modo DVD. (El indicador DVD se iluminará.) Presione SETUP en el modo de 1 parada o no hay disco. POWER Presione o Language.
Ajuste de la relación de aspecto de la pantalla de TV POWER OPEN/ CLOSE EJECT 1 2 3 4 5 6 7 8 9 VCR/DVD DISPLAY/CALL INPUT SELECT/ PROGRESSIVE Preparación: • ENCIENDA el TV y ajústelo en el modo de entrada de video. • Presione VCR/DVD para seleccionar el modo DVD. (El indicador DVD se iluminará.) SETUP en el modo de 1 Presione parada o no hay disco. Language Picture Sound Parental Other Presione o para seleccionar Picture. ESPAÑOL Se puede seleccionar la relación de aspecto para su TV.
Selección de las indicaciones en la pantalla/ Datos del status del Disco Ap arecen o d e s a p a r e c e n la s indicaciones en la pantalla cuando presione los botones DISPLAY. POWER OPEN/ CLOSE EJECT 1 2 3 4 5 6 7 8 9 Preparación: • ENCIENDA el TV y ajústelo en el modo de entrada de video. • Presione VCR/DVD para seleccionar el modo DVD. (El indicador DVD se iluminará.) SETUP en el modo de 1 Presione parada o no hay disco.
Control de la Gama Dinámica POWER 1 OPEN/ CLOSE EJECT 2 3 VCR/DVD DISPLAY/CALL Preparación: • ENCIENDA el TV y ajústelo en el modo de entrada de video. • Presione VCR/DVD para seleccionar el modo DVD. (El indicador DVD se iluminará.) SETUP en el modo de 1 Presione parada. Presione o para Language Picture Sound Parental Other ESPAÑOL El DRC (Control de la Gama Dinámica) le permite controlar la gama dinámica para obtener un sonido conveniente para su equipo. seleccionar “Sonido”.
Exploración progresiva La unidad admite el sistema de exploración progresiva, además del sistema convencional de exploración entrelazada. Si su televisor cuenta con tomas de componentes que admiten la entrada de vídeo progresivo, podrá disfrutar de imágenes de gran calidad activando el modo de exploración progresiva. Preparación: • Conecte la unidad a un televisor con tomas de componentes. • Encienda el televisor y seleccione el modo correspondiente de entrada de vídeo.
Lista de códigos de idiomas Entre el número de código apropiado para los ajustes iniciales “AUDIO”, “SUB TITLE” y/o “MENU LANGUAGE” (consulte las páginas 46-48).
Problemas y localización de averías Utilice la siguiente lista de verificación de localización de averías cuando tiene problemas con este aparato. Consulte con su concesionario local o tienda de servicio si continúan los problemas. Compruebe que se han hecho correctamente todas las conexiones cuando utilice con otros aparatos. SINTOMA POSIBLE SOLUCION Página DVD/VCR • Verifique que el cable de alimentación esté conectado. 5 • Pruebe con otro tomacorriente de CA.
Problemas y localización de averías / Limpieza de la cabeza de video Página POSIBLE SOLUCION 16 No se ve la imagen en 4:3 (16:9). 52 • El ajuste no corresponde al de su TV. 49 No hay indicaciones en la pantalla. • Seleccione Display On. 50 ESPAÑOL SINTOMA No se ve la imagen, o la pantalla • El sector S-VIDEO/COMPONENT no está ajustado está borrosa o dividida en dos partes. correctamente.
Especificaciones GENERALIDADES Fuente de alimentación: Consumo de energía: 120 V CA, 60 Hz Operation: 18 Vatios Stand by: 2 Vatios 7,9 libras (3,6 kg) Anchura : 16-15/16 pulgadas (430 mm) Altura : 3-7/8 pulgadas (99 mm) Profundidad : 9-15/16 pulgadas (253 mm) Peso: Dimensiones: Entradas/Salidas: Entrada de video: Salida de video: Entrada de audio: Salida de audio: Antena: Respuesta de frecuencia Hi-Fi: Gama dineámica de Hi-Fi: VCR Video cabezas: Pistas de audio: 1 Vp-p/75 ohmios 1 Vp-p/75 ohmios –8 dBm/5