
Instructions / Assembly
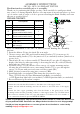

"F"
LONG TUBE
"D"
DIFFUSER
"B" DUAL
SHADE
" "
" "
" " WIRE
CONNECTORS
"C"
SOCKET ASSEMBLY
"F"
LONG TUBE
"F"
LONG TUBE
"E"
SHORT TUBE
"DD"
CANOPY NUTS
" "
"E"
SHORT TUBE
"G"
SWIRL JOINT
ASSEMBLY INSTRUCTIONS
SKU NO.: HCF-1310 PENDANT FIXTURE
Read instruction carefully prior to assembly
Thank you for purchasing this quality product. Check carefully for small parts which
may come loose during shipment. Remove all components from pack and place top down
on soft surface such as carpet or cloth to prevent scratching the finish. Identify and count
all
parts as specified below.
PACKAGE CONTENTS
It is recommended to use two or more persons during the assembly
process.
1. Insert the diffuser (D) into the shade (B) at an angle.
2. Unscrew canopy nuts (DD) and detach mounting bracket (CC) from canopy (A).
Attach mounting bracket (CC)to the junction box (not included) with two junction box
screws (AA).
3. Thread tube (E) onto socket assembly (F).Thread tube(F) onto tube (E).Adjust the
height of the lamp by either increasing or decreasing the tube (E) or tube(F).Finally
thread tube into swirl joint (G).
4. Assemble canopy (A) onto the tube. Place canopy (A) against mounting surface,
allowing the preassembled screws on mounting bracket (CC) to pass through the
canopy (A). Secure with previously removed canopy nuts (DD)
5. Make electrical connections using wire connectors (BB)
6: Install light bulbs (not included).This fixture has been rated for up to
Three (3) E26 Socket 60-Watts Maximum Light Bulbs (not included)
or CFL Equivalent light bulbs (not included) or LED Equivalent bulbs (not included).
7. Restore Electrical power when complete.
Thanks for your purchase. Any questions please don’t hesitate to contact us, we'll resolve
all your problem ASAP. Customers are always the best teachers for us to keep growing!
Should you have any questions or concerns, please do not hesitate to contact us by
emailing: help@cs-supportpro.com.
Part
Description
Quantity
A
Canopy
1
B
Dual Shade
1
C
Socket Assembly
(Preassembled with shade)
1
D
Diffuser
(Preassembled with shade)
1
E
Short Tube
2
F
Long Tube
3
G
Swirl Joint (Preassembled
with canopy)
1
CAUTION! IMPORTANT SAFETY INSTRUCTIONS:
Connect the cord with the ribbed surface to the white wire of the supply circuit.
Connect the half with the markings and smooth surface to the black wire of the supply
circuit.
Connect the bare copper grounding wire from the fixture to the green screw on the
mounting bracket and the grounding conductor of the supply circuit. Use U.L/CSA Listed
wire connectors suitable for the size, type and number of conductors. No loose strands or
loose connections should be present. MADE IN CHINA