
User Manual


ENGLISH en
9
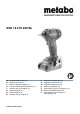
7 Setting wheel for preselecting rotational speed
and tightening torque
8 Battery pack *
9 Battery pack release button
10 Capacity indicator button *
11 Capacity and signal indicator *
12 Belt hook (attach as shown) *
* depending on the features / model
Remove the battery pack from the machine
before any adjustment or maintenance is
carried out. Before fitting the battery pack, make
sure that the machine is switched off.
6.1 Battery pack
Charge the battery pack before use (8).
If performance diminishes, recharge the battery
pack.
The ideal storage temperature is between 10°C and
30°C.
"Li-Power, LiHD" li-ion battery packs have a
capacity and signal indicator: (11)
- Press the button (10), the LEDs indicate the
charge level.
- If one LED is flashing, the battery pack is almost
flat and must be recharged.
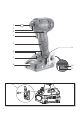
Removal:
Press the battery pack release (9) button and pull
the battery pack (8) forwards
.
Inserting:
Slide in the battery pack (8) until it engages.
6.2 Setting the direction of rotation, engag-
ing the transporting safety device
(switch-on lock)
Do not actuate the rotation selector switch or
engage the transportation lock (3) unless the
motor has stopped completely!
Actuate the rotation selector switch / Engage the
transportation lock (3)
R = Right rotation set
(insert screws)
L = Left rotation set
(remove screws)
0 = Central position: transportation lock setting
(switch-on lock)
6.3 Switching on and off
Switching on: press the trigger switch (4).
Switching off: release the trigger switch (4).
6.4 Speed / tightening torque
The speed and tightening torque are connected
directly. The lower the speed, the lower the
tightening torque.
The tightening torque is influenced in two ways:
1) Preselect operating mode/desired
tightening
torque at the setting wheel (7):
= max. tightening torque (power mode)
= adjustable tightening torque
= especially for self-cutting screws: at the
beginning high speed (for drilling) and later low
speed (for tightening the screw).
2) Stepless adjustment of the tightening torque:
The speed and tightening torque can be adjusted
steplessly in any position of the setting wheel by
pressing the trigger (4) firmly or lightly, thus
adapting to working conditions.
Recommendation: determine the correct setting
by carrying out trial screwdriving.
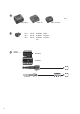
6.5
Changing screwdriving bit
for
SSD...
Inserting screwdriving bit: Slide locking sleeve
(2) forward and insert screwdriving bit as far as the
stop. Release locking sleeve (2).
Pull on the screwdriver bit to check that it is
correctly seated.
Removing screwdriving bit: Slide locking sleeve
(2) forward and remove screwdriving bit.
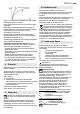
Only use screwdriving bits with such plug-in
ends:
The screwdriving bit used must match the
screw.
Damaged screwdriving bits must not be used.
Mount the machine on the screw, ensuring it is
aligned straight.
The screwdriving process has two elements:
inserting the screw and
tightening the screw with the percussion mech-
anism.
The tightening torque depends on the impact dura-
tion.
With an impact duration of approx. 5 seconds, the
maximum tightening torque has been reached.
6. Initial Operation/Setting
7. Use
P
.
.
.
9,5 mm (3/8“)