
Instructions / Assembly

1
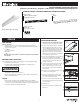
PACKAGING CONTENTS / CONTENU DE L’EMBALLAGE / CONTENIDO DEL PAQUETE
Instruction Manual/Instrucciones/Directives
Questions?/ Des questions?/ ¿Preguntas? 1-800-334-6871 ConsumerProducts@cooperlighting.com
INSTALLATION INSTRUCTIONS
1. Turn off the power at the main fuse/breaker box.
Carefully open carton, remove fixture from carton.
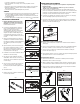
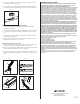
2. To remove the lens from the luminaire, start at one
end of the fixture by pushing down on the lens in
the center. While pressing down on the lens, gently
slide the lens toward the end being pressed down
(Fig. 1). There is a tab that the lens has to slide
underneath to allow it to be removed (Fig. 2). The
opposite end of the lens will then be clear from the
housing and the lens can be removed.
3. Remove the screw holding the access plate, detach
the access plate from the housing and gently
bring the wires sticking outside of the fixture to the
inside of the fixture (Fig. 3) (Do not pull the wires
out of the access plate).
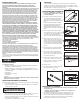
4. Locate the electrical junction box on the mounting
surface and place fixture so the oval hole on the
fixture is centered over the junction box. Feed the
power supply wires from junction box through the
oval hole (Fig. 4).
5. Using the holes at the middle of the fixture, fasten
the fixture to the mounting surface.
6. Connect all of the fixture wires to power supply
wires: White to White, Black to Black, and Yellow/
Green to Green with wire nuts (Fig. 5).
7. After all connections are made push all wires and
wire nuts back inside junction box, then reinstall the
access plate (Fig. 6).
8. Reinstall the lens.
9. Turn breaker on and energize the fixture to verify
light turns on.
ITEMS REQUIRED
(Purchase separately)
• Stud mount (2) 1 1/2 in. long #8 or larger wood screws and a #10 flat washer
• Drywall mount (2) 3 in. long 3/16” or larger diameter toggle bolt and #10 flat washer
(if joist cannot be located)
• Screwdriver
• Safety Glasses & Gloves
• Wire Cutters
• Ladder
Note: This product is not intended for continuous row applications. Suspension kits
sold separately.
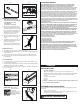
IMPORTANT SAFETY INSTRUCTIONS
When using product, basic precautions should always be followed, including the following:
• Read and follow these instructions.
• Heed all warnings, including below warnings AND those included on product.
• Save these instructions and warnings.
• Risk of fire/electric shock.
• Ground fixture to avoid potential electric shock.
• Turn off the power at fuse or circuit breaker box before installation and maintenance.
• Edges may cut. Handle with care.
CAUTION
• Fixture should be installed by persons with wiring experience or by a qualified
electrician. The electrical system, and the method of electrically connecting the fixture
to it, must be in accordance with the National Electrical Code and local building codes.
• Knockouts not intended for use with flexible conduit.
ENGLISH
A. Fixture housing
Boîtier de l’appareil d’éclairage
Alojamiento del accesorio
B. Lens
Panneau
Lente
Utility Wrap Light WP Series
WARNING
Slide the Lens
Towards End
Step 2:
Step 1:
Push down
center of the lens
Fig. 1
C. (3) Wire connectors
(3) Serre-fils
(3) Conectores de cable
Push & Slide Lens
Under Tab
Fig. 2
Fig. 3
Fig. 4
Wire Access Hole