CD-3000 Series Operator’s Guide
CD-3706/P CD-3000 SeriesOperator’s Operator’sGuide Guide Document Document Revision: Revision: 030501.1 100102 Copyright Notice Copyright ©1996-2002 by MediaFORM, Inc. All rights reserved. This manual and the accompanying illustrations may not be copied, reproduced, electronically transmitted, or translated into another language, in whole, or in part, without the written consent of MediaFORM, Inc.
CD-3706/P CD-3000 SeriesOperator’s Operator’sGuide Guide Document Document Revision: Revision: 030501.1 100102 End User License Agreement • You have acquired a device (“3000 Series CD-R/RW duplicator”) that includes software licensed by MediaFORM from Microsoft Licensing Inc. or its affiliates (“MS”).
CD-3706/P CD-3000 SeriesOperator’s Operator’sGuide Guide Document Document Revision: Revision: 030501.1 100102 Table of Contents ABOUT MEDIAFORM, INC. ................................................................................................................................... 4 WHAT TO EXPECT FROM YOUR MEDIAFORM CD DUPLICATOR .............................................................................. 4 ABOUT THIS MANUAL .............................................................................
CD-3706/P CD-3000 SeriesOperator’s Operator’sGuide Guide Document Document Revision: Revision: 030501.1 100102 About MediaFORM, Inc. Thank you for purchasing MediaFORM’s CD-3000 standalone autoloading CD duplicator. MediaFORM manufactures a wide variety of CD duplication equipment. This includes manual and fully automatic CD and DVD duplicators, and printers. We hope you will consider us for all of your duplication needs.
CD-3706/P CD-3000 SeriesOperator’s Operator’sGuide Guide Document Document Revision: Revision: 030501.1 100102 Getting Started Carefully remove the CD-3000 CD duplicator from the shipping container. Inspect the contents, and verify them against the packing slip. Report any errors in shipping as soon as possible.
CD-3706/P CD-3000 SeriesOperator’s Operator’sGuide Guide Document Document Revision: Revision: 030501.1 100102 The Best Place To Put The CD-3000 The best operating location for the CD-3000 CD duplicator is in a climatecontrolled area, free of dirt, dust, humidity, excessive heat, and electronic or electromagnetic interference. Room temperature should be between 65 and 75 degrees Fahrenheit, or between 18 and 23 degrees Celsius.
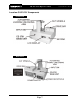
CD-3706/P CD-3000 SeriesOperator’s Operator’sGuide Guide Location Of CD-3701 Components Front View Rear View Page 7 Document Document Revision: Revision: 030501.
CD-3706/P CD-3000 SeriesOperator’s Operator’sGuide Guide Location Of CD-3702 Components Front View Rear View Page 8 Document Document Revision: Revision: 030501.
CD-3706/P CD-3000 SeriesOperator’s Operator’sGuide Guide Location Of CD-3703 Components Front View Rear View Page 9 Document Document Revision: Revision: 030501.
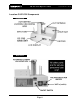
CD-3706/P CD-3000 SeriesOperator’s Operator’sGuide Guide Document Document Revision: Revision: 030501.1 100102 Location Of CD-R/RW Recorder Parts And Controls LCD Display Screen And Keypad SmartDRIVE 40X Legend 1. Disc tray - Discs are loaded and removed from this tray. Pressing the eject button will open the tray when the power is switched on to the 3000 Series. 2.
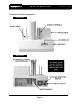
CD-3706/P CD-3000 SeriesOperator’s Operator’sGuide Guide Document Document Revision: Revision: 030501.1 100102 Removing Packing Restraints The CD-3000 ships with a picker arm restraint to reduce the possibility of damage in transit. This restraint must be removed before operation or power-on. Gently remove the foam tube from around the transfer arm. Save the foam tube, as you will need to return it to its place when transporting the unit in the future.
CD-3706/P CD-3000 SeriesOperator’s Operator’sGuide Guide Document Document Revision: Revision: 030501.1 100102 System Startup Before duplicating can begin it is necessary to review a few details. • Plug one end of the supplied power cord into the upper receptacle at the rear of the unit. • Next, verify that the voltage selector switch is set correctly. It is located between the two power receptacles. The CD-3000 supports both 115 VAC and 230 VAC at 50 ~ 60 Hz.
CD-3706/P CD-3000 SeriesOperator’s Operator’sGuide Guide Document Document Revision: Revision: 030501.1 100102 • Make sure you power on the unit using the switch seen below, which is located on the back of the CD-3000. • Once the proper voltage setting has been confirmed, it is time to turn on the unit. The power switch is located at the back of the unit, next to the AC power input. Wait a minute or two while the system starts up. The screen will now read: MF I N C .
CD-3706/P CD-3000 SeriesOperator’s Operator’sGuide Guide Document Document Revision: Revision: 030501.1 100102 Loading A Disc • After the CD-3000’s power has been switched on, press the eject button on the front of the recorder to open its disc tray. • Load by carefully placing the disc (label side up) into the recessed area of the disc tray, so that the disc lays flat. • Press the eject button on the front of the recorder to close the disc tray.
CD-3706/P CD-3000 SeriesOperator’s Operator’sGuide Guide Document Document Revision: Revision: 030501.1 100102 General Operation In addition to Relay Mode copying, the 3000 Series is extremely versatile and offers many useful and powerful features. Function Keys Various uses for the 3000 Series will be explained throughout this Operator’s Guide. The following section explains the purpose of the function keys.
CD-3706/P CD-3000 SeriesOperator’s Operator’sGuide Guide Document Document Revision: Revision: 030501.1 100102 The size, creation date and time of all the hard disk images stored in the 3000 Series are displayed in sequence. If the Multiple Images feature is “disabled”, the size of the current hard disk image is displayed. VERI F Y SYST EM AF T E R COP Y OP T I ONS This displays the Verify After status of the 3000 Series.
CD-3706/P CD-3000 SeriesOperator’s Operator’sGuide Guide Document Document Revision: Revision: 030501.1 100102 1 = MU L T I P L E I MA G E S S E L E CT OP T I ON The factory setting for this function is disabled. When enabled, the Multiple Images feature allows up to four images to be stored on the hard disk drive at one time. This setting will remain in effect until disabled, even after restarting the 3000 Series.
CD-3706/P CD-3000 SeriesOperator’s Operator’sGuide Guide Document Document Revision: Revision: 030501.1 100102 • Press the “STOP/NO” key to exit • Press the “5” key on the keypad. The screen will now read: S T A R T I MP O R T I N G A U D I O ? [ S T OP ] = NO [ S T ART ] = Y E S • By using the Audio Track Import feature, audio compilation discs can be created one track at a time from one or more masters. • Manually place an audio master disc into drive number 1.
CD-3706/P CD-3000 SeriesOperator’s Operator’sGuide Guide RE AD Document Document Revision: Revision: 030501.1 100102 WA T E R M A R K ? The watermark is a unique electronic fingerprint. These fingerprints allow discs to be traced back to the specific unit and even to the recorder that wrote them. Watermarks are useful ways of dealing with unauthorized copying, authenticating discs as well as helping to diagnose copying problems. • Press the “START/YES” key to read the watermark..
CD-3706/P CD-3000 SeriesOperator’s Operator’sGuide Guide Document Document Revision: Revision: 030501.1 100102 • Press the “8” key on the keypad. The screen will now read: S E L E CT RE CORDI NG S P E E D [ 0 ] =1 6 X [ 1 ] =2 4 X [ 2 ] =4 0 X • The factory setting for this function is “40x”. When selected the Select Recording Speed feature allows you to set the copying speed as determined by the capabilities of the recorders installed in the 3000 Series.
CD-3706/P CD-3000 SeriesOperator’s Operator’sGuide Guide Document Document Revision: Revision: 030501.1 100102 Creating A Hard Disk Image The CD-3000 comes equipped with an internal hard disk drive, which can be used to store copies of master discs for later recording or comparing. Each master is saved as a single image file. Up to four images can be stored on the hard disk at one time. A hard disk image is useful as a convenient way of copying standard master discs.
CD-3706/P CD-3000 SeriesOperator’s Operator’sGuide Guide Document Document Revision: Revision: 030501.1 100102 WA I T I N G F O R D R I V E S R E A D Y GOOD: 0 BAD: 0 OF : 0 RE AD GOOD: 0 7 5 % BAD: 0 OF : 0 MA S T E R A R C H I V E D O K GOOD: 0 BAD: 0 OF : 0 ARCHI V E OK, PRESS ST ART GOOD: 0 BAD: 0 OF : 0 The master disc is now stored as an image on the hard disk Note: If discs failed to copy properly they will be dropped in the reject area in front of the drive bay. These discs should not be used.
CD-3706/P CD-3000 SeriesOperator’s Operator’sGuide Guide Document Document Revision: Revision: 030501.1 100102 Creating Multiple Hard Disk Images The Multiple Images feature allows the CD-3000’s internal hard disk to store up to four master disc images. The factory setting for this function is “disabled”. To enable it, and create multiple image files, proceed as follows: • From the main operating screen depicted below: SEL ECT COP Y OR C O MP A R E • Press the “2” key.
CD-3706/P CD-3000 SeriesOperator’s Operator’sGuide Guide Document Document Revision: Revision: 030501.1 100102 • Press the “START/YES” key. The screen will now read: I MA G E A = [ 1 ] B= [ 2 ] S E L E C T I MA G E C= [ 3 ] • Select the number that will designate the location of your master. The screen will then read in sequence: L OADI NG MA S T E R . . . .
CD-3706/P CD-3000 SeriesOperator’s Operator’sGuide Guide Document Document Revision: Revision: 030501.
CD-3706/P CD-3000 SeriesOperator’s Operator’sGuide Guide Document Document Revision: Revision: 030501.1 100102 Copying From A Hard Disk Image After a hard disk image has been created, it can be used as the copying master source. If you have not already created a hard disk image, do so now, as described in the previous section. Multiple Images Disabled To make copies from a hard disk image that was previously created with the Multiple Images feature “disabled” (i.e.
CD-3706/P CD-3000 SeriesOperator’s Operator’sGuide Guide Document Document Revision: Revision: 030501.1 100102 Note: If discs failed to copy properly they will be dropped in the reject area in front of the drive bay. These discs should not be used. To help you determine the nature of the problem, error messages can be displayed by pressing the “9” key on the keypad.
CD-3706/P CD-3000 SeriesOperator’s Operator’sGuide Guide Document Document Revision: Revision: 030501.1 100102 • Press the “START/YES” key, and you will be returned to the main operating screen: SEL ECT COP Y OR C O MP A R E Note: If discs failed to copy properly they will be dropped in the reject area in front of the drive bay. These discs should not be used. To help you determine the nature of the problem, error messages can be displayed by pressing the “9” key on the keypad.
CD-3706/P CD-3000 SeriesOperator’s Operator’sGuide Guide Document Document Revision: Revision: 030501.1 100102 Comparing From A Hard Disk Image For quality control purposes, the CD-3000 is equipped with powerful verification capabilities. Copied discs can also be compared against hard disk images. This feature ensures copying integrity. Note: Due to the nature of the various compact disc formats, only CD-ROM Mode 1, CD-ROM Mode 2, CD-ROM XA Mode 2 Form 1, and most CD formats can be compared.
CD-3706/P CD-3000 SeriesOperator’s Operator’sGuide Guide SEL ECT COP Y OR Document Document Revision: Revision: 030501.1 100102 C O MP A R E Note: If discs failed to copy properly they will be dropped in the reject area in front of the drive bay. These discs should not be used. To help you determine the nature of the problem, error messages can be displayed by pressing the “9” key on the keypad.
CD-3706/P CD-3000 SeriesOperator’s Operator’sGuide Guide Document Document Revision: Revision: 030501.1 100102 C O MP A R E O K , P R E S S S T A R T GOOD: 0 BAD: 0 OF : 0 • Press the “START/YES” key, and you will be returned to the main operating screen: SEL ECT COP Y OR C O MP A R E Note: If discs failed to copy properly they will be dropped in the reject area in front of the drive bay. These discs should not be used.
CD-3706/P CD-3000 SeriesOperator’s Operator’sGuide Guide Document Document Revision: Revision: 030501.1 100102 Viewing SCSI Device Information To view the CD-3000 SCSI device information, the steps are as follows: • From the main operating screen depicted below: SEL ECT COP Y OR C O MP A R E • Press the “6” key. Something similar to the following will be displayed on the screen: 1 ( 1 , 1 ) GE NE RI C CRD- BP 1 7 V: 1 .
CD-3706/P CD-3000 SeriesOperator’s Operator’sGuide Guide Document Document Revision: Revision: 030501.1 100102 Working With CD-ReWritable (CD-RW) Discs In addition to working with CD-Recordable (CD-R) discs, the CD-3000 can also copy both to and from CD-ReWritable (CD-RW) discs. CD-R discs are write-once and can be read on any CD audio player, CD-ROM, and MultiRead CD-ROM drive.
CD-3706/P CD-3000 SeriesOperator’s Operator’sGuide Guide Document Document Revision: Revision: 030501.1 100102 Setting The Internal Clock The CD-3000’s internal clock is set at the factory for Eastern Standard Time (observing daylight savings when applicable). To set the internal clock, the steps are as follows: • Press the “7” key on the keypad. The screen will now read: CL E AR HD? Press the “STOP/NO” and you will be prompted to set the “System Time.
CD-3706/P CD-3000 SeriesOperator’s Operator’sGuide Guide Document Document Revision: Revision: 030501.1 100102 Firmware Updates From time to time the CD-3000’s internal “firmware” may need updating to add new features or improve existing functions. Firmware is easily updated by loading a “Firmware Update CD” into the system. The latest version of firmware will be available for downloading to your computer from the MediaFORM web site: www.mediaform.
CD-3706/P CD-3000 SeriesOperator’s Operator’sGuide Guide F I R M WA R E UP GRADE OK • You will then be returned to the main operating screen: SEL ECT COP Y OR Page 36 C O MP A R E Document Document Revision: Revision: 030501.
CD-3706/P CD-3000 SeriesOperator’s Operator’sGuide Guide Document Document Revision: Revision: 030501.1 100102 System Startup • Turn on the power to the CD-3000. Wait a minute or two while the system starts up. The screen will now read: MF I N C . D U P L I C A T I O N MA D E EASY Once complete, the main operating screen is displayed on the screen: SEL ECT COP Y OR C O MP A R E • Turn on the power to the PC and the computer will recognize the CD3000’s CD-R/RW recorders as valid devices.
CD-3706/P CD-3000 SeriesOperator’s Operator’sGuide Guide Document Document Revision: Revision: 030501.1 100102 Appendix A: Supported Formats Originally designed for audio use, the Compact Disc (CD) evolved quickly and now employs a wide variety of formats for audio, data, and multimedia applications. The following is a list of the most popular formats currently supported by the CD-3000. Periodic firmware updates will be made available to deal with new formats as they appear.
CD-3706/P CD-3000 SeriesOperator’s Operator’sGuide Guide CD-3000 Supported Formats CD-ROM Mode 1 CD-ROM XA Mode 2 (form 1, form 2) Photo CD (single and multi session) CD-DA CD-Extra (CD PLUS) CD-R CD-RW *High-Speed CD-RW is not supported to write Page 39 Document Document Revision: Revision: 030501.