D CLIENT for DIRECTOR/DIRECTOR PRO Series Publishing System Operator’s Guide
D CLIENT for MF Digital Director/Director Pro Series Revised 05312006 The DIRECTOR/DIRECTOR PRO is a state-of-the-art CD/DVD publishing system and duplicator. It is designed to create, duplicate and verify most standard compact disc formats. This startup section will guide you through starting and configuring the DIRECTOR/DIRECTOR PRO application.
D CLIENT for MF Digital Director/Director Pro Series Revised 05312006 D CLIENT Application Layout The D CLIENT application is organized into a sequence of five pages accessible by tabs at the top of the screen • Status • Data Image Editor • Audio Image Editor • Label Editor • Audio Extractor By completing information on these pages you control the actions of the DIRECTOR/DIRECTOR PRO to create, duplicate and verify CD/DVDs as well as print disc labels.
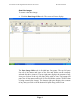
D CLIENT for MF Digital Director/Director Pro Series Revised 05312006 Data Disc Images To create a data disc image: • Click the Data Image Editor tab. The screen will now display: The Data Image Editor tab is divided into four panes. The top left pane lists all of the names and icons of the files and folders on the currently selected disk drive (source). The top right pane displays the contents of any item you click on in the top left pane along with its icon.
D CLIENT for MF Digital Director/Director Pro Series Revised 05312006 Data Image Editor Toolbar Horizontally at the top of the panes, which contains eight buttons: New Open, Save, Properties, Disc Capacity, CD/DVD, DVD, Wildcard. Data Image Editor Toolbar: New Folder Creates a new volume. Open Opens an existing folder on the disc image. Save Saves files or folders.
D CLIENT for MF Digital Director/Director Pro Series Revised 05312006 Static And Dynamic Content The DIRECTOR/DIRECTOR PRO allows CD/DVDs to be created from both static and dynamic content. A finished CD/DVD created from static content will contain the exact files and folders that are specified when the disc image is created.
D CLIENT for MF Digital Director/Director Pro Series Revised 05312006 Adding Files And Folders • Click the desired file or folder in the top left or right pane (source) and hold down the mouse button. • Drag the file or folder over the CD/DVD icon in the lower right then release the mouse button • Files and folders can also be added to the disc image using the Open button. A box appears choose the image and click he Open button the image will be added.
D CLIENT for MF Digital Director/Director Pro Series Revised 05312006 Saving The Current Disc Image File Once a data disc image has been created, it must be saved for the DIRECTOR/DIRECTOR PRO to use it as a data source for recording. Disc images can either be saved as script files (with an “ISC” extension) or physical image files (with an “ISO” extension). A script file (ISC) contains pointers to the source data files and is used as a guide at the time of recording the CD/DVD.
D CLIENT for MF Digital Director/Director Pro Series Revised 05312006 To save a data disc image script file: • Click the Save button on the toolbar. The screen will now display: The file will automatically be saved with the .isc extension.
D CLIENT for MF Digital Director/Director Pro Series Revised 05312006 • Click the OK button. The screen will now display: • Select the volume and directory where you want to save the script file. • Enter the name for the script file and click the Save button. To save a disc physical image file: • Click the Save button on the toolbar. The screen will now display: • Select the volume and directory where you want to save the image file. • Enter the name for the image file.
D CLIENT for MF Digital Director/Director Pro Series Revised 05312006 Volume Properties Volume Label Enter the name you want to call the CD/DVD. Publisher Enter the name of the publisher. Data Preparer Enter the name of the person who prepared the CD/DVD. Copyright File Enter the file name that provides copyright information about the CD/DVD. Abstract File Enter the file name that describes the contents of the CD/DVD.
D CLIENT for MF Digital Director/Director Pro Series Revised 05312006 Loading An Existing Script File Once a data disc image script file has been saved it can be modified at a later date. To load an existing script file: • Click the Load Script button on the toolbar. The screen will now display: • Select the appropriate file and click the Open button.
D CLIENT for MF Digital Director/Director Pro Series Revised 05312006 Creating Disc Labels The DIRECTOR/DIRECTOR PRO’s built-in label design software provides a quick and easy way to create simple disc labels that contain text and graphics. More sophisticated labels can be created by using the provided software included with the your printer. To use the DIRECTOR/DIRECTOR PRO’s built-in label design software: • Click the Label Editor tab.
D CLIENT for MF Digital Director/Director Pro Series Revised 05312006 Label Editor Menu Bar Horizontally along the top of the Label Editor window is the menu bar, as depicted below: The menu bar contains eight buttons: New, Open, Save, Cut, Select Font, Point Mode, Text Mode and Import Picture. Label Menu Buttons: New Creates a new disc label. Open Opens an existing disc label file (*.LBL). Save Saves the current disc label.
D CLIENT for MF Digital Director/Director Pro Series Revised 05312006 Creating Text Using the Text Mode tool, you can create horizontal text anywhere on your disc label. In addition, once the text has been entered it can be repositioned and its font and other attributes changed. To create text: • Click the Text Mode button on the toolbar. • Click where you want the type to begin. • Enter the text you want.
D CLIENT for MF Digital Director/Director Pro Series Revised 05312006 • To change the text that you previously typed in, edit the contents of the text box. • To change the font, style, size or color, click the Select Font button. The screen will now display: • After making the changes click the OK button. • Click the OK button. Importing Graphics Using the Import Picture tool, you can place graphics created using other software anywhere on your disc label.
D CLIENT for MF Digital Director/Director Pro Series Revised 05312006 Resizing Graphics To proportionally resize a graphic image after it has been imported: • Click the Point button on the toolbar. • Click the graphic image you wish to resize. A bounding box will appear around the image with eight solid squares (handles). • Click and drag the appropriate handle until the image is the correct size and release the mouse button.
D CLIENT for MF Digital Director/Director Pro Series Revised 05312006 • You may center text horizontally only. You may choose to center graphics horizontally, vertically, or both. Clicking on the “Center” popup menu option centers the graphic horizontally and vertically.
D CLIENT for MF Digital Director/Director Pro Series Revised 05312006 Deleting Text, Graphics And Dates To delete a piece of text, a graphic image or a date field after it has been created or imported: • Click the Point Mode button on the tool bar. • Click the piece of text or graphic image you wish to delete. • Click the Delete button on the menu bar or press the DELETE key on the keyboard.
D CLIENT for MF Digital Director/Director Pro Series Revised 05312006 Opening Existing Disc Labels Once a disc label has been saved it can be modified at a later date. To open an existing disc label file: • Click the Open button on the menu bar. • Select the appropriate file and click the Open button.
D CLIENT for MF Digital Director/Director Pro Series Revised 05312006 Utilizing .PDF Files for Printing (Command Module Client Only) MF Digital Duplication Systems now allows you to create your Disc labels using the popular Adobe Acrobat File, PDF for printing. To make this process simple, MF Digital has created PDF templates for you to design your artwork on. These templates are located on our tech support page. http://www.mfdigital.com/techsupport.
D CLIENT for MF Digital Director/Director Pro Series Revised 05312006 Utilizing .PDF Files for Printing – Command Module Only • • • After you lay out your design, the template layer needs to be “turned off”. This simply done by using the layers palette. (red square, Fig. D) You’ll notice to the left of each layer is an eye. Clicking the eye will turn that layer off. Notice the template now disappears. Fig.
D CLIENT for MF Digital Director/Director Pro Series Revised 05312006 Audio Disc Images The DIRECTOR/DIRECTOR PRO creates industry standard audio (Red Book) CD/DVDs from scratch that can be played on any home, car or portable compact disc audio player or computer CD/DVD or DVD-ROM drive. Audio tracks are created using any combination of 44.1 kHz, 16 bit stereo WAV or MP3 files. To create an audio disc image: • Click the Audio Image Editor.
D CLIENT for MF Digital Director/Director Pro Series Revised 05312006 The Audio Image Editor tab is divided into three panes. The top left pane lists all the names and icons of the disk drives available to the DIRECTOR/DIRECTOR PRO, as well as files and folders on the currently selected disk drive (source). The top right pane displays the contents of any item you click on in the top left pane along with its icon.
D CLIENT for MF Digital Director/Director Pro Series Revised 05312006 Adding Tracks • As depicted below, drag one or more WAV / MP3 files onto the text. Multiple files may be selected by pressing and holding down the SHIFT or CTRL key while clicking on the tracks. SHIFT allows you to select a range of contiguous tracks, while CTRL allows you to randomly pick multiple tracks. As additional tracks are added, drag and drop them in at the desired insertion point.
D CLIENT for MF Digital Director/Director Pro Series Revised 05312006 Editing A Track • Right click the track to be edited. The screen will now display: The right hand buttons have the following options: • Play Selection • Set IN Point • Set OUT Point • Remove Subindex These options allow custom changes to the tracks. Choosing OK sets the changes and Cancel cancels the changes.
D CLIENT for MF Digital Director/Director Pro Series Revised 05312006 Changing ISRC Codes and Copy Prohibit Flags Note: DIRECTOR/DIRECTOR PRO systems equipped with Pioneer DVD-R drives do not support MF Digital SmartDRIVE features. The INTERNATIONAL STANDARD RECORDING CODE (ISRC) is an optional 12-character descriptor that identifies a specific track on an audio CD/DVD.
D CLIENT for MF Digital Director/Director Pro Series Revised 05312006 Inserting, Editing And Removing Silence When assembling an audio CD/DVD disc image the DIRECTOR/DIRECTOR PRO application does not insert silences (gaps) between tracks. To insert silence between tracks: • Right click the track that is to be edited. Choose “Edit” on the drop down menu • A pop up screen appears. The Silence option appears in the middle of the screen with a slide control.
D CLIENT for MF Digital Director/Director Pro Series Revised 05312006 • Click the silence indicator you wish to remove in the lower left pane and hold down the mouse button. • Drag the silence indicator over the trashcan in the bottom right of the • WaveMan tab and release the mouse button. • Click the Yes button. Inserting, Editing And Removing Sub-indexes Sub-indexes are markers used by CD/DVD audio players to locate specific points inside an audio track.
D CLIENT for MF Digital Director/Director Pro Series Revised 05312006 • Click the up and down indicators to specify the new location of the subindex (minutes, seconds, frames). • Click the OK button. To remove sub-indexes: • Click the audio track you wish to edit in the lower left pane and its existing sub-indexes will be displayed in the bottom right pane. • Click on the sub-index you want in the bottom right pane and hold down the mouse button.
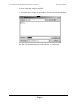
D CLIENT for MF Digital Director/Director Pro Series Revised 05312006 Saving The Current Audio Disc Image Once an audio disc image has been created it must be saved so that it can be used by the DIRECTOR/DIRECTOR PRO as an audio source for recording. Disc images are saved as script files (with an “ISC” extension). To save an audio disc image script file: • Click the Save button on the toolbar. The screen will now display: • Select the volume and directory where you want to save the script file.
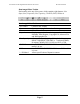
D CLIENT for MF Digital Director/Director Pro Series Revised 05312006 Status Tab Click on Status Tab and the following window will be displayed: Removing A Job To remove a pending job from the queue so that it will not be produced: • Click the job you wish to remove in the JOB QUEUE window. • Click the Remove Job button. Clearing The Completed Jobs List To clear the list of completed jobs: • Click the Clear List button.