en Side By Side Refrigerator Power supply: 115 V Frequency: 60 Hz Capacity: 26.3 cu. ft. Warning: Before using this product, please read this manual carefully and keep it for future reference. The design and specifications are subject to change without prior notice for product improvement. Consult with your dealer or manufacturer for details.
Dear user THANK YOU and CONGRATULATIONS on your purchase of this high-quality Midea product. Your Midea refrigerator is designed for reliable, trouble-free performance. Please take a moment to register your new refrigerator. Register your new refrigerator at www.midea.com under the Support tab. For future reference, record your product model and serial numbers located on the back of the refrigerator above the compressor compartment.
Drip Tray.................................................................................................... 27 WARRANTY ..................................................................................... 38 YOUR SAFETY AND THE SAFETY OF OTHERS ARE VERY IMPORTANT The level of risk is shown by the following indications. WARNING This symbol indicates the possibility of injury or damage to property.
IMPORTANT SAFETY INSTRUCTIONS Refrigerator Safety WARNING GENERAL APPLIANCE SAFETY Operating Requirements • • ELECTRICAL SAFETY Parts and Features • • • • Installation • • • Plug into a grounded 3 prong outlet. Do not remove ground prong. Do not use an adapter. Unplug the power cord by holding the plug, never by pulling the cord. Do not turn the appliance on or off by plugging in or unplugging the power cord. Do not use an extension cord. Unplug the refrigerator before cleaning or defrosting.
USE AND CARE SAFETY • • • • • • • • SERVICE SAFETY Disconnect power before servicing. Flammable refrigerant used. To be repaired only by trained service personnel. Do not puncture refrigerant tubing. Troubleshooting • • Refrigerator Care • Refrigerator Use • Before Use • Installation • Parts and Features • Operating Requirements • Flammable refrigerant used. Follow handling instructions carefully. Risk of fire or explosion due to puncture of refrigerant tubing.
• Refrigerator Safety Operating Requirements • • Parts and Features • Refer all servicing to qualified service personnel. Do not repair or replace any part of this appliance unless specifically recommended in this manual. Servicing is required when the appliance has been damaged in any way, such as the power supply cord or plug is damaged, liquid has been spilled or objects have fallen into the appliance, the appliance has been exposed to rain or moisture, does not operate normally, or has been dropped.
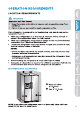
ELECTRICAL REQUIREMENTS Refrigerator Safety WARNING Operating Requirements Electrical Shock Hazard • Plug into a grounded 3 prong outlet. • Do not remove the ground prong from the power cord plug. • Do not use an adapter. • Do not use an extension cord. • Failure to do so can result in death, fire or electrical shock. Parts and Features IMPORTANT: A 115 Volt, 60 Hz., AC only, 15-amp fused, grounded electrical supply is required.
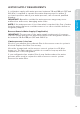
WATER SUPPLY REQUIREMENTS NOTE: If the water pressure is less than what is required, the flow of water from the water dispenser could decrease or ice cubes could be hollow or irregularly shaped. Operating Requirements IMPORTANT: Operation outside the water pressure range may cause malfunction and severe, damaging water leaks. Refrigerator Safety A cold water supply with water pressure between 30 and 100 psi (207 and 689 kPa) is required to operate the water dispenser and ice maker.
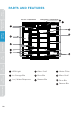
PARTS AND FEATURES Refrigerator Safety Freezer compartment Refrigerator compartment Operating Requirements Parts and Features Installation Before Use Refrigerator Use Refrigerator Care Troubleshooting 10 LED Light Glass Shelf Water Filter Ice Storage Bin Door Bin Glass Shelf Ice / Water Dispenser Drawer Bin Door Bin Drawer Bin
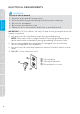
SPECIFICATIONS Width with door open 90° 40.9" (104 cm) Width with door open 130° 61.4" (156 cm) Weight 284 lbs. (129 kg) Power requirements 115 V ~ 60 Hz, 15A minimum requirement Power cord length 66.9" (170 cm) UNPACK IMPORTANT: Remove ALL exterior and interior packing materials including the foam packing between the exterior condenser and the refrigerator cabinet. (ONLY IF NEEDED) WARNING Troubleshooting Electrical Shock Hazard · Disconnect power before removing doors.
REMOVE DOORS Refrigerator Safety IMPORTANT: Keep the refrigerator doors closed until you are ready to lift them from the cabinet. 1. Remove the Freezer bottom hinge cover screws and hinge cover. Operating Requirements Parts and Features 2. Pull out the locking washer from the water pipe connector and the pull out the freezer door water pipe from quick connector. Note: please be noted the fast connector can’t be left at the end of water pipe of door.
6. Using an 8 mm socket wrench, remove the three hinge screws. Ground screw Top hinge Parts and Features NOTE: Provide additional support for the door while the hinge is being removed. Do not depend on the door gasket magnets to hold the door in place while you are working. Operating Requirements Hinge screws Refrigerator Safety 7. Using a Phillips screwdriver, remove the ground screw (left freezer door ). 8. Remove the top left freezer door hinge. door onto a soft surface to protect the finish.
CONNECT TO WATER Refrigerator Safety A cold water supply with water pressure of between 30 and 100 psi (207 and 689 kPa) is required to operate the water dispenser and ice maker. If you have questions about your water pressure, call a licensed, qualified plumber. Operating Requirements IMPORTANT: • Connect only to a drinking (potable) water supply. • Plumbing shall be installed in accordance with the International Plumbing Code and any local codes and ordinances.
3. Using a cordless drill, drill a ПШИ" (6.35 mm) hole in the cold water pipe. 5. Tighten the packing nut. Tighten the pipe clamp screws slowly and evenly so the washer makes a watertight seal. Do not overtighten. g Refrigerator Use Connect to Refrigerator 1. Unplug refrigerator or disconnect power. 2. Close shut-off valve. 4. Remove the plastic cap from the end of the refrigerator water line. a water line b Compression nut c Plastic cap Troubleshooting a Refrigerator Refrigerator Care 3.
Refrigerator Safety 5. Insert the water line directly into the fitting on the end of the refrigerator water line. Tighten the compression nut. Do not overtighten. 6. Confirm connection is secure by gently pulling on the water line. 7. Turn on the water supply to refrigerator and check for leaks. Correct any leaks. Operating Requirements Complete the Installation WARNING Parts and Features Electrical Shock Hazard • Plug into a grounded 3 prong outlet.
Refrigerator Safety INSTALL WATER FILTER REMOVE BYPASS PLUG 1. Turn off the water supply to refrigerator. IMPORTANT: Keep the bypass plug for later use. The ice maker and dispenser will not operate unless either a water filter or the bypass plug is properly installed. Installation 3. Turn the bypass plug counterclockwise, and then pull out to remove. Parts and Features Filter cover Operating Requirements 2. Squeeze the sides of the filter cover where marked, and then pull downward to open the cover.
INSTALL WATER FILTER Refrigerator Safety 4. Remove the water filter from its packaging, and then remove the clear, plastic cap from the filter head. 5. Align the tabs on the filter head with the notches in the opening, and then insert the water filter into the opening. Press inward, while turning the filter clockwise to install. Operating Requirements NOTE: The housing allows the filter to move slightly upward and downward. Parts and Features Water filter Installation Before Use 6.
FLUSH THE WATER SYSTEM 1. Turn on the main water supply. NOTE: Do not dispense the entire 2.5 gallon amount continuously. Depress and release the dispenser pad for cycles of 30 seconds ON and 60 seconds OFF. In some homes, additional flushing may be required. DOOR ALIGNMENT (IF NEEDED) Installation Door alignment or adjustment can be done on side-by-side model refrigerators. Parts and Features 3. Open the refrigerator door to make sure there are no water leaks coming from the water filter.
LEVEL REFRIGERATOR Refrigerator Safety IMPORTANT: Level the refrigerator for proper operation and to avoid cooling, frost and moisture problems that can occur if the doors do not close completely. 1. Move the refrigerator to its final location. See “Move to Final Location.” Operating Requirements 2. Place a carpenter's level on the top of the cabinet to check that the refrigerator is level from side to side and tilted slightly downward toward the back.
REFRIGERATOR USE Refrigerator Safety GENERAL • Operating Requirements • • The storage life of frozen foods varies and the recommended storage time should not be exceeded. Place frozen food into the freezer as quickly as possible after purchase. Do not refreeze frozen foods which have thawed completely. WARNING Parts and Features Electrical Shock Hazard • Plug into a grounded 3 prong outlet. • Do not remove the ground prong from the power cord plug. • Do not use an adapter.
CONTROLS Refrigerator Safety The control panel is located on right side of freezer door. When the refrigerator is first plugged into the electrical outlet, the display will begin to illuminate and scroll; after which the display icons will fully illuminate for 3 seconds and a tone will sound.
TEMPERATURE The temperature of each compartment is adjustable within its specified range. Default temperature setting: 39°F (4°C). The temperature range for the refrigerator compartment is 34°F to 44°F (1°C to 7°C). Default temperature setting: 0°F (-18°C). The temperature range for the freezer compartment is -7°F to 7°F (-22°C to -14°C).
Refrigerator Safety LOCK/UNLOCK CONTROLS To Unlock the Controls: Press and hold will illuminate. for 3 seconds. A tone will sound,and the display Operating Requirements To Lock the Controls: Press and hold for 3 seconds. A tone will sound,and the display NOTE: After 30 seconds, if no control is pressed, the controls will automatically lock. Parts and Features SUPER COOL MODE Press and hold for 3 seconds to enter Super Cool mode,the temperature in the compartment will lower to 34°F (1°C).
ICE MAKER to turn ON/OFF the freezer compartment ice maker. Press When the .!!6!.ŏ% !ŏ) '!. is on, the control will be illuminated. The freezer compartment ice bin is removable for cleaning or emptying when a large amount of cubed ice is needed. To Remove the Ice Bin: 1. Open the freezer door as soon as possible . Parts and Features After emptying and/or cleaning, replace the ice bin immediately.
Refrigerator Safety 7KH GLVSHQVHU FRQWURO LQFRUSRUDWHV EDFNOLW /(' LFRQV WR GHVLJQDWH WKH RSHUDWLQJ PRGH RI WKH GLVSHQVHU 7KHUH DUH WZR GLVSOD\ PRGHV WKDW \RX FDQ FKRRVH EHWZHHQ 6WDQGE\ 0RGH DQG $FWLYH 0RGH
. The Crushed indicator will illuminate. 2. Using your finger or container, press the pad to dispense crushed ice. Operating Requirements Dispensing Crushed Ice 1. Press the Crushed button Refrigerator Safety 7R XVH DV D QLJKW OLJKW RU H[WHQG WKH GXUDWLRQ WKDW WKH GLVSHQVHU OLJKW LV RQ SUHVV DQG KROG :DWHU DQG &XEHG LFRQV WRJHWKHU IRU VHFRQGV 7KH GLVSHQVHU OLJKW ZLOO WXUQ RII DXWRPDWLFDOO\ DIWHU KRXUV 7R WXUQ RII KROG WKH VDPH EXWWRQV DJDLQ IRU VHFRQGV WKH 3.
Refrigerator Safety REFRIGERATOR CARE Both the refrigerator and freezer compartments defrost automatically and require minimal cleaning and maintenance. To keep your refrigerator running efficiently and odor free, we recommend that you wipe up spills immediately and clean the refrigerator regularly. Operating Requirements CLEANING WARNING Parts and Features Electrical Shock Hazard • Unplug your appliance or disconnect power before cleaning.
5. Clean the gasket around the door. Gently wipe the gasket using a soft cloth dampened with a mild detergent solution. NOTE: Gaskets must be kept clean and pliable to assure a proper seal. 7. Plug in or reconnect power. MOVING 1. Unplug your refrigerator from the wall outlet. Parts and Features IMPORTANT: When moving your refrigerator, DO NOT tilt it beyond 45° from upright. Operating Requirements 6. Using a soft cloth, thoroughly dry all surfaces. Refrigerator Safety 4.
TROUBLESHOOTING Refrigerator Safety IMPORTANT: DO NOT try to repair your refrigerator yourself. Doing so invalidates the warranty. Operating Requirements GENERAL Parts and Features POSSIBLE CAUSE SOLUTION The refrigerator is not on or is not cooling The refrigerator is unplugged. Make sure that the refrigerator power cord is fully plugged into the electrical outlet. The fuse on the circuit is blown or the circuit breaker is tripped.
POSSIBLE CAUSE SOLUTION Food in the refrigerator is not cold The door has been opened Make sure that the door is too often or was not closed closed properly. properly. The temperature control is set too warm. Set the temperature control to a colder setting. Items in the refrigerator compartment are freezing The air vents are blocked. Place large items on the sides of the top shelf so that they are not blocking the air circulating from the vent in the center.
PROBLEM Refrigerator Safety The The room temperature is compressor hotter than normal. turns on and off frequently. A large amount of food was recently added. Operating Requirements Parts and Features Installation Refrigerator has an odor Before Use Refrigerator Use Refrigerator Care Troubleshooting ! POSSIBLE CAUSE SOLUTION This is normal. Allow time for the recently added food to cool, and then check again. The door is not closed completely or was opened too often.
ICE AND WATER Connect refrigerator to water supply and turn water shutoff valve fully open. The ice maker(s) are turned off. Turn on the ice maker(s). See “Controls.” The refrigerator has just been installed. Wait 12 hours after ice maker installation for ice production to begin. The ice storage bin is not in place. Make sure the ice storage bin is correctly installed. A large amount of ice was recently removed. Allow sufficient time for ice maker to produce more ice.
Refrigerator Safety PROBLEM POSSIBLE CAUSE SOLUTION The water and ice dispenser do not operate properly The refrigerator is not connected to a water supply or the water supply shutoff valve is not turned on. Connect the refrigerator to the water supply and turn the water shutoff valve fully open. Operating Requirements There is a kink in the water A kink in the line can source line. reduce water flow. Straighten the water source line.
The water filter was recently installed or replaced. Flushing the water system removes the air from the lines which causes the water dispenser to drip. Flush the water system. See “Flush the Water System.” The water from the dispenser tastes bad Water has not been dispensed recently (approx. 4 days). Dispense and discard at least 1 gallon of water. The water filter needs to be replaced. Replace the water filter when indicated. Water from the dispenser is warm The refrigerator has just been installed.
ERROR CODES Refrigerator Safety Operating Requirements Parts and Features Installation Before Use Refrigerator Use Refrigerator Care Troubleshooting 36 If an error code is displayed on the control panel, contact your place of purchase or Insignia customer service at 1-866-646-4332.
PERFORMANCE DATA SHEET WATER FILTRATION SYSTEM MODEL MF-2008-R2 CAPACITY 200 GALLONS (757 LITERS) System tested and certified by NSF International against NSF/ANSI Standards 42 and 53 for the reduction of contaminants specified on the Performance Data Sheet. This system has been tested according to NSF/ANSI Standards 42 and 53 for the reduction of the substances listed below.
MIDEA REFRIGERATOR LIMITED WARRANTY ATTACH YOUR RECEIPT HERE. PROOF OF PURCHASE IS REQUIRED TO OBTAIN WARRANTY SERVICE. Please have the following information available when you call the Customer Service Center: Q Q Q Q Name, address and telephone number Model number and serial number A clear, detailed description of the problem Proof of purchase including dealer or retailer name and address IF YOU NEED SERVICE: 1.
WHAT IS NOT COVERED 1. Failure caused by damage to the unit while in your possession (other than damage caused by defect or malfunction), by its improper installation, or by unreasonable use of the product, including without limitation, failure to provide reasonable and necessary maintenance or to follow the written Installation and Instruction Manual. 2. Products purchased “as-is” or refurbished are not covered by this warranty. 3. Food loss caused by refrigerator or freezer failure. 4.
GUIDE DE L’UTILISATEUR Réfrigérateur avec congélateur juxtaposé Alimentation en électricité : 115 V Fréquence : 60 Hz Capacité : 26.3 cu. ft. Extension gratuite de 3 mois 1-844-224-1614 MODÈLE NUMÉRO MRS26D5AST www.midea.
Cher utilisateur MERCI FÉLICITATIONS www.midea.
28 29 29 30 30 30 DÉPANNAGE 31 31 34 37 38 39 Installation SÉCURITÉ DU RÉFRIGÉRATEUR Sécurité du Exigences de Composantes et Réfrigérateur Fonctionnement Caractéristiques ENTRETIEN DU RÉFRIGÉRATEUR Avant l’utilisation AVERTISSEMENT ATTENTION Dépannage AVERTISSEMENT Ce symbole signale la possibilité d’une tension dangereuse constituant un risque de choc électrique susceptible d’entraîner la mort ou une blessure grave.
SÉCURITÉ EN MATIÈRE D’ÉLECTROMÉNAGERS • • SÉCURITÉ ÉLECTRIQUE • Installation • • • • Sécurité du Exigences de Composantes et Réfrigérateur Fonctionnement Caractéristiques • • Avant l’utilisation • • Utilisation du Réfrigérateur Entretien du Réfrigérateur • • • Dépannage 4 AVERTISSEMENT SÉCURITÉ DE L’EMPLACEMENT
• • SÉCURITÉ — UTILISATION ET SOINS • • • • • • • • Dépannage • Entretien du Réfrigérateur • Utilisation du Réfrigérateur • Avant l’utilisation • Installation • Sécurité du Exigences de Composantes et Réfrigérateur Fonctionnement Caractéristiques • 5
• SÉCURITÉ — ENTRETIEN • • • Sécurité du Exigences de Composantes et Réfrigérateur Fonctionnement Caractéristiques • Installation • • Avant l’utilisation Utilisation du Réfrigérateur CET APPAREIL EST UNIQUEMENT DESTINÉ À UN USAGE DOMESTIQUE Entretien du Réfrigérateur Dépannage 6 •
MISE AU REBUT APPROPRIÉE • • • Utilisation du Réfrigérateur • • Entretien du Réfrigérateur • • Avant l’utilisation AVERTISSEMENT Installation EXIGENCES EN MATIÈRE D’EMPLACEMENT Sécurité du Exigences de Composantes et Réfrigérateur Fonctionnement Caractéristiques AVERTISSEMENT EXIGENCES DE FONCTIONNEMENT Dépannage • REMARQUES : 7
Sécurité du Exigences de Composantes et Réfrigérateur Fonctionnement Caractéristiques Installation Avant l’utilisation Utilisation du Réfrigérateur Entretien du Réfrigérateur Dépannage
• • EXIGENCES RELATIVES À L’ALIMENTATION EN EAU Sécurité du Exigences de Composantes et Réfrigérateur Fonctionnement Caractéristiques • Installation Avant l’utilisation Utilisation du Réfrigérateur Entretien du Réfrigérateur Dépannage 9
COMPOSANTES ET CARACTÉRISTIQUES Sécurité du Exigences de Composantes et Réfrigérateur Fonctionnement Caractéristiques Partie congélateur Partie réfrigérateur Installation Avant l’utilisation Utilisation du Réfrigérateur Entretien du Réfrigérateur Dépannage 10 Témoin lumineux à DEL Tablette en verre Filtre à eau Bac à glaçons Panier de porte Tablette en verre Distributeur eau/glaçons Bac à légumes Panier de porte Bac à légumes
INSTALLATION DÉBALLAGE Avant l’utilisation Dépannage WARNING Entretien du Réfrigérateur (AU BESOIN SEULEMENT) Utilisation du Réfrigérateur DÉPOSE DES PORTES Installation AVERTISSEMENT Sécurité du Exigences de Composantes et Réfrigérateur Fonctionnement Caractéristiques 9 11
OUTILS NÉCESSAIRES Sécurité du Exigences de Composantes et Réfrigérateur Fonctionnement Caractéristiques RETIRER LES PORTES IMPORTANT : Gardez les portes du réfrigérateur fermées jusqu’à ce que vous soyez prêt à les retirer du réfrigérateur. 1. Retirez les vis du couvercle de la charnière inférieure du congélateur et le couvercle de la charnière. 2. Retirez la rondelle frein du raccord du tuyau d'eau et tirez, puis retirez le tuyau d'eau de la porte du congélateur du raccord rapide.
6. À l’aide d’une clé à douille de 8 mm, retirez les trois vis de charnière. Vis de charnière Vis de mise à la terre Charnière supérieure REMARQUE : Fournissez un appui supplémentaire pour la porte pendant pour maintenir la porte en place pendant que vous travaillez. 8. Retirez la charnière supérieure gauche de la porte du congélateur. qu’elle ouvre à un angle de 90° par rapport au réfrigérateur, puis soulevez la porte de la charnière inférieure. Placez la porte sur une 90° Installation 9.
RACCORDEMENT À L’EAU Installation 1. Avant l’utilisation Utilisation du Réfrigérateur 2.
3. 5. Installation Dépannage 3. Entretien du Réfrigérateur 1. Utilisation du Réfrigérateur 7. Avant l’utilisation 6. Sécurité du Exigences de Composantes et Réfrigérateur Fonctionnement Caractéristiques 4. 2.
4. 6. Sécurité du Exigences de Composantes et Réfrigérateur Fonctionnement Caractéristiques 7. Installation 1. Utilisation du Réfrigérateur • • • • • Avant l’utilisation 2. Entretien du Réfrigérateur Dépannage 16 5.
AVERTISSEMENT • • • • IMPORTANT : • • Installation • Sécurité du Exigences de Composantes et Réfrigérateur Fonctionnement Caractéristiques DÉPLACEZ À SA DESTINATION FINALE Avant l’utilisation Utilisation du Réfrigérateur Entretien du Réfrigérateur Dépannage 17
INSTALLATION DU FILTRE À EAU Sécurité du Exigences de Composantes et Réfrigérateur Fonctionnement Caractéristiques RETRAIT DU BOUCHON DE DÉRIVATION 1. Fermez l'alimentation en eau du réfrigérateur. 2. Serrer les côtés du couvercle du filtre (aux endroits indiqués), puis tirer vers le bas pour ouvrir le couvercle. Couvercle du filtre Installation 3. Tourner le bouchon de dérivation dans le sens antihoraire, puis tirer pour enlever.
REMARQUE : Le logement permet au filtre de bouger légèrement vers le haut et vers le bas. . 6. Ouvrez l'alimentation en eau du réfrigérateur. 7. Refermer le couvercle du filtre. Installation REMPLACEMENT DU FILTRE À EAU r Avant l’utilisation r 1. Fermez l'alimentation en eau du réfrigérateur. 2. 3. r Dépannage 2. Entretien du Réfrigérateur 1. 7 Utilisation du Réfrigérateur 4 4.
ALIGNER LES PORTES (AU BESOIN) Sécurité du Exigences de Composantes et Réfrigérateur Fonctionnement Caractéristiques Installation Avant l’utilisation Utilisation du Réfrigérateur Entretien du Réfrigérateur Dépannage 20 L'alignement ou le réglage des portes peut être effectué sur les modèles de réfrigérateurs côte à côte. Écrou d'ajustement la gauche Pieds à hauteur réglable droite Clé à molette Écrou de verrouillage 1.
2. Installation 4. 5. AVANT L’UTILISATION PÉRIODE D’ATTENTE REMARQUE : NETTOYAGE Dépannage 2. Entretien du Réfrigérateur • Utilisation du Réfrigérateur • Avant l’utilisation 1. Sécurité du Exigences de Composantes et Réfrigérateur Fonctionnement Caractéristiques 3.
UTILISATION DU RÉFRIGÉRATEUR • • • AVERTISSEMENT • • Sécurité du Exigences de Composantes et Réfrigérateur Fonctionnement Caractéristiques • • • Installation 1. 2. 3.
COMMANDES La première fois que le réfrigérateur est branché dans la prise de courant, l’écran d’affichage commence à s’illuminer et défiler. Après quoi, les icônes de l’affichage s’illumineront totalement pendant 3 secondes et un signal sonore retentira. Dans des conditions normales, lorsqu’aucune porte n’est ouverte et qu’aucune touche n’est enfoncée pendant 30 secondes, l’écran d’affichage s’éteint et se verrouille.
TEMPÉRATURE Sécurité du Exigences de Composantes et Réfrigérateur Fonctionnement Caractéristiques Lorsque le réfrigérateur est branché pour la première fois dans une source d’alimentation électrique, les réglages par défaut des températures s’affichent. La température de chaque compartiment est réglable dans sa plage de températures propre. Compartiment de réfrigération Réglage de la température par défaut : 39 °F (4 °C).
VERROUILLAGE / DÉVERROUILLAGE DES COMMANDES Maintenir la touche enfoncée pendant 3 secondes. Un signal sonore retentira et l’écran d’affichage s’illuminera. Pour verrouiller les commandes : Maintenir la touche enfoncée pendant 3 secondes. Un signal sonore retentira et l’écran d’affichage s’éteindra. REMARQUE : Après 30 secondes, si aucune touche n’est enfoncée, les commandes se verrouilleront automatiquement.
Sécurité du Exigences de Composantes et Réfrigérateur Fonctionnement Caractéristiques Installation Avant l’utilisation Utilisation du Réfrigérateur Entretien du Réfrigérateur Modes du panneau de commande du distributeur Dépannage 26 Le panneau de commande du distributeur comporte des icônes à DEL rétroéclairées pour indiquer le mode de fonctionnement du distributeur. Vous pouvez choisir entr e, le mode “Veille” et le vant les instructions mode “Actif”.Vous pouve ci-dessous.
En mode “Actif”, les icônes du distributeur (glaçons, eau, glace pilée) restent toujours allumées. Le panneau de commande utilise une icône à DEL plus lumineuse pour indiquer le mode de distribution sélectionné. Permutation entre le mode “Actif” et le mode “Veille” : Restez appuyé sur les icônes EAU et GLACE PILÉE pendant 3 secondes. La commande du distributeur clignotera pendant 2 secondes, confirmant ainsi le changement de mode.
Sécurité du Exigences de Composantes et Réfrigérateur Fonctionnement Caractéristiques Distribution d’eau 1. Appuyer sur la touche Water (eau) . Le voyant de l’eau s’illumine. 2. À l’aide du doigt ou d’un contenant, appuyer sur le levier pour distribuer de l’eau. 3. Relâcher le levier pour mettre fin à la distribution d’eau. Distribution de glaçons 1. Appuyer sur la touche Cubed (glaçons) . Le voyant des glaçons s’illumine. 2.
ENTRETIEN DU RÉFRIGÉRATEUR AVERTISSEMENT • • • • Avant l’utilisation 2. Utilisation du Réfrigérateur 1.
3. 5. REMARQUE : 6. 7. DÉPLACEMENT IMPORTANT : Sécurité du Exigences de Composantes et Réfrigérateur Fonctionnement Caractéristiques 1. 2. 3. Installation EMPLACEMENT Avant l’utilisation 1. 2. 3. Utilisation du Réfrigérateur 4. REMPLACEMENT DES AMPOULES Entretien du Réfrigérateur Dépannage 30 4. 4.
DÉPANNAGE Sécurité du Exigences de Composantes et Réfrigérateur Fonctionnement Caractéristiques GÉNÉRALITÉS Installation Avant l’utilisation Utilisation du Réfrigérateur Entretien du Réfrigérateur Dépannage 31
Sécurité du Exigences de Composantes et Réfrigérateur Fonctionnement Caractéristiques Installation Avant l’utilisation Utilisation du Réfrigérateur Entretien du Réfrigérateur Dépannage 32
Sécurité du Exigences de Composantes et Réfrigérateur Fonctionnement Caractéristiques Installation Avant l’utilisation Utilisation du Réfrigérateur Entretien du Réfrigérateur Dépannage 33
GLAÇONS ET EAU Sécurité du Exigences de Composantes et Réfrigérateur Fonctionnement Caractéristiques Installation Avant l’utilisation Utilisation du Réfrigérateur Entretien du Réfrigérateur Dépannage 34
Sécurité du Exigences de Composantes et Réfrigérateur Fonctionnement Caractéristiques Installation Avant l’utilisation Utilisation du Réfrigérateur Entretien du Réfrigérateur Dépannage 35
Sécurité du Exigences de Composantes et Réfrigérateur Fonctionnement Caractéristiques Installation Avant l’utilisation Utilisation du Réfrigérateur Entretien du Réfrigérateur Dépannage 36
Si un code d'erreur est af ché sur l'écran du panneau de commandes, contacter le revendeur ou le service à la clientèle d'Insignia au 1-866-646-4332. CODE D'ERREUR DESCRIPTION DE L’ERREUR Erreur de la machine à glaçons Erreur du capteur de température dans le compartiment du réfrigérateur. Erreur du capteur de température dans le compartiment du congélateur. Erreur du capteur de dégivrage dans le compartiment du congélateur.
ŏ ŏ ŏ ŏ SISTEMA INTERNO DE FILTRACIÓN DE AGUA MODELO MF-2008-R2 CAPACIDAD 200 GALONES (757 LITROS) %/0!) ŏ,.+ +ŏ5ŏ !.0%"% +ŏ,+.ŏ ŏ * !.* 0%+* (ŏ/!#Ò*ŏ( /ŏ*+.) /ŏ ĥ ŏąĂŏ5ŏĆăŏ, . ŏ( ŏ.! 1 %¨*ŏ !ŏ(+/ŏ +*0 )%* *0!/ŏ!/,! %"% +/ !*ŏ( ŏ +& ŏ !ŏ 0+/ŏ !(ŏ !* %)%!*0+ċ /0!ŏ/%/0!) ŏ$ ŏ/% +ŏ,.+ +ŏ !ŏ 1!. +ŏ +*ŏ( /ŏ +.) /ŏ ĥ ŏąĂŏ5ŏĆăŏ, . ŏ( ŏ.! 1 %¨*ŏ !ŏ( /ŏ/1/0 * % /ŏ!*1)!. /ŏ ŏ +*0%*1 %¨*ċŏ ŏ +* !*0. %¨*ŏ !ŏ( /ŏ/1/0 * % /ŏ%* % /ŏ!*ŏ #1 ŏ!*0. * +ŏ (ŏ/%/0!) ŏ"1!ŏ.
GARANTÍA LIMITADA DEL REFRIGERADOR MIDEA ŏ ŏ ŏ ċŏ ŏ ŏ ŏ ŏ ŏ ŏ ŏ ŏ ŏ ŏ ċ !*# ŏ ŏ %/,+/% %¨*ŏ( ŏ/%#1%!*0!ŏ%*"+.) %¨*ŏ 1 * +ŏ(( )!ŏ (ŏ !*0.+ŏ !ŏ/!.2% %+ŏ (ŏ (%!*0!č Q +) .!Čŏ +)% %(%+ŏ5ŏ*Ò)!.+ŏ !ŏ0!(h"+*+ Q Ò)!.+ŏ !ŏ)+ !(+ŏ5ŏ*Ò)!.+ŏ !ŏ/!.%! Q * ŏ !/ .%, %¨*ŏ ( . ŏ5ŏ !0 (( ŏ !(ŏ,.+ (!) Q +),.+ *0!ŏ !ŏ +),. Čŏ%* (1% +ŏ!(ŏ*+) .!ŏ5 +)% %(%+ŏ !(ŏ %/0.% 1% +.ŏ+ŏ2!* ! +. ŏ ŏ ŏ g č āċ ŏ *0!/ŏ !ŏ +ŏ*0 0 .*+/ŏ, . ŏ ++.
ŏ ŏ ŏ āċŏ ŏ ((+ŏ 1/ +ŏ,+.ŏ ¦+ŏ ŏ( ŏ1*% ŏ)%!*0. /ŏ/!ŏ!* 1!*0. ŏ!*ŏ/1ŏ,+/!/%¨*ŏĨ-1!ŏ*+ŏ/! ŏ ¦+ŏ 1/ +ŏ ,+.ŏ1*ŏ !"! 0+ŏ+ŏ) (ŏ"1* %+* )%!*0+ĩČŏ,+.ŏ/1ŏ%*/0 ( %¨*ŏ%* +..! 0 ŏ+ŏ,+.ŏ1*ŏ1/+ŏ%.. 6+* (!ŏ !(ŏ ,.+ 1 0+Čŏ%* (15!* +Čŏ!*0.!ŏ+0.+/Čŏ( ŏ" (0 ŏ !ŏ) *0!*%)%!*0+ŏ. 6+* (!ŏ5ŏ*! !/ .%+ŏ+ŏ!(ŏ 1),(%)%!*0+ŏ !(ŏ *1 (ŏ !ŏ%*/0.1 %+*!/ŏ!ŏ%*/0 ( %¨*ċ Ăċŏ ŏ +/ŏ,.+ 1 0+/ŏ +),. +/ŏė +)+ŏ!/08*Ęŏ+ŏ.!/0 1. +/ŏ*+ŏ!/08*ŏ 1 %!.0+/ŏ,+.ŏ!/0 ŏ# . *0 ċ ăċŏ h. % ŏ !ŏ (%)!*0+/ŏ 1/ ŏ,+.ŏ" (( ŏ !(ŏ.!".%#!.
sp MANUAL DE USUARIO Refrigerador Side-by-Side Fuente de lamientación: 115 V Frecuencia: 60 Hz Capacidad: 26.3 cu. ft. Advertencia: Antes de utilizar este producto, lea atentamente este manual y guárdelo para consultarlo posteriormente. El diseño y las especificac ones están sujetos a cambios sin previo aviso para mejoras de los productos. Consulte con su distribuidor o fabricante para obtener detalles.
Estimado usuario GRACIAS y FELICITACIONES por haber comprado este producto Midea de alta calidad. Su refrigerador Midea está diseñada para un rendimiento confiable y sin p oblemas. Dedique un momento a registrar su nuevo refrigerador. Registre su nuevo refrigerador en www.midea.com haciendo clic en la solapa Support (Soporte). Para futuras consultas, tome nota del modelo de su producto y los números de serie ubicados sobre el compartimiento del compresor, en la parte trasera del refrigerador.
Bandeja antigoteo ................................................................................. 29 RESOLUCIÓN DE PROBLEMAS..................................................... 32 General .......................................................................................................32 Hielo y agua ............................................................................................. 35 Códigos de error....................................................................................
SEGURIDAD GENERAL DEL ELECTRODOMÉSTICO • • SEGURIDAD ELÉCTRICA Requisitos Características Seguridad del para el y Piezas Refrigerador Funcionamiento • • • • Instalación • • Antes de Usar Requisito de conexión a tierra • Uso del Refrigerador • Cuidado del Refrigerador SEGURIDAD DE LA UBICACIÓN • Resolución de Problemas 4 ADVERTENCIA • NOTA: •
• • • SEGURIDAD SOBRE USO Y CUIDADO • • • Resolución de Problemas • • Cuidado del Refrigerador • Uso del Refrigerador • Antes de Usar • Instalación • • Requisitos Seguridad del Características para el Refrigerador Funcionamiento y Piezas • • • 5
• • SEGURIDAD DE SERVICIO • • • Requisitos Características Seguridad del para el y Piezas Refrigerador Funcionamiento • Instalación • • Antes de Usar Uso del Refrigerador ESTE ELECTRODOMÉSTICO ES SOLO PARA USO DOMÉSTICO Advertencias de la “Proposition 65” del estado de California: Cuidado del Refrigerador ADVERTENCIA: Resolución de Problemas 6 •
ELIMINACIÓN ADECUADA Peligro de asfixia Antes de tirar su refrigerador viejo: • • • IMPORTANTE: Requisitos Seguridad del Características para el Refrigerador Funcionamiento y Piezas ADVERTENCIA Instalación REQUISITOS PARA EL FUNCIONAMIENTO ADVERTENCIA • • Uso del Refrigerador Peligro de explosión e Incendio Antes de Usar REQUISITOS DE UBICACIÓN Cuidado del Refrigerador • • NOTAS: Resolución de Problemas • 7
Requisitos Características Seguridad del para el y Piezas Refrigerador Funcionamiento Instalación Antes de Usar Uso del Refrigerador Cuidado del Refrigerador Resolución de Problemas
• • REQUISITOS DEL SUMINISTRO DE AGUA Si la presión del agua es demasiado baja: Uso del Refrigerador IMPORTANTE: Antes de Usar Abastecimiento de agua por ósmosis inversa (si es aplicable) Instalación NOTA: Requisitos Seguridad del Características para el Refrigerador Funcionamiento y Piezas • IMPORTANTE: Cuidado del Refrigerador Resolución de Problemas 9
Requisitos Características Seguridad del para el y Piezas Refrigerador Funcionamiento CARACTERÍSTICAS Y PIEZAS Compartimento para congelar Compartimento para refrigerar Instalación Antes de Usar Uso del Refrigerador Cuidado del Refrigerador Resolución de Problemas 10 Luz LED Repisa de vidrio Filtro de agua Bandeja para almacenar hielo Bandeja de la Puerta Repisa de vidrio Dosificador de agua/hielo Bandeja del cajón Bandeja de la Puerta Bandeja del cajón
SPECIFICATIONS ADVERTENCIA Instalación DESEMPACAR Requisitos Seguridad del Características para el Refrigerador Funcionamiento y Piezas INSTALACIÓN Peligro de explosión o Incendio Antes de Usar (SOLO SI ES NECESARIO) Resolución de Problemas ADVERTENCIA Cuidado del Refrigerador DESMONTAJE DE LA PUERTA Uso del Refrigerador IMPORTANTE: Peligro de Choque Eléctrico • • • 11
HERRAMIENTAS NECESARIAS Requisitos Características Seguridad del para el y Piezas Refrigerador Funcionamiento Destornillador Phillips Llave de cubo de 8 mm RETIRAR LAS PUERTAS INFORMACIÓN IMPORTANTE: Mantenga las puertas del refrigerador cerradas hasta que esté listo para levantarlas del gabinete. 1. Retire los tornillos de la cubierta de la bisagra inferior y la cubierta de la bisagra del congelador. 2.
6. Con una llave de tubo de 8 mm, retire los tres tornillos de la bisagra. Tornillos de la bisagra Tornillo de conexión a tierra Bisagra superior NOTA: Proporcione soporte adicional para la puerta mientras retira la bisagra. No dependa de los imanes de la junta de la puerta para mantenerla en su lugar mientras trabaja. 8. Retire la bisagra superior izquierda de la puerta del congelador. Instalación 9.
CONEXIÓN AL AGUA • • Conectar la línea de agua 1. Instalación NOTA: Antes de Usar Uso del Refrigerador 2.
3. 5. Requisitos Seguridad del Características para el Refrigerador Funcionamiento y Piezas 4. Instalación Antes de Usar 6.
Para conectar la línea de agua al refrigerador 1. 2. 3. 4. Requisitos Características Seguridad del para el y Piezas Refrigerador Funcionamiento 7. Instalación 6. Antes de Usar 5. Uso del Refrigerador 7.
Complete la instalación Peligro de Choque Eléctrico • • • • • 1. NOTA: 2.
Requisitos Características Seguridad del para el y Piezas Refrigerador Funcionamiento Instalación Antes de Usar Uso del Refrigerador Cuidado del Refrigerador Resolución de Problemas 18 INSTALACIÓN DEL FILTRO DE AGUA RETIRE EL TAPÓN DE DERIVACIÓN 1. Cierre el suministro de agua al refrigerador. 2. Apriete los lados de la tapa del filtro donde está marcado, y luego tire hacia abajo para abrir la tapa. Cubierta del filtro 3.
4. Saque el filtro de agua de su empaque y luego retire la tapa de plástico transparente del cabezal del filtro. 5. Alinee las lengüetas del cabezal del filtro con las muescas de la abertura y luego inserte el filtro de agua en la abertura. Presione hacia adentro, mientras gira el filtro en sentido horario para instalarlo. NOTA: La carcasa permite que el filtro se mueva ligeramente hacia arriba y hacia abajo.
Requisitos Características Seguridad del para el y Piezas Refrigerador Funcionamiento 3. Instale un nuevo filtro de agua siguiendo los pasos 4 a 7 de la sección anterior. 4. Mantenga presionado el control del filtro de agua durante 3 segundos para borrar y restablecer el reloj de estado del filtro. NOTA: La luz se apagará y sonarán 3 pitidos.
La alineación o el ajuste de las puertas se pueden realizar en los modelos de refrigeradores de lado a lado. Tornillo de ajuste Eje fijo Izquierda Pata niveladora Derecha Llave inglesa 2. Afloje la contratuerca rotando en sentido de las manecillas del reloj; después gire el tornillo de ajuste en sentido de las manecillas del reloj para levantar o en contra para bajar la puerta. Nota: Si es necesario, repita los pasos anteriores. hasta que las puertas estén alineadas. Cuidado del Refrigerador 4.
NIVELAR EL REFRIGERADOR 1. 2. NOTA: 3. Requisitos Características Seguridad del para el y Piezas Refrigerador Funcionamiento IMPORTANTE 5. Instalación 4.
LIMPIEZA 2. USO DEL REFRIGERADOR GENERAL • • • Peligro de choque eléctrico 1. • • Resolución de Problemas • Cuidado del Refrigerador 3. Uso del Refrigerador • • • Antes de Usar • • Instalación ADVERTENCIA Requisitos Seguridad del Características para el Refrigerador Funcionamiento y Piezas 1. 2.
Requisitos Características Seguridad del para el y Piezas Refrigerador Funcionamiento No cubra los estantes del refrigerador con papel de aluminio, papel encerado o papel de toalla. Los revestimientos interfie en con la circulación de aire frío, lo que hace que el refrigerador sea menos eficien e. Organice y etiquete los alimentos para reducir las aperturas de las puertas y las búsquedas prolongadas. Retire tantos elementos como sea necesario a la vez, y luego cierre la puerta lo antes posible.
Cuando el refrigerador se enchufa por primera vez a una fuente de alimentación, se mostrarán los ajustes de temperatura predeterminados. La temperatura de cada compartimento se puede ajustar dentro de su rango especificado. Compartimento de refrigeración Ajuste de temperatura predeterminado: 4° C (39° F). El rango de temperatura para el compartimiento de refrigeración es de 1° C a 7° C (34° F a 44° F). Compartimento de congelación Configuración de temperatura predeterminada: -18° C (0° F).
CONTROLES DE BLOQUEO/DESBLOQUEO Requisitos Características Seguridad del para el y Piezas Refrigerador Funcionamiento Para desbloquear los controles: Mantenga pulsado el botón Despertar un pitido y la pantalla se iluminará. durante 3 segundos. Sonará Para bloquear los controles: Mantenga pulsado el botón Despertar un pitido y la pantalla se apagará. durante 3 segundos. Sonará NOTA: Después de 30 segundos, si no se presiona ningún control, los controles se bloquearán automáticamente.
Máquina de hielo para congelador Presione el botón para ENCENDER/PAGAR la máquina de hielo del compartimiento de congelación. Cuando la máquina de hielo del congelador esté encendida, el control se iluminará. Depósito de hielo del congelador El depósito de hielo del compartimento de congelador es extraíble para limpiarlo o vaciarlo cuando se necesita una gran cantidad de cubitos de hielo. Después de vaciarlo y/o limpiarlo, coloque nuevamente el depósito de hielo inmediatamente.
Modos de control del dispensador Requisitos Características Seguridad del para el y Piezas Refrigerador Funcionamiento Instalación Antes de Usar Uso del Refrigerador Cuidado del Refrigerador Resolución de Problemas 28 El control del dispensador incorpora iconos LED retroiluminados para determinar el modo de funcionamiento del dispensador. Existen dos modos de visualización entre los que puede elegir, modo de espera y modo activo. Puede cambiar los modos siguiendo las instrucciones a continuación.
Dispensación de agua 1. Presione el botón Agua (Water) . El indicador de Agua se iluminará. 2. Usando su dedo o un recipiente, presione la lengüeta para dispensar agua. 3. Suelte la lengüeta dispensadora para detener el flujo de agua. Instalación Dispensación de cubitos de hielo 1. Presione el botón Cubos (Cubed) . El indicador Cubos se iluminará. 2. Usando su dedo o un recipiente, presione la lengüeta para dispensar los cubitos. 3. Suelte la lengüeta dispensadora para dejar de dispensar hielo.
Cómo sustituirlos: Requisitos Características Seguridad del para el y Piezas Refrigerador Funcionamiento 1. Inserte el recipiente en el revestimiento de la puerta por encima del soporte y luego presione hacia abajo para encajarlo. CUIDADO DEL REFRIGERADOR LIMPIEZA ADVERTENCIA Peligro de choque eléctrico Instalación • • ADVERTENCIA Antes de Usar Peligro de explosión • • Uso del Refrigerador IMPORTANTE: 1. 2. Cuidado del Refrigerador 3. 4. 5. Resolución de Problemas NOTA: 6. 7.
MUDANZA 1. 2. 3. 4. ALMACENAMIENTO IMPORTANTE: 1. 3. 4. Antes de Usar REEMPLAZO DE LUCES Instalación 2.
IMPORTANTE: GENERAL El refrigerador no funciona Instalación Antes de Usar Uso del Refrigerador Cuidado del Refrigerador Resolución de Problemas La puerta del refrigerador no cierra completamente SOLUCIÓN CAUSA POSIBLE PROBLEMA Requisitos Características Seguridad del para el y Piezas Refrigerador Funcionamiento 2 RESOLUCIÓN DE PROBLEMAS
PROBLEMA La comida en el refrigerador no está fría SOLUCIÓN Requisitos Seguridad del Características para el Refrigerador Funcionamiento y Piezas Las luces LED no se encienden CAUSA POSIBLE Instalación Antes de Usar Cuidado del Refrigerador El refrigerador hace ruidos o vibraciones inusuales Uso del Refrigerador Los elementos del compartimento frigorífico se están congelando Resolución de Problemas
El compresor se enciende y apaga con frecuencia Requisitos Características Seguridad del para el y Piezas Refrigerador Funcionamiento Instalación Antes de Usar El refrigerador tiene un olor Uso del Refrigerador Cuidado del Refrigerador Resolución de Problemas 4 Se acumula humedad en el interior del refrigerador SOLUCIÓN CAUSA POSIBLE PROBLEMA
HIELO Y AGUA Instalación Antes de Usar Cuidado del Refrigerador NOTA: Uso del Refrigerador Los cubitos de hielo son huecos o pequeños Requisitos Seguridad del Características para el Refrigerador Funcionamiento y Piezas La máquina de hielo no produce hielo o no produce suficiente hielo SOLUCIÓN CAUSA POSIBLE PROBLEMA Resolución de Problemas
Requisitos Características Seguridad del para el y Piezas Refrigerador Funcionamiento Instalación Antes de Usar Uso del Refrigerador Cuidado del Refrigerador Resolución de Problemas 6 El dispensador de agua y hielo no funciona correctamente SOLUCIÓN CAUSA POSIBLE PROBLEMA
PROBLEMA NOTA: El agua del dispensador sabe mal Instalación El agua del dispensador está tibia SOLUCIÓN Requisitos Seguridad del Características para el Refrigerador Funcionamiento y Piezas Hay fugas o goteos de agua fuera del sistema dispensador CAUSA POSIBLE Antes de Usar Uso del Refrigerador Resolución de Problemas Sale agua de la cubeta debajo del cajón del congelador Cuidado del Refrigerador Sale agua por la parte trasera del refrigerador
CÓDIGOS DE ERROR Requisitos Características Seguridad del para el y Piezas Refrigerador Funcionamiento Instalación Antes de Usar Uso del Refrigerador Cuidado del Refrigerador Resolución de Problemas 38 Si aparece un código de error en el panel de control, comuníquese con su lugar de compra o con el servicio de atención al cliente de Insignia al 1-866-646-4332.
HOJA DE DATOS DE RENDIMIENTO SISTEMA INTERNO DE FILTRACIÓN DE AGUA MODELO MF-2008-R2 CAPACIDAD 200 GALONES (757 LITROS) %/0!) ŏ,.+ +ŏ5ŏ !.0%"% +ŏ,+.ŏ ŏ * !.* 0%+* (ŏ/!#Ò*ŏ( /ŏ*+.) /ŏ ĥ ŏąĂŏ5ŏĆăŏ, . ŏ( ŏ.! 1 %¨*ŏ !ŏ(+/ŏ +*0 )%* *0!/ŏ!/,! %"% +/ !*ŏ( ŏ +& ŏ !ŏ 0+/ŏ !(ŏ !* %)%!*0+ċ /0!ŏ/%/0!) ŏ$ ŏ/% +ŏ,.+ +ŏ !ŏ 1!. +ŏ +*ŏ( /ŏ +.) /ŏ ĥ ŏąĂŏ5ŏĆăŏ, . ŏ( ŏ.! 1 %¨*ŏ !ŏ( /ŏ/1/0 * % /ŏ!*1)!. /ŏ ŏ +*0%*1 %¨*ċŏ ŏ +* !*0. %¨*ŏ !ŏ( /ŏ/1/0 * % /ŏ%* % /ŏ!*ŏ #1 ŏ!*0. * +ŏ (ŏ/%/0!) ŏ"1!ŏ.
GARANTÍA LIMITADA DEL REFRIGERADOR MIDEA ADJUNTE SU RECIBO AQUÍ. SE REQUIERE COMPROBANTE DE COMPRA PARA OBTENER UN SERVICIO DE GARANTÍA. !*# ŏ ŏ %/,+/% %¨*ŏ( ŏ/%#1%!*0!ŏ%*"+.) %¨*ŏ 1 * +ŏ(( )!ŏ (ŏ !*0.+ŏ !ŏ/!.2% %+ŏ (ŏ (%!*0!č Q +) .!Čŏ +)% %(%+ŏ5ŏ*Ò)!.+ŏ !ŏ0!(h"+*+ Q Ò)!.+ŏ !ŏ)+ !(+ŏ5ŏ*Ò)!.+ŏ !ŏ/!.%! Q * ŏ !/ .%, %¨*ŏ ( . ŏ5ŏ !0 (( ŏ !(ŏ,.+ (!) Q +),.+ *0!ŏ !ŏ +),. Čŏ%* (1% +ŏ!(ŏ*+) .!ŏ5 +)% %(%+ŏ !(ŏ %/0.% 1% +.ŏ+ŏ2!* ! +. SI NECESITA SERVICIO TÉCNICO: 1. ŏ *0!/ŏ !ŏ +ŏ*0 0 .*+/ŏ, . ŏ ++.
LO QUE NO CUBRE 1. ŏ ((+ŏ 1/ +ŏ,+.ŏ ¦+ŏ ŏ( ŏ1*% ŏ)%!*0. /ŏ/!ŏ!* 1!*0. ŏ!*ŏ/1ŏ,+/!/%¨*ŏĨ-1!ŏ*+ŏ/! ŏ ¦+ŏ 1/ +ŏ ,+.ŏ1*ŏ !"! 0+ŏ+ŏ) (ŏ"1* %+* )%!*0+ĩČŏ,+.ŏ/1ŏ%*/0 ( %¨*ŏ%* +..! 0 ŏ+ŏ,+.ŏ1*ŏ1/+ŏ%.. 6+* (!ŏ !(ŏ ,.+ 1 0+Čŏ%* (15!* +Čŏ!*0.!ŏ+0.+/Čŏ( ŏ" (0 ŏ !ŏ) *0!*%)%!*0+ŏ. 6+* (!ŏ5ŏ*! !/ .%+ŏ+ŏ!(ŏ 1),(%)%!*0+ !(ŏ *1 (ŏ !ŏ%*/0.1 %+*!/ŏ!ŏ%*/0 ( %¨*ċ 2. ŏ +/ŏ,.+ 1 0+/ŏ +),. +/ŏė +)+ŏ!/08*Ęŏ+ŏ.!/0 1. +/ŏ*+ŏ!/08*ŏ 1 %!.0+/ŏ,+.ŏ!/0 ŏ# . *0 ċ 3. h. % ŏ !ŏ (%)!*0+/ŏ 1/ ŏ,+.ŏ" (( ŏ !(ŏ.!".%#!. +.