Operating Instructions Combi-Steam Oven DGC 4084 XL DGC 4086 XL To prevent accidents and appliance damage read these instructions before installation or use. en - US M.-Nr.
Contents IMPORTANT SAFETY INSTRUCTIONS. . . . . . . . . . . . . . . . . . . . . . . . . . . . . . . . . 4 Guide to the appliance . . . . . . . . . . . . . . . . . . . . . . . . . . . . . . . . . . . . . . . . . . . . . 8 Control panel . . . . . . . . . . . . . . . . . . . . . . . . . . . . . . . . . . . . . . . . . . . . . . . . . . . . . 10 Display . . . . . . . . . . . . . . . . . . . . . . . . . . . . . . . . . . . . . . . . . . . . . . . . . . . . . . . . . . 11 Included accessories . . . . . . . . . .
Contents Additional functions . . . . . . . . . . . . . . . . . . . . . . . . . . . . . . . . . . . . . . . . . . . . . . 37 Start time / Finish . . . . . . . . . . . . . . . . . . . . . . . . . . . . . . . . . . . . . . . . . . . . . . . . . . 37 Timer . . . . . . . . . . . . . . . . . . . . . . . . . . . . . . . . . . . . . . . . . . . . . . . . . . . . . . . . . . . 38 Lighting . . . . . . . . . . . . . . . . . . . . . . . . . . . . . . . . . . . . . . . . . . . . . . . . . . . . . . . . .
IMPORTANT SAFETY INSTRUCTIONS Correct usage WARNING- When using your appliance follow basic precautions, including the following: Read all instructions before installation or use of the combi-steam oven to prevent injury and appliance damage. Use the combi-steam oven only for its intended purpose. This appliance is intended for residential cooking only. This appliance conforms to all uniform safety codes and regulations. Keep these operating instructions in a safe place and pass them on to any future user.
IMPORTANT SAFETY INSTRUCTIONS Children Technical safety ~ Use the Child Safety Lock to prevent ~ Before installing the combi-steam children from turning on the appliance or changing its settings. ~ Close supervision is necessary when the combi-steam oven is used near children. ~ To reduce the risk of injury, do not allow children to play in, on, or near the steam oven. ~ Do not allow children to open the appliance door when in use. Keep children away from the appliance until it has cooled down.
IMPORTANT SAFETY INSTRUCTIONS ~ Do not use the appliance until it has been properly installed into cabinetry. ~ Never open the outer casing of the User safety ~ Protect your hands with oven mitts appliance. Tampering with electrical connections or components and mechanical parts is dangerous and could cause machine damage. or potholders when using the appliance. Use only dry, heat resistant potholders. Moist or damp potholders used on hot surfaces can result in steam burns.
IMPORTANT SAFETY INSTRUCTIONS ~ Do not store items on the appliance when not in use. Items could melt or catch fire from residual heat or if the appliance is turned on inadvertently. ~ Do not heat unopened food ~ Do not leave cooked foods in the cooking compartment. Do not use items in the steam oven which may rust. This could lead to the corrosion of the appliance. containers. Pressure can build up causing an explosion that will damage the cooking compartment.
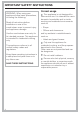
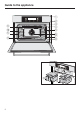
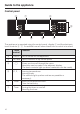
Guide to the appliance On/Off Lift Panel Clear a b c d e f g h Timer i j e k l m 8 o n
Guide to the appliance a Control panel b Ventilation outlet c Moisture sensor d Temperature sensor e Lighting f Grease filter g Door gasket h Drip channel i Browning / Broil element j Side runners with 3 shelf levels k Drain l Slide-in compartment for condensate container m Condensate container n Slide-in compartment for water container o Water container 9
Guide to the appliance Control panel a d d e On/Off Lift Panel Clear Timer b c f g The appliance is operated using the control panel, display a and the electronic touch controls b - g. An audible tone will sound each time a control is touched. b c d e 10 Touch control Function On/Off On/Off control for the appliance. Lift Panel Open/Close the lift-up control panel C Allows you to scroll through the menu. Selections can be made in the adjacent display.
Guide to the appliance Display The display shows the following in addition to text: Symbol ß p ---+/- L Description This symbol appears next to a menu item or a prompt, e.g. "Continue", and is allocated with a sensor. Select the desired option by touching the button beside the symbol. A maximum of 3 options can be shown in the display. These arrows indicate if more options are available. A dotted line will appear under the last option. The beginning of the list will appear under the dotted line.
Guide to the appliance Included accessories All standard and additional accessories can be reordered if necessary (see "Optional accessories"). DGGL 20 1 perforated cooking container Size 17.7" W x 7.5" D x 1.6" H DGG 20 1 solid cooking container Size 17.7" W x 7.5" D x 1.6" H DGGL 12 1 perforated cooking container Size 17.7" W x 7.5" D x 1.6" H Universal tray 1 Universal tray Wire oven rack To support cookware.
Before using for the first time The appliance will turn on automatically when it is connected to the power supply. A welcome screen will appear in the display and you will then be asked to select some basic settings which are needed to set the appliance up for first time use. Follow the instructions on the display. Setting the language The welcome screen will be replaced by the request to set a language: ^ Touch one of the touch controls next to the arrows until the language you want appears in the display.
Before using for the first time Time of day You will then be requested to enter the Time of day. You can either use the controls next to + and - or the numerical keypad to enter the time. Enter the time as 4 figures, e.g. 10 minutes past 9 o'clock in the morning = 09:10. ^ Enter the hour and minutes and confirm with "OK".
Before using for the first time A functional test is carried out on the appliance at the factory, this may cause some water may drip from the lines into the oven compartment during transport. Cleaning for the first time Remove any protective foil. Water container Take the water container out of the appliance and rinse it by hand or in the dishwasher. Accessories / Oven interior Take all accessories out of the oven. The cooking containers can be washed in the dishwasher.
Before using for the first time Setting the correct boiling point for water Run the Steam / Universal (212°F / 100°C) program for 15 minutes. Continue as described in the "Quick Guide" section. This procedure sets the correct boiling point for water for the altitude in your area and also flushes the waterlines. This procedure causes more steam than usual to be emitted from the appliance.
Description of the functions Control panel The water and condensate containers are located behind the lift-up control panel. The panel can be opened by touching "Lift Panel" and closed by touching "Lift Panel" then "OK". The panel is equipped with a finger pinch protection. If it encounters resistance when opening/closing, the process is interrupted. Do not touch the appliance door handle while the panel is opening or closing. Water container The max. water level is 47 fl. oz. (1.4 liters), the min. 34 fl.
Description of the functions Temperature Some functions have default temperatures. The default temperature can be altered within a given range (see "Functions") for an individual cooking program or permanently (see "Settings"). Cooking duration (time) Depending on the function, you can set a cooking duration of between 1 - 6 minutes and 10 - 12 hours. The duration of the MasterChef, Maintenance and Menu cooking functions are set at the factory and cannot be changed.
Description of the functions Preheating phase While the appliance is heating up to the set temperature, the display will show the rising temperature inside the oven along with the words "Preheating phase" (Exceptions: MasterChef, Menu cooking, Reheating, Maintenance). Steam When cooking with steam, the duration of the preheating phase will depend on the quantity and temperature of the food. In general, the preheating phase will last for approx. 7 minutes.
Description of the functions Interior lighting To save energy, the oven compartment lighting has been set at the factory to turn off after the program has started. To turn the light on for a short time during operation, touch one of the inactive touch controls on the left or right hand side of the display. If you would like the oven compartment to be illuminated the whole time the oven is operating the factory default setting can be changed (see "Settings - Lighting").
Programs / Functions Complete information on the following functions, as well as tips for using your appliance can be found in the enclosed booklets "User instructions".
Programs / Functions Program / Function Default temperature Available Temperature range X Bake Use this at the end of the baking time to brown the bottom of the food some more 375 °F 190 °C 210 - 437 °F 100 - 225 °C Y Broil For broiling thin cuts in large quantities and for browning food in large dishes 437 °F 225 °C 300 - 437 °F 150 - 225 °C Z EcoBroil For grilling of thin cuts in small quantities and for browning food in small dishes 437 °F 225 °C 300 - 437 °F 150 - 225 °C \ ConvectionBro
Programs / Functions Default temperature Available Temperature range Defrost For gentle thawing of frozen products 140 °F 60 °C 120 - 140 °F 50 - 60 °C U Humidity plus For cake mixes 300 °F 150 °C 85 - 437 °F 30 - 225 °C T Lighting - - - - - - Program / Function ) Maintenance Soak Dehydrate F Descale Rinse Settings You can change the factory default settings 23
Quick Guide Check that the drain filter is fitted correctly before each cooking program. Coarse food particles can clog the drain. Filling the water container Make sure you do not touch the appliance door handle while the panel is opening or closing. Danger of pinching fingers! ^ Select "Lift Panel" to open the control panel. ^ Remove the water container (right), and fill it up to at least the "min" mark. Use only cold tap water (below 68°F / 20°C).
Quick Guide Setting a cooking duration ^ Enter the duration with either + / - or the numerical keypad and confirm with "OK". If you are using the numerical keypad to enter the duration, you must enter both the hour and the minutes if the duration is more than 59 minutes. Example: Duration of 80 minutes = 1:20h. Setting the moisture level (Combination steam and Reheat) ^ Enter the desired moisture level with + / - or the numerical keypad.
Quick Guide After use ^ Remove the water and condensate containers and empty. Push the water container slightly upwards to remove it. ^ Clean and dry the whole appliance after each use. See "Cleaning and care". Make sure the appliance is completely dry before closing the door.
Operation During operation Interrupting a program or cooking Operations are interrupted as soon as the door is opened. The heating will turn off and the remaining cooking duration will be stored in memory until the door is closed again. Operation will resume when the door is closed. Functions using steam: Steam will escape when the door is opened. Step back from the steam oven and wait until the steam has dissipated.
Operation Saving settings You can save the settings for a cooking program while it is in progress, so that you can call it up again from the Favorites menu at a later date. ^ Select "Change". ^ Touch one of the buttons next to the arrows in the display until "Save as" appears. ^ Select "Save as". A summary will appear in the display. ^ Confirm with "Continue". ^ Follow the instructions given in "Favorites - Save".
Operation Steam Cooking - Universal / Defrost ^ Fill the water container and place it into the appliance. ^ Place the food in the appliance. ^ Turn the appliance on. ^ Select the desired mode. ^ Confirm the default temperature with "OK". Or a different temperature can be entered at this time if desired. ^ Enter the cooking duration and confirm with "OK". The appliance will start automatically after the duration has been confirmed.
Operation Combination steam Combination steam works by combining heat and steam. You can combine up to six cooking stages in a combination steam program. You can set the temperature, moisture level and duration for each cooking stage. The cooking program will be completed in the order the individual stages were entered. The following example describes a cooking program with 3 cooking stages. ^ Fill the water container and place it the appliance. ^ Turn the appliance on using the "On/Off" button.
Operation Cooking stage 2 ^ Select the desired mode. ^ Set the temperature and confirm with "Continue". ^ Set the moisture level and confirm with "Continue". ^ Set the duration and confirm with "Continue". ^ Select "Add another cooking stage". Cooking stage 3 ^ Select the desired mode. ^ Set the temperature and confirm with "Continue". ^ Set the moisture level and confirm with "Continue". ^ Set the duration and confirm with "Continue". ^ Confirm "Complete the cooking stages" with "Continue".
Operation ConvectionPlus / Surround / Browning / Bake / EcoBroil / ConvectionBroil / Intensive / Humidity Plus The grease filter on the back wall must be removed for baking. Exception: Place the grease filter in the back wall when baking single crust (bottom) deep fresh fruit pies or pizza with thick toppings. The combi-steam oven will begin to operate automatically after the pre-set temperature has been confirmed. Any time between 1 minute and 12 hours can be selected.
Operation Menu Cooking You can select up to three ingredients, e.g. fish, rice and vegetables. The various components can be selected in any order. The combi-steam oven uses cooking duration for its calculations so that food with the longest cooking duration must be placed in the oven first. The Menu Cooking program uses steam only. Meat, for example, will not be browned. ^ Fill the water container and place it in the appliance. ^ Turn the appliance on using the "On/Off" button.
Operation Reheat ^ Fill the water container and place it in the appliance. ^ Turn the appliance on using the "On/Off" button. ^ Select "Reheat". ^ Either confirm the default temperature with "OK" or enter and confirm the desired temperature. ^ Either confirm the moisture level with "OK" or enter and confirm the desired moisture level. ^ Enter the cooking duration and confirm with "OK". Sabbath program For supporting religious customs, this program is ready to use for 72 hours.
Operation Favorites You can save up to 25 cooking programs each with a maximum of 6 cooking stages under names that you can create in the Favorites menu. All the functions listed under "Favorites" can be combined together. The display will only show the standard functions until you have created a Favorite. If Favorites have already been created and saved, the following will appear: Select The Favorites can be found here and started. Create You can create Favorites.
Operation Create ^ Select "Favorites". ^ Select "Create". ^ Select the desired mode. ^ Enter the settings as usual and confirm with "Continue". A summary will appear in the display. You can add additional cooking stages or after confirming with "Continue" you can save the cooking program. Saving settings The program can be saved using the preset name, e.g. "Dish 1", or with a name of your choice, e.g. "Minestrone" or a combination of both, e.g. "Dish 1 Minestrone".
Additional functions Start time / Finish You can delay the start time. The appliance will turn on automatically at the selected time. It is not possible to delay the start time when using "Menu cooking"and "Maintenance". Using "Start time" you can enter when you would like the program to start. Using "Finish" you can enter when you would like the program to end. This function cannot be used if the oven interior is too hot, e.g. at the end of a cooking program.
Additional functions Timer The timer can be used to manage kitchen activities. You can also use the timer when a program is running. A time can be set between 1 second and 9 hours 59 minutes. A time of up to 10 minutes will be shown in min:sec in the display, and a time of more than 10 minutes in h:min. The timer time must be entered in minutes and seconds or hours, minutes and seconds. Example: 8 minutes = -:-8:00. At the end of the set time you will hear an audible tone. Turn the timer off with "Clear".
Additional functions Lighting You can set the lighting to stay on when the appliance is not being operated, e.g. when cleaning. ^ Turn the appliance on with the "On/Off" button. ^ Select "Lighting". System lock The system lock prevents the combi-steam oven from being turned on unintentionally. The lock deactivated by factory default. Before this feature can be activated, you will need to change the factory default setting to "Permitted" (see "Settings - Safety").
Settings Some of the standard settings have an alternative which you can select if desired. Multiple settings can be changed one after the other. Proceed as follows: ^ Turn the appliance on. ^ Select the "Settings" menu. ^ Select the setting you want to change. A checkmark L indicates which setting is currently selected. If you do not make a selection in the sub-menu within approx. 5 seconds, the display will revert to the "Settings" menu.
Settings Lighting You can choose whether you want the oven cavity to be illuminated throughout the cooking program or only for 15 seconds. Change main menu You can change the order of options in the main menu by placing up to three options (except the Settings option) at the beginning of the main menu. You can also specify the position of the option in the list. Preheating phase The Preheating phase can be changed for the "ConvectionPlus" and "Surround" functions.
Settings Keep warm This function can be activated or deactivated. This setting is deactivated as the factory default setting. Automatic rinse This function can be activated or deactivated. Default temperatures If you frequently change a default temperature it may be a good idea to change it permanently. You can change the temperatures within the permitted range. Water hardness The appliance is factory set to water hardness setting "Hard".
Settings Safety Once "System lock" setting has been changed to "Permitted", you will be able to activate the system lock when the combi-steam oven is turned off. Units of measurement The weight to be shown in lbs or kg, the temperature in °F or °C and the depth/thickness in inches or cm. Showroom program This program is for dealers who want to demonstrate the appliance without the heater elements working. Do not activate this setting for domestic use.
Cleaning and Care ,Do not use a steam cleaner to clean the combi-steam oven. The steam could reach the electrical components and cause a short circuit. Clean and dry the appliance and accessories after each use. Allow the appliance to cool down. Make sure the appliance is completely dry before closing the door. If leaving the appliance unused for an extended period, clean it once more thoroughly to prevent the build-up of odors. Leave the door open afterwards. Do not use commercial cleaning agents.
Cleaning and Care Appliance front Remove soiling on the appliance front right away. If soiling is left on, it may be impossible to remove and the surfaces can discolor or change. Glass cleaners may be used to clean the exterior. However do not allow them to sit or "puddle", this can cause damage to the surface. Remove the cleaner promptly. Clean the appliance front with a clean sponge, dishwashing liquid and warm water. Then wipe them dry with a soft cloth.
Cleaning and Care Accessories Universal tray, wire oven rack and side runners These items have been treated with PerfectClean. See "Cleaning and Care - PerfectClean". Do not wash in a dishwasher. – Remove light soiling with a dish cloth, liquid dish soap and warm water. – Remove stronger soiling with a dish sponge, hot water and liquid dish soap. If necessary, you can also use the hard side of the dish sponge or soak the item. Rinse and wipe thoroughly with clean water, and dry the surfaces.
Cleaning and Care Grease filter Clean the grease filter after every roasting program with a mild solution of warm water and liquid dish soap or in the dishwasher. ^ Pull the grease filter upwards to remove it. If the grease filter is cleaned in the dishwasher, results are better if the filter is placed horizontally in the basket. Some dishwasher detergents may cause the surface of the filter to discolor. This will not affect the functioning of the filter in any way.
Cleaning and Care Oven interior The oven interior is made from stainless steel which has been treated with a PerfectClean finish which gives the surface an iridescent appearance. See "Cleaning and Care PerfectClean". For easy cleaning of the oven interior you can remove the door and the side runners. After a program using steam – Remove condensate with a sponge or soft cloth, – Remove light, greasy soiling with a sponge, liquid dish soap and warm water. Rinse with clean water.
Cleaning and Care Door seal, inside of the door Grease deposits on the seal between the inside of the oven door and the oven interior can cause it to become brittle and cracked. Clean the door seal after every baking, broiling or roasting program using a clean, damp microfiber cloth without detergent or with a clean sponge, liquid dish soap and warm water. Wipe dry with a soft cloth. Replace the seal with a new one if it becomes porous or brittle. Door seals are available from Miele.
Cleaning and Care PerfectClean The surfaces of the oven interior, side runners, Universal tray and wire oven rack have a PerfectClean finish. The PerfectClean enamel is a smooth, nonstick surface that cleans easily with a sponge. For optimal use, it is important to clean the surfaces each time the combi-steam oven is used. The surface will become harder to clean and the anti-stick properties will deteriorate if soiling is not removed after each use and allowed to build up.
Cleaning and Care Maintenance Soak Excessive soiling after roasting can be soaked using this program. ^ Allow the oven interior to cool down. ^ Remove all accessories and fill the water container. ^ Select "Maintenance". ^ Select "Soak" and follow the instructions in the display. The soaking process takes about 10 minutes. Drying Residual moisture in inaccessible places inside the oven is dried. ^ Dry the oven interior with a soft cloth. ^ Select "Maintenance". ^ Select "Drying".
Cleaning and Care Descale For optimum cleaning results it is recommended that you use Miele descaling tablets to descale your combi-steam oven (see "Optional accessories") to avoid damage to the appliance. Ensure that the descaling agent does not come into contact with the door handle or the metal control panel as this could cause marks. Wipe the descaling agent immediately from these surfaces. The appliance will need descaling after a certain number of operating hours.
Cleaning and Care After the final confirmation of "OK" the descaling starts. The descaling program can be canceled only during the first minute. Do not turn the appliance off during the descaling program or the program will have to be restarted. After a period of about 30 minutes there is a rinse cycle. ^ Follow the instructions in the display. After the remaining time has expired the display shows "Empty condensate container". ^ Follow the instructions on the display and confirm with "OK".
Cleaning and Care Removing the runners ^ Pull the runners sideways first a then forward b and out. ^ Re-insert them in the reverse order. Oven door To remove the door Before the door can be removed the release levers on both door hinges must be unlocked. ^ Open the door fully.
Cleaning and Care ^ Unlock the release levers on both door hinges by pushing on them. Turn the release levers until they click and are in a slanted position. Never pull the door off the brackets in the horizontal position. These will then snap back, and damage the device. Danger of injury. ^ Close the door until it stops. ^ Holding the door evenly with both hands, lift the door up at a slant and off the hinges. Do not lift the door at the door handle. The handle and door panels could be damaged.
Cleaning and Care To dismantle the door The door is protected all around by seals against the penetration of vapors. If soiling builds up in the space between the glass panels, you can disassemble the door to clean the inside of the glass. Do not use abrasive cleaners, hard sponges or brushes or sharp metal scrapers for cleaning glass surfaces. You will scratch the surface. Do not use oven cleaner. The surface of the aluminum will be damaged.
Cleaning and Care ^ Lift the inner panel slightly and pull it out. ^ Lift the middle glass panel slightly and pull it out. The seals may sometimes loosen during this process. These seals protect the panel from slipping in the frame. ^ Clean the glass panels and other items. To reassemble the door ^ Slide the middle panel back in; the printed material number must be visible in the lower right hand corner. ^ Insert the side seals for the inner panel into the appropriate grooves.
Cleaning and Care ^ Replace the inner panel with the printed text facing down. Slide the panel back as far as it will go. Ensure that the side seals do not slip. Proper fit of the seal ensures that no vapors can penetrate the door during cooking programs. ^ Put on the retainers and secure them. To refit the door ^ Fit the door back on the hinges. Make sure that the door is not tilted. ^ Open the door fully. ^ Turn the release levers until they click in the vertical position.
Frequently asked questions Repairs should only be carried out by an authorized technician in accordance with local and national safety regulations. Unauthorized repairs could cause injury or appliance damage. Problem Possible fault Solution The appliance cannot be turned on. The circuit breaker has tripped. Reset the circuit breaker (see the data plate for minimum amperage). There may be a technical Disconnect the appliance fault. from the power supply for 1 minute.
Frequently asked questions Problem Possible fault The fan can still be heard after the appliance has been turned off. The appliance is equipped The fan automatically turns with a fan that directs off after some time. vapors from the oven interior to the outside. The fan will continue to run for a while after the appliance has been turned off. You can hear a noise Water is being pumped in (humming) when the or out. appliance is turned on, when it is operating, and after it has been turned off.
Frequently asked questions Problem A whistling sound is heard when the appliance is turned on again. The oven lighting does not work. The "Start time" function does not show on the display. Cakes and pastries are not cooked properly after following the times given in the recipe. Cakes/pastries are unevenly browned. Possible fault Solution When the door is closed, the None pressure has to equalize, which can cause a whistling sound. This does not indicate a defect.
Frequently asked questions Problem Possible fault Solution The suction hose in the water container is: – not properly attached Correct the position of the suction hose: F and a number appear in the display F 10 – not vertical F 44 F 195 Communications failure Turn the appliance off and after a few minutes on again. If the fault message still appears, contact Miele Technical Service.
Frequently asked questions Problem F 190 F 196 F.. Other fault messages Possible fault Defective water inlet valve Solution This defect can occur when the panel is opened or closed while water is being supplied. Confirm with "OK" and continue the operation. If the fault message is displayed again, contact Miele Technical Service. There is a technical fault. Turn the appliance off and then back on again. The drain filter in the oven Turn off the appliance, seat floor is not installed properly.
Frequently asked questions Manually opening the control panel Manually closing the control panel ^ Carefully open the appliance door. ^ Grasp the panel at top and bottom. ^ Gently push the panel downwards. ^ Grasp the panel at top and bottom. ^ Pull the panel out forward first. ^ Gently push the panel upwards. 64 ^ Push the panel back in.
Optional accessories Miele offers a range of useful accessories as well as cleaning and care products for your appliance. You can easily order these products from the Mieleusa.com store or your Miele dealer. Cooking containers There are a number of perforated and soiled cooking containers in different sizes. The cooking containers with a width of 12.8" (325 mm) cannot be inserted directly into the side runners; the wire oven rack or the container is needed as well.
Optional accessories DGGL 5 Perforated cooking container Gross capacity 5.28 pints (2.5 liters) / net capacity 4.23 pints (2 liters) 12.8" W x 10.4" D x 2.4" H DGGL 6 Perforated cooking container Gross capacity 8.45 pints (4 liters) / net capacity 5.92 pints (2.8 liters) 12.8" W x 6.9" D x 2.6" H DGG 7 Solid cooking container Gross capacity 8.45 pints (4 liters) / net capacity 5.92 pints (2.8 liters) 12.8" W x 6.9" D x 3.9" H DGGL 8 Perforated cooking container Gross capacity 4.
Optional accessories DGD 1/3 Small lid for DGGL 1, DGGL 5, DGGL 6, DGG 2, DGG 7 and DGG 11 cooking containers DGD 1/2 Large lid for DGGL 4, DGGL 8 and DGG 3 cooking containers Other FlexiClip The FlexiClip can be used on any shelf level. Each shelf level can be taken out of the oven individually. Container rack PerfectClean finish, to hold 12.8" wide containers.
Optional accessories Gourmet casserole dish Die-cast aluminum dish with a non-stick finish and stainless steel lid. Fits directly into a side runner or the FlexiClips. Not suitable for use on induction or gas cooktops. HUB 5000-XL Depth 13.8" (35 cm), maximum capacity approx. 17.6 lbs (8 kg) The dish cannot be placed in the appliance with the lid on. Gourmet casserole lid The lid is made from stainless steel HBD 60-35 fits HUB 5000-XL Gourmet pizza tray 10.5" circular pan with PerfectClean finish.
Optional accessories Cleaning and care products The Miele range includes cleaning and care products specifically for your appliance.
Technical Data ,CAUTION: Before installation or servicing, disconnect the power supply by either removing the fuse, shutting off the main power or manually "tripping" the circuit breaker. Installation work and repairs should only be performed by a qualified technician in accordance with all applicable codes and standards. Repairs and service by unqualified persons could be dangerous.
After sales service and data plate In the event of a fault which you cannot correct yourself please contact the Miele Technical Service Department at the phone numbers listed on the back of this booklet. When contacting the Technical Service Department, please quote the model and serial number of your appliance. Attach the enclosed data plate here. Ensure that the model number is the same as the one on the cover of this manual.
Caring for our environment Disposal of packing material Disposal of an old appliance The transport and protective packing materials are environmentally friendly for disposal and may be recyclable. Old appliances may contain materials that can be recycled. Please contact your local recycling authority about the possibility of recycling these materials. Ensure that any plastic wrap is disposed of safely and kept out of the reach of children.
Alteration rights reserved / 1013 M.-Nr. 09 064 860 / 02 INFORMATION IS SUBJECT TO CHANGE. PLEASE REFER TO OUR WEBSITE TO OBTAIN THE MOST CURRENT PRODUCT SPECIFICATIONS, TECHNICAL & WARRANTY INFORMATION.