Operating and Installation Instructions Condenser Dryer PT 7135 C Vario To prevent accidents and machine damage read these instructions before installation or use. en - US, CA M.-Nr.
Contents IMPORTANT SAFETY INSTRUCTIONS. . . . . . . . . . . . . . . . . . . . . . . . . . . . . . . . . 4 Operating the dryer . . . . . . . . . . . . . . . . . . . . . . . . . . . . . . . . . . . . . . . . . . . . . . . . 7 Control panel . . . . . . . . . . . . . . . . . . . . . . . . . . . . . . . . . . . . . . . . . . . . . . . . . . . . . . 7 Before using for the first time . . . . . . . . . . . . . . . . . . . . . . . . . . . . . . . . . . . . . . . . . . 7 Display . . . . . . . . . . . . . . . . . . .
Contents Frequently asked questions . . . . . . . . . . . . . . . . . . . . . . . . . . . . . . . . . . . . . . . . 28 Check and fault messages in the display . . . . . . . . . . . . . . . . . . . . . . . . . . . . . . . 28 An unsatisfactory drying result . . . . . . . . . . . . . . . . . . . . . . . . . . . . . . . . . . . . . . . 30 Other problems . . . . . . . . . . . . . . . . . . . . . . . . . . . . . . . . . . . . . . . . . . . . . . . . . . . 31 Changing the light bulb . . . . . . . . . . . . . . . .
IMPORTANT SAFETY INSTRUCTIONS ,WARNING - To reduce the risk of fire, electric shock, or injury to persons when using your appliance, follow basic precautions, including the following: ~ Make sure that no unattended children can access the machine. There is a potential danger that children can be trapped in the drum. This may cause major injuries or the death of the child. ~ Do not reach into the dryer if the drum is moving.
IMPORTANT SAFETY INSTRUCTIONS ~ To prevent the risk of fire, the following articles must not be dried in this tumble dryer: ~ To prevent the risk of fire, the – items which have not been washed. – fabrics which contain a large amount of rubber, foam rubber or rubber-like materials. For example, products made from latex, shower caps, waterproof textiles, rubberized articles, and items of clothing and pillows with foam rubber filling, or similarly textured rubber-like materials.
IMPORTANT SAFETY INSTRUCTIONS ~ GROUNDING INSTRUCTIONS This appliance must be grounded. In the event of a malfunction or breakdown, grounding will reduce the risk of electric shock by providing a path of least resistance for electric current. This appliance is equipped with a cord having an equipment-grounding conductor and a grounding plug. The plug must be inserted into an appropriate outlet that is properly installed and grounded in accordance with all local codes and ordinances.
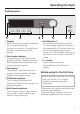
Operating the dryer Control panel a Display After the machine has been switched on, the display lights up. As soon as the dryer is ready to use, the Main menu appears in the display. b Direct select buttons For selecting an individual drying program quickly. These buttons can be programmed to select your own favorite drying programs. c Start button The indicator light flashes when a program can be started and lights up when the program starts.
Operating the dryer Display Main menu 1 Cottons Program selection ... 2 Minimum iron Settings F ... 3 Woollens handcare 4 Smoothing 10:00 When the dryer is switched on, the Main menu (with four favorite programs listed) appears with Program selection highlighted. Multi-function selector Turning the multi-function selector moves the highlighting to the next option. Pressing the multi-function selector selects the highlighted option.
Operating the dryer program selection menu Program selection Back A Cottons Minimum iron Delicates H You can use the multi-function selector to select any program. The highlighting will move up or down depending on the direction the multi-function selector is turned in. The HV arrows on the right of the display, indicate further options. Pressing the multi-function selector takes you to the main menu of the program selected. Drying program main menu Cottons Normal Duration 0:50 h Low temp.
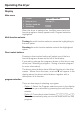
Operating the dryer Operating the tumble dryer in Laundromat mode The Main menu will vary depending on the Controls setting selected. ^ The dryer is operated either with direct select buttons D, E, F, G or the multi-function selector. WS-direct select buttons, basic 1 Cottons Normal+ 2 Minimum iron Normal 3 Woollens handcare 4 Cool air 4 programs are available to choose from. To specify which programs are available go to the Settings/supervisor level menu.
Notes and tips on laundry care 1. Sort the laundry Garment care label symbols Drying q Normal/higher temperature r Reduced temperature: Select Low temperature (for delicate textiles) s Do not tumble dry Ironing I Very hot H Hot G Warm J Do not iron Before drying – Wash heavily soiled items very thoroughly, ensuring that you use sufficient detergent and select a high temperature. If in doubt, wash the items several times.
Notes and tips on laundry care 2. Load the tumble dryer ,Using the tumble dryer incorrectly could cause a fire. Read the "IMPORTANT SAFETY INSTRUCTIONS" before using the tumble dryer. ,Make sure that objects, e.g. detergent dispensing balls, have been removed from the laundry. They could melt and cause damage to the dryer or the laundry. – Do not overload the drum. Overloading can cause unnecessary wear and tear to the laundry, give a disappointing drying result and cause more creasing.
Short instructions A Sort the laundry ,It is very important to read the "Notes and tips on laundry care" section before proceeding. B Load the dryer ,To avoid damaging your laundry, when shutting the door check that no items of laundry have become trapped in the door opening. ^ Open the door. ^ Load the drum. ^ Shut the door either with a gentle swing, or lean against it and push it shut.
Short instructions C Select a program ^ Switch the dryer on by pressing the On/Off K button. Please note: – If no further selection is made within 15 minutes, the dryer will switch off automatically. – This does not apply to machines with a payment system. Program chart – See separate booklet "Commissioning, Program chart and Settings". You can select a program either by: 2. Selecting a program from the Program selection menu (turn A and press B).
Short instructions D Start the program The Start button will flash as soon as a program can be started. ^ Press the Start button. The Start button will now light up. – Prog. running will appear in the display, followed by Drying and the program duration. – With sensor drying programs, e.g. Machine iron ... Hand iron etc., the drying level reached will be shown in the display later on.
Short instructions E Remove the laundry when the program has finished Anti-crease (if selected) and End will appear in the display to indicate that the program has finished. Please note: – To avoid creasing, during the anti-crease phase the drum will continue to turn at intervals until the laundry is removed. – The dryer will switch off automatically 15 minutes after the end of a program/the end of the anti-crease phase. It is advisable to remove laundry as soon as the program has finished. ^ Open the door.
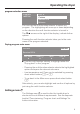
Selecting a program Selecting/changing a program Main menu 1 Cottons program selection ... 2 Minimum iron Settings F ... 3 Woollens handcare 4 Smoothing 10:00 ^ Press shortcut button D. Main menu Cottons Normal Duration 0:50 h Low temp. Timer Y Save Back A H H H H ^ By turning the multi-function selector you can then highlight the following options in the display: Program (Cottons) or the drying level (Normal), and confirm your selection by pressing the multi-function selector.
Selecting a program Note: If you do not make a selection in the sub-menu within approx. 20 seconds, the display will revert to the main menu. – programs with drying levels Cottons Normal+ Drying levels from Machine iron - Extra dry c ^ Use the multi-function selector to select the drying level you want, and confirm your selection. – The display will show which drying levels can be selected for each individual program.
Selecting a program Low temperature Select Low temperature for all delicate or minimum iron fabrics with the r care label (e.g. acrylic garments). – Delicate fabrics are dried at a lower temperature. – The program duration is longer. ^ Press shortcut button D Low temp. Saving a favorite program You can program the direct select buttons to call up the four most frequently used drying programs.
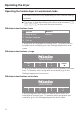
Timer Depending on the Delay start setting, you can use the Timer to set the time you wish a program to finish or start at, or you can delay the start of the program. To open the Timer sub-menu Cottons Normal+ Low temp. Duration 1:06 h Low temp. B Timer Y Save Back A H H H H ^ Use direct select button E Timer to open the Timer sub-menu. To select a delay start time Cottons Normal+ Low temp.
Changing the program sequence Payment system Opening the door or cancelling the program after it has started may cause a loss of credit (depending on how the dryer was set up)*. * Either during the commissioning process or subsequently, a Miele service technician can re-set the payment system so that programming changes can be made. Once a program has started - changing the program You cannot change to another program once a program has started (this prevents unintentional alterations).
Cleaning and care Cleaning the lint filters Lint from items being dried is collected by the lint filters in the door and the door opening. Clean the filters after each drying program*. Cleaning them while dry ^ Remove any lint from the hollow part of the door opening. You could also use a cleaning brush which is available as an optional extra from your Miele dealer or Miele or use a vacuum cleaner. ^ Once clean, push the filter back into the door holder until it clicks into position.
Cleaning and care Cleaning them with water If there is a great deal of compacted lint on any of the filters, they can be removed and cleaned under hot running water. ^ Open the door and pull the lint filter out of the door as described previously. The two filters in the door opening can also be removed if you need to clean them with water. Replacing the filters ,Do not replace the filters if they are damp or wet. Damp or wet filters could cause operational faults.
Cleaning and care Cleaning the tumble dryer ,To reduce the risk of electric shock, disconnect the appliance from the power supply by unplugging or tripping the circuit breaker. ,Do not use an abrasive cleaner, glass cleaner or all-purpose cleaner. They will damage the dryer. ^ The exterior and the control panel can be cleaned with warm water and liquid dish soap applied with a soft sponge.
Cleaning and care Cleaning the heat exchanger ,Check the heat exchanger unit regularly. It should always be cleaned immediately the Clean condenser unit or Clean out airways message appears. Removing the heat exchanger ^ Turn the lever on the inner cover downwards to the vertical position. ^ Pull the cover forwards. ^ Remove it by pulling it diagonally upwards. ^ Open the access panel. The hooks at the side will prevent the panel from falling off. ^ Now remove the panel by pulling it diagonally upwards.
Cleaning and care If you can see some lint: ^ Clean the condenser unit as described below. To clean the condenser unit ^ Use a shower head or similar to rinse the unit out as shown. ^ Pull the condenser (heat exchanger) unit out of its housing by the handle. Checking the condenser unit (heat exchanger unit) – From the sides. ^ Hold the condenser unit up to the light as shown. ^ Check to see if there is any lint inside it. The arrows in the illustration above indicate where to look.
Cleaning and care ^ Check the condenser unit again for any visible lint, and if necessary flush it through again until it has all gone. ^ Also make sure the rubber seals are clean. The rubber seals must not be removed and must be free of kinks. To check and clean the condenser unit housing ^ Remove any soiling still visible inside the housing by hand using a damp cloth. Do not try and access areas you cannot reach by hand.
Frequently asked questions With the help of the following notes minor faults in the performance of the appliance, some of which may result from incorrect operation, can be put right without contacting the Service Department. ,Repair work to electrical appliances should only be carried out by a suitably qualified person in strict accordance with current local and national safety regulations. Repairs and other work by unqualified persons could be dangerous.
Frequently asked questions Problem E E \ Possible cause Remedy Clean out airways Clean the filters Check ducting. There is a blockage – Confirm with OK. in the ducting system. – Clean the lint filters. – Check all possible causes appears at the end given under "The drying of a program.* process goes on too long or even switches off." Clean out airways There is a very severe – See above. Clean the filters blockage in the Check ducting. ducting system. appears after a program has been cancelled.
Frequently asked questions An unsatisfactory drying result Problem The laundry is not sufficiently dry. Possible cause The load consisted of different fabrics. Feathers are a natural product and this is quite normal. Items made of synthetic Synthetic fibres tend to fibers are charged with attract static charge. static electricity after drying. Feather filled pillows smell after drying. There is a build-up of lint.
Frequently asked questions Other problems Problem The drying process goes on too long or even switches off. Possible cause You might be asked to clean the airways/ducting system again. Ventilation to and from the dryer may be insufficient, e.g. because it is installed in a room which is too small. This can cause the temperature in the room to rise sharply. The vents below the door are blocked. The lint filters are clogged up with lint or were still wet when they were replaced.
Frequently asked questions Problem Possible cause Water leaks from the dryer after the condenser unit has been cleaned. – The inner cover of the – Ensure that the condenser unit has not condenser unit is been locked properly positioned correctly and/or the condenser and lock the inner unit has not been cover. positioned correctly. – Check the rubber seals. – Lint has collected in the condenser unit – Use a cloth to remove housing. any visible lint from the inside of the condenser unit housing.
Frequently asked questions Problem Possible cause Remedy The program does not start and the display is dark. There is no power to the dryer. – Is the dryer switched on? – Is the door closed properly? – Has the fuse or circuit breaker tripped? The dryer switches off automatically after 15 minutes if no further selection is made. The display is dark and the Start button is flashing slowly. The display is in a different language. The Start button light flashes when a program is being selected.
Frequently asked questions Changing the light bulb Disconnect the dryer from the electrical supply. ^ Open the door. You will find the interior light bulb cover at the top of the drum aperture. The light bulb specification and maximum wattage is stated on the data plate and on the light bulb cover. ^ Replace the light bulb. ^ To close the cover push it upwards and press it on the left and right until you hear it click into position.
After sales service Repairs PC / Optical interface In the event of a fault which you cannot fix yourself, please contact the Miele Technical Service Department at the address on the back of this booklet. The indicator or check light marked PC on the fascia panel is the interface used by Miele service technicians during servicing work for testing purposes and for updating the machine´s program data. When contacting the Service Department, please quote the model and serial number of your appliance.
INSTALLATION INSTRUCTIONS To prevent accidents and machine damage read these instructions before installation or use.
IMPORTANT SAFETY INSTRUCTIONS , WARNING - Risk of Fire ~ To reduce the risk of severe injury or death, follow all installation instructions. ~ Clothes dryer installation must be performed by a qualified installer. ~ Install the clothes dryer according to the manufacturer's instructions and local codes. ~ Check the packaging, the dryer and accessories for any signs of damage. Do not use a damaged appliance. ~ Repair and maintenance work should be performed by a Miele authorized service technician.
Installation Front view a Power cord b Control panel c Door d Service panel for condenser unit e Four height adjustable screw feet 38 f External drainage options (e.g.
Installation View from above Side view 35 7/16" 46 3/4" 27 15/16" 33 7/16" 23 7/16" Washer-dryer stack a Protruding lid edge (see arrows) for dryer transport. The tumble dryer can be combined with a Miele washing machine in a washer-dryer stack. A stacking kit is required which can be purchased from Miele. The stacking kit must be fitted by a Miele authorised service technician.
Installation Installing the tumble dryer Levelling the machine ,Make sure the dryer door can be opened without hindrance after installation. Transporting the dryer to its installation site The machine must be perfectly level to ensure safe and proper operation. When moving the dryer, hold it by the lid where it protrudes to the rear. To manoeuvre the dryer out of its packing case to its installation site you will also need to hold it by the front feet. ,Ensure the dryer is stable during transportion.
Installation ,Never block the vents on the dryer. In order to ensure sufficient ventilation to the dryer, do not reduce the vent gap between the underside of the dryer and the floor with a plinth, deep-pile carpet, etc. This dryer is not suitable for building under. Room in which the dryer is located Air taken in for use in the drying process will be warm when it is expelled from the underside and back of the dryer. This expelled air heats up the air in the room.
Installation External drainage of the condensed water The condensed water is pumped away through the drain hose which is located at the back of the dryer at the bottom. Drain hose length: . . . . . . 6' 6 3/4" (2 m) Drain pump height: . . . . . 3' 3 3/8" (1 m) ,Do not pull on the drain hose and do not allow it to become kinked as this could damage it. Drain hose connection: ^ Remove adapter 1 and hose clip 3 behind it. 1. Direct into a sink or basin. – Hook the hose over the edge and secure.
Installation Electrical connection ,This installation should be performed by an experienced and qualified technician, in accordance with local codes and regulations. GROUNDING INSTRUCTIONS This appliance must be grounded. In the event of malfunction or breakdown, grounding will reduce the risk of electric shock by providing a path of least resistance for electric current. This appliance is equipped with a cord having an equipment grounding conductor and a grounding plug.
Technical data Height 33 7/16" (850 mm) (adjustable + / - 1/4" (7 mm)) Width 23 7/16" (595 mm) Depth Depth with door open 27 9/16" (710 mm) 46 3/4" (1,188 mm) Weight Drum volume 133 lbs (60.5 kg) 28.6 gal (130 l) Maximum capacity Length of connection cable 14.3 lbs (6.5 kg) Dry laundry weight 63" (1.6 m) Voltage Connected load Fuse rating Lamp wattage See data plate Test certificates awarded Max. load bearing in operation approx.
Caring for the environment Disposal of the packing materials The cardboard box and packing materials protect the appliance during shipping. They have been designed to be biodegradable and recyclable. To prevent suffocation, ensure that any plastic wrappings, bags, etc. are disposed of safely and kept out of the reach of children. Disposal of an appliance Old appliances may contain materials that can be recycled.
Please have the model and serial number of your appliance available when contacting Technical Service. U.S.A. Canada Miele, Inc. Importer Miele Limited National Headquarters 9 Independence Way Princeton, NJ 08540 Phone: 800-843-7231 609-419-4298 Fax: www.mieleusa.com Technical Service & Support Phone: 800-999-1360 888-586-8056 Fax: TechnicalService@mieleusa.com Headquarters and Miele Centre 161 Four Valley Drive Vaughan, ON L4K 4V8 www.miele.