AlchemyTV DVR User Guide Revision 2.
Table of contents Introduction and Overview of AlchemyTV DVR . . . . . . . . . . . . . . . . . . . . . . . . . . . . . . . . . .1 Introduction and System requirements . . . . . . . . . . . . . . . . . . . . . . . . . . . . . . . . . . . . . . . . . . .2 Overview of AlchemyTV DVR . . . . . . . . . . . . . . . . . . . . . . . . . . . . . . . . . . . . . . . . . . . . . . . . . .3 Hardware and software installation . . . . . . . . . . . . . . . . . . . . . . . . . . . . . . . . . . . . . . . . . . .
Introduction and Overview of AlchemyTV DVR AlchemyTV DVR™ User Guide Page 1
Introduction Thank you for choosing AlchemyTV DVR™ from Miglia Technology. AlchemyTV DVR™ allows you to watch TV on your PowerMac and enables you to record your favorite programmes onto your hard drive in a supported QuickTime format of your choice. System requirements: • PowerMac G4 or G5 with a free PCI or PCI-X slot • G4/400 MHz or higher processor • 256 MB of RAM • Mac OS X 10.2.8 or higher • QuickTime 6.
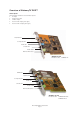
Overview of AlchemyTV DVR™ Video inputs AlchemyTV™ features several video inputs: • TV input • Composite input • S-Video input • Stereo audio input (jack type) • Stereo audio output (jack type) TV/Antenna Composite IN Audio IN S-Video IN Audio OUT Remote Receiver G4/G5 version Product code: DVRPCI-SIL FM Radio TV/Antenna Composite IN Audio IN S-Video IN Audio OUT Remote Receiver G4-Only version Product code: DVRPCI-PALSEC DVRPCI-NTSC AlchemyTV DVR™ User Guide Page 3
• TV/Antenna connection: This connector should be used for your analogue TV cable coming from an RF antenna or a cable box. • FM Connector: This connector is available solely with the G4-only version of the card. It allows you to connect an FM antenna. • Composite input: Composite is a widely used standard for connecting video equipment. Note that the quality of this connection is not as good as S-Video. This type of connector is often found on camcorders and VCRs.
Hardware and Software Installation AlchemyTV DVR™ User Guide Page 5
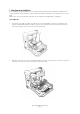
I. Hardware Installation The installation of AlchemyTV™ is a two step process starting with the hardware installation into your PowerMac. AlchemyTV™ is a PCI card that should be installed in a free expansion slot of your Mac. Makes sure you are wearing an anti-static wrist wrap before beginning the installation. PowerMac G4 1. Shut down your Mac and open the side door of your PowerMac. Locate an unused PCI slot.
PowerMac G5 1. Shut down your Mac. Remove the side panel and plastic door of your PowerMac. Locate an unused PCI slot. Using a small Phillips-head screwdriver, remove the retaining screw from the PCI expansion slots access panel, then remove the access panel itself. 2. Align the connector end of the card with the PCI expansion slot and insert the card. Secure the card with the screw that you removed in the previous step. 3. Close the plastic cover and side panel.
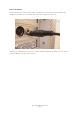
Remote Installation: Connect the remote control receiver cable to the RM port on the AlchemyTV card. Make sure the plug of the cable rests on the PCI card and not the metalwork of the case. Note that the infrared remote control has a plastic separator between the battery and the electric contacts. Remove it to operate the remote.
II. Software Installation 1. Insert the Installation CD that shipped with your AlchemyTV DVR™ card into your CD/DVD drive. 2. Before installing the version available on the CD, it is recommended that you check any available updates on the Miglia site. Double-click on the icon named ‘Click here to check if a newer version is available’ to access the website page. 3. Open the folder AlchemyDVR and double-click on the ‘’Install AlchemyTV DVR™” icon to launch the installer.
6. The AlchemyTV DVR folder will be located in the ‘Applications’ folder of the volume containing your system software. 7. Note that the control panel “Remote Control’ is also added to the System Preferences panel. If you have installed the Application Enhancer (for the iChat patch), the APE manager will also appear. 8.
Setting up AlchemyTV DVR for viewing and recording AlchemyTV DVR™ User Guide Page 11
Introduction This chapter will guide you through the initial setup of the AlchemyTV DVR card and software. Before proceeding, make sure you have installed the PCI card and the software and connected your video source via the composite or S-Video or coaxial connectors. I. Serial Number and Registration 1. Launch AlchemyTV DVR located in your Applications folder 2. You will be asked to enter your serial number located on the CD sleeve or the CD itself.
7. Once this operation finished, the Setup Assistant will create video compression and display settings based on the performance of your computer. These settings can be modified at a later stage by using the Preferences submenu. 8. If you wish to view live TV, you can open the TV window via the View menu.
Using the AlchemyTV DVR Menus and Onscreen Remote AlchemyTV DVR™ User Guide Page 14
I. AlchemyTV DVR Menus Various functions are accessible via the menu bar: 1. The AlchemyTV DVR Menu lets you access: About box: Displays about box with version number Setup Assistant: Launches the Setup Assistant Register: Open the Registration dialog Software Update: Checks online if a new version is available. This check is also performed automatically at launch if an internet connection is open. Hide/Show/Quit: Standard Hide, show and quit options. 2.
The Edit Menu 4. The View Menu contains the video related commands. Scheduled Recordings: Open the scheduled recordings window. Enables timed recordings. Log Window: The log window contains a report for each finished or aborted scheduled recording. TV Window: Displays the live TV window TV Window Size: Contains 3 pre-defined sizes, quarter, half and full size. The Full Screen option will hide all other applications and display the video in full screen mode.
The View Menu 5. The Window menu contains a shortcut to the full screen mode (Zoom) and enables you to switch between open windows. 6. The Help menu contains a link to the Miglia supportweb page and allows to open this manual. II.
1. Basic Remote Functions Technical Channel: Displays the technical channel number Volume level: Displays the volume level selected in the software Channel List: Shows a list of all stored/saved TV channels Channel Up/Down: Switches channels up and down Snapshot: Stores a snapshot of the picture currently displayed in the TV window Channel: Displays the channel number as per the TV tuner channel list Video input list: Displays the four possible video inputs.
Video Source Settings: This panels allows you to adjust the video source settings: Device: Enables you to select the desired video input device. This will most likely be AlchemyTV Format: Enables you to select the video standard. US, Canada and Japan residents should use ‘NTSC’, while most European users should select ‘PAL’. French and Eastern European users should select ‘SECAM’. Use Channel Name as index: This option is important for US residents.
Window Settings: The Window pane enables you to activate three options: Always in front: The TV window will always be in front of all other applications. Transparency: Enables you to adjust the level of transparency for the TV window. Clip edges: The option to clip the edges enables you to reduced the viewable area of the picture. This is helpful if you are watching a widescreen movie or the TV picture displays a line at the top (due to closed captioning).
Using the AlchemyTV DVR Preferences AlchemyTV DVR™ User Guide Page 21
I. AlchemyTV DVR preferences overview 1. Select AlchemyTV DVR > Preferences 1. The preferences are divided in four categories: Storage: This category allows you to set the general storage preferences Video Input: This menu allows you to set all video and audio preferences. Advanced settings are available via standard QuickTime sub-menus. Channel Templates: This menu contains the pre-defined and user defined channel lists.
I. The Storage Sub-menu 1. The Storage tab contains three important options: Filename Templates: Name templates used for your recorded video files 2. The Filename Template allows you to enter pre-defined values for the name of the file that will be stored onto your hard drive.
II. The Video Input Menu The Video Input menu contains the most important controls you have over the video you will view or record to your hard drive. A. Adjusting the video settings 1. The image sub-menu allows you to control the brightness, lighting, saturation and hue of the recorded video. Adjustments can be made by moving the sliders or entering a value on the right hand side.
2. Video Compression will adjust the video codec and quality settings for the video you will record to your hard drive. Select the QuickTime codec of your choice in the drop down menu. The options are identical to those you would choose for AlchemyTV. The ‘Expert settings’ allow you to access the QuickTime video motion menu. Note: This option will also affect the video you record via the TV window and the scheduled recordings.
3. The Video Compression Expert Settings menu may be familiar to you. It is a standard QuickTime window you may have seen in other applications. It enables an advanced control over the QuickTime codecs. Some Codecs may have advanced settings available under the codec list. This is notably true for MJPEG and some third-party codecs. This codec list can be expanded by installing third party codecs like DivX and 3ivX.
4. The Size Menu The Video Size for scheduled recordings can be adjusted via this sub-menu. You can either use a pre-defined size (Full size, Half-screen, quarter size) or a custom size via the list item ‘Other’. Note that full size video requires a fast processor. The option to clip the edges enables you to reduced the viewable area of the picture. This is helpful if you are watching a widescreen movie or the TV picture displays a line at the top (due to closed captioning).
5. The audio settings enable you to control various audio settings of the video you will record to your hard drive. These settings will be applied to bothscheduled recordings and the live TV window. The Device list let’s you select the desired input device, eg. AlchemyTV, the built-in motherboard audio or any other compatible USB or FireWire device. If you are capturing via the TV tuner, AlchemyTV and TV Tuner are the correct settings.
Destination controls the audio output of the recorded audio during live playback. Internal: The internal speaker of your PowerMac or the speakers attached to it will be used External: The speakers you may have connected to the audio out of the AlchemyTV card will be used. This can be used to pass-through the audio to another device. Internal and External: Both outputs will be used. Sample controls the sample rate, the size and the mode (mono/stereo).
8. The TV Tuner Sub-menu The TV tuner sub-menu allows you to create and select channel layouts. It also enables you to scan and fine-tune channels manually, without the help of the Setup Assistant. It is possible to create a new channel setup without using the Setup Assistant. To Do so, select‘Create from Template’ in the drop-down menu. The selected pre-defined channel list can then be scanned and fine tuned. Note: This will not be required if you already have setup AlchemyTV DVR with the Setup Assistant.
III. Channel Templates The Channel Templates sub-menu organises your channel lists and features an import/export function. A Channel List contains the list of the channels you can receive, the frequency of each channel and its name. It is strongly recommended that you export a Channel List once all the tuning/naming operations have been completed. Should you ever have to delete the preference file or reinstall the software, it will be handy to import the channel list and avoid thus avoid a new channel scan.
IV. The Plugins Menu AlchemyTV DVR supports a Plugins architecture allowing a smooth integration with third-party applications and devices. The Device/hardware plugins will usually not have any options. The current iCal plugin can however be adjusted to import or export recordings via the ‘Show Settings’ button. The ‘Export’ function is activated by default. You may want to check this menu with every update of the application, as plug-ins maybe added.
Schedule a recording with AlchemyTV DVR AlchemyTV DVR™ User Guide Page 33
I. Schedule a recording with AlchemyTV DVR 1. Click on View > Show scheduled recordings. 2. In the ‘Scheduled Recordings’ window, click ‘Add’ to program a new recording.
3. Select your desired channel and enter the name of the program you wish to record (the name itself does not affect the recording. You can either use a Filename template or give a unique name to the recorded file. Time, date and repetition can be entered on the right side of the window. You can also select the level of picture clipping for the recoding Click ‘Add record’ when you are finished.
4. Your new recording will be added to the ‘Scheduled Recordings’ list (see 2.). Note that AlchemyTV DVR will not wake up your computer from sleep to start a recording. The application needs to be running if you wish to have the recording start automatically. Program name Channel name Scheduled start Scheduled length 5. Scheduled recordings window list items: Status: Displays the status of the recording via icons.
II.. iCal synchronisation AlchemyTV DVR can synchronise your recordings with iCal. Make sure that the iCal plugin is set to import or export recordings, depending on your preference. 1. Export: Once you have created a recording in AlchemyTV DVR, it will appear as a separate calendar item in iCal. 2. Import: An iCal calendar item can be imported into AlchemyTV DVR, provided it follows the naming convention ‘Channel :: Program’.
The infrared remote control AlchemyTV DVR™ User Guide Page 38
I. The Remote Control Settings 1. Open System Preferences > Remote. The ‘Remote’ item is located at the bootom of the Sytem Preferences panel in the ‘other’ section. 2. The Remote Control software translates the key you press on the IR remote into key combinations that are sent to the applications or operating system. The ‘key maps’ can be customised for any given application via the control panel. You will notice the ‘AlchemyTV’ item on the left side of the screen.
3. You can control most applications that run on your Mac by adding a key map for them in the control panel. Click on ‘New’ at the bottom of the screen, select the desired application and the possible key mappings will appear on the right hand side of the screen. 4. By clicking on the ‘Set...’ button in the Action section, you can assign a specific key combination to a button on the remote. 5. The ‘Global’ key mappings control the Finder. 6.
Example: How to setup the Remote Control for iTunes 1. Select “New” and browse to the folder where iTunes is located (usually in Startup drive > Applications). Press OK to create a new key mapping for iTunes. 2. Scroll down the window displaying the key assignments until you find ‘Vol +’. Highlight this line and click on the highlight column (displaying ‘no action’). A drop down menu will appear giving you access to a drop down menu. Select ‘Send key’ 3. Click on ‘Set...
QuickTime Codecs AlchemyTV DVR™ User Guide Page 42
I. QuiickTime Codecs AlchemyTV DVR relies on QuickTime to perform the encoding of your video footage. All codecs that are accessible in QuickTime are accessible in AlchemyTV (export codecs are not included). Some codecs should not be used with AlchemyTV, as they have been designed for other types of applications, but many are useable. The recommended codecs for capture with the AlchemyTV are Motion-JPEG and MPEG-4.
License Agreement This license contract is part of the purchase contract. The conditions for the use of the Alchemytv™software are written down in the following license contract. With the use of the AlchemTV™software you agree to the conditions of the license contract for the use of the AlchemyTV™software. A special note to Miglia technology ltd or its traders is not necessary.
5.3 Should the software be faulty, the original CD on which the software is memorized has to be properly packed and returned to the authorized trader. In every case the complaint about the software has to be made by including your name, address, telephone number and a description of the defect and the system configuration. 5.4 Miglia reserves the right to decide if repairing or replacing the faulty software grants the possible guarantee.