
Use and Care Manual


6
Using Bluetooth
To enter the Bluetooth mode, press the button, or
press the MODE button to cycle through to Bluetooth.
Pairing
• If no Bluetooth device is connected, Bluetooth
pairing will begin automatically and the icon will
ash on the display.
• The radio will continue to search for a signal for
3 minutes.
• To manually pair a device, press and hold bluetooth
button until the begins to fast ash.
• While the is ashing, select "M18 PACKOUT
RADIO" on the Bluetooth capable device.
• Once the device has successfully paired with the
radio, the will be shown on the radio's display.
Connecting
To enter the Bluetooth mode, press the button, or
press the MODE button to cycle through to Bluetooth.
When the radio locates a paired Bluetooth device,
the will stop ashing.
If connection is lost between the radio and the Blue-
tooth device, the radio will try to reconnect automati-
cally for up to 3 minutes.
Controlling
When streaming music through to the radio via a
Bluetooth device, use the button to start and
pause the music. Use the ◄ and ► to move through
the tracks.
CHARGER OPERATION
WARNING
Charge only MILWAUKEE M18™
Lithium-Ion battery packs in the
MILWAUKEE Li-Ion Battery Charger. Other types
of batteries may cause personal injury and dam-
age. Battery pack and charger are not compatible
with V™-technology or NiCd systems.
When to Charge MILWAUKEE Li-Ion
Battery Packs
Remove the battery pack from the tool for charging
when convenient for you and your job. MILWAUKEE
batteries do not develop a "memory" when charged
after only a partial discharge. It is not necessary to run
down the battery pack before placing it on the charger.
• Use the Fuel Gauge to determine when to charge
your MILWAUKEE Li-Ion battery pack.
• You can "Top-O" your battery pack's charge before
starting a big job or long day of use.
How to Charge the Battery Pack
Plug the Radio + Charger into a 120V outlet. The
battery packs will not charge if the Radio + Charger
is not plugged in. Place the battery pack onto the bay
by sliding the pack on from the top of the bay. The
red light will turn on, either ashing (pack is too hot
or cold) or continuous (pack is charging).
• A fully discharged battery pack with an internal tem-
perature in the normal range will charge in about 30
to 185 minutes, depending on the battery pack.
• Heavily cycled batteries may take longer to charge
completely.
• The Fuel Gauge lights on the battery pack are
displayed as the pack is being charged, indicating
how fully charged the pack is.
• After charging is complete, the continuous green
light will turn on and the fuel gauge will turn o.
• The charger will keep the battery pack fully charged
if it is left on the charger.
• If the light indicator ashes red and green, check
that the battery pack is fully seated into the bay. Re-
move the pack and reinsert. If the problem persists,
contact a MILWAUKEE service facility.
• If the light indicator does not come on, check that
the battery pack is fully seated into the bay. Remove
the pack and reinsert. If the light indicator still does
not come on, contact a MILWAUKEE service facility.
Charging a Hot or Cold Battery Pack
The Red Flashing Indicator light on the charger in-
dicates that the battery pack temperature is outside
the charging range. Once the battery pack is within
the acceptable range, normal charging will take place
and the red light will be continuous. Hot or cold bat-
teries may take longer to charge.
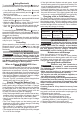
Li-Ion Charging Status
Battery Pack
Temperature
Red Charger
Indicator Light
Charging Status
Too Hot
Normal Range
Too Cold
Fast Flashing
Continuous
Fast Flashing
Not charging
Normal charging
Not charging
MAINTENANCE
WARNING
To reduce the risk of injury, always
unplug the charger and remove the
battery pack from the charger or tool before
performing any maintenance. Never disassemble
the tool, battery pack or charger. Contact a
MILWAUKEE service facility for ALL repairs.
Maintenance and Storage
Store your charger in a cool, dry place.
As a general practice, it is best to unplug battery
chargers and remove battery packs when not in use.
No battery pack damage will occur, however, if the
charger and battery pack are left plugged in.
Changing Back-up Batteries
WARNING
Batteries may leak chemicals or
may explode if used incorrectly.
The following care should be taken to prevent
such an incident:
•Make sure the positive (+) and negative (-) bat-
tery terminals are positioned correctly.
•Do not mix new and old batteries together, or
mix dierent types of batteries.
•Do not try to recharge non-rechargeable batteries.
If chemicals from the batteries come in contact
with your skin, wash them o immediately with
water. If chemicals leak onto the radio, clean the
radio completely.
Choking hazard. Keep batteries away from
children.
To hold station presets and clock time when the bat-
tery pack is removed and the radio is unplugged, (2)
AAA batteries are required.
1. Remove battery pack and unplug radio.
2. Remove the screw and battery cover.
3. Insert two (2) AAA batteries according to
matching positive (+) and negative (-) marks.
4. Replace the battery cover and screw.
5. Always dispose of used batteries properly.