
Use and Care Manual


4
WARNING
Do not use blades, brush cutting
wheels, accessories, or attach-
ments other than those recommended by
MILWAUKEE. Serious injury or product damage
may occur.
Do not operate the tool without the front handle in
place. The front handle must be attached properly
during use. Use both hands when operating the
tool, according to the attachment instructions.
Maintain a rm grip. Using one hand could cause
loss of control and result in serious injury.
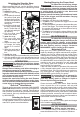
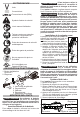
Installing the Front Handle
The front handle is shipped uninstalled
and must be installed before use.
1. Place the two nuts into the front
handle detents.
2. Insert one bracket into the handle.
3. Install the side handle on the power
head pole, below the “Place Handle
Here" sticker, at a distance that is
comfortable and provides the best
control.
4. Wrap the other bracket around the
back of the shaft.
5. Insert the two screws through the
lower bracket and into the side
handle.
6. Tighten the screws securely using
the included key.
WARNING
Before use, read manual and labels
of the attachment tool. Important
assembly and use instructions are provided in
the attachment manual. Only use an attachment
extension when recommended in the tool attach-
ment manual.
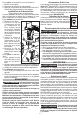
Quik-Lok
TM
System
To install an attachment or extension:
1. Remove battery pack.
2. Loosen the lock knob.
3. Slide the attachment pole into the Quik-Lok™
latch. The detent on the pole should line up with
the slot in the Quik-Lok™ latch.
4. Push the sections together securely. Tug on the
poles to ensure they are secure.
5. Tighten the lock knob.
Quik-Lok ™ release button
Detent
Attachment pole
Lock knob
Power head
To remove an attachment or extension:
1. Remove battery pack.
2. Loosen the lock knob.
3. Push in the Quik-Lok™ release button and pull
the poles apart.
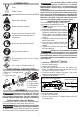
SYMBOLOGY
Volts
Direct Current
No Load Revolutions per Minute (RPM)
Safety Alert Symbol
Read operator’s manual
Always wear eye protection and
use proper personal protective
equipment.
Wear non-slip safety footwear
Wear protective gloves
Do not expose to rain or use in damp
locations.
C
US
UL Listing for Canada and U.S.
FUNCTIONAL DESCRIPTION
1. Quik-Lok ™ release button
2. Pole
3. Trigger lock-out
1
4. Rear handle
5. Trigger switch
6. Front handle
7. Lock knob
56
7
2
4
3
ASSEMBLY
WARNING
Recharge only with the charger
specied for the battery. For spe-
cic charging instructions, read the operator’s
manual supplied with your charger and battery.
Removing/Inserting the Battery
To remove the battery, push in the release buttons
and pull the battery pack away from the tool.
WARNING
Always remove battery pack before
changing or removing accessories.
To insert the battery, slide the pack into the body
of the tool. Make sure it latches securely into place.