
Instructions / Assembly

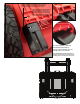
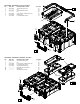
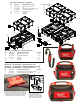

FIG. PART NO. DESCRIPTION OF PART NO. REQ.
3 43-62-8430 Side Handle Service Kit (1)
4 --------------- Pin (2)
5 44-22-8430 Latch Service Assembly (Set of 2) (1)
7 43-44-8430 Lid Gasket (Not Shown) (1)
9 31-01-0501 5 Bin Kit (Set of 1) (2)
9a --------------- Large Bin (1)
9b --------------- Small Bin (4)
48-22-8430 PACKOUT™ Organizer
FIG. PART NO. DESCRIPTION OF PART NO. REQ.
3 43-62-8435 Side Handle Service Kit (1)
4 --------------- Pin (2)
7 43-44-8435 Lid Gasket (Not Shown) (1)
9 31-01-0501 5 Bin Kit (1)
9a --------------- Large Bin (1)
9b --------------- Small Bin (4)
48-22-8435 PACKOUT™ Compact Organizer
9a
9b
9
9a
9b
(2x)
4
3
4
(2x)
4
3
4
(2x)
5
(2x)
9a
9b
9
9a
9b
(4x)
FIG. PART NO. DESCRIPTION OF PART NO. REQ.
1 48-22-8299 Shoulder Strap (For all three tote models) (1)
2 44-22-8300 Lock Kit (For all three tote models) (1)
48-22-8310 10" PACKOUT™ (Small) Storage Tote
48-22-8315 15" PACKOUT™ (Medium) Storage Tote
48-22-8320 20" PACKOUT™ (Large) Storage Tote
ð
ñ
ð
2
To install a new Lock Kit (2),
align spring as shown and
guide the tabs of locking
carriage in channels of tote
base. Push locking carriage
upward to snap into place.
1
To remove a damaged lock system, ip tote
upside down and approach tote from the bottom
of base. Insert a large at blade screwdriver in
middle of locking carriage as shown. Lightly pry
carriage upward out of base opening. Remove
and discard old locking carriage and spring.