
Use and Care Manual

8
9
APPLICATIONS
WARNING To reduce the risk of heat
damage and personal injury, shield com-
bustible materials and areas adjacent to
workpiece. Protect yourself from hot paint
scrapings and dust.
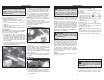
Cutting Styrofoam
1. To attach the styrofoam cutting nozzle, fi rst attach
reduction nozzle Cat. No. 49-80-0305 to the heat
gun (See “Installing Reduction Nozzles”). Attach
the styrofoam nozzle to the reduction nozzle.
2. To cut styrofoam, use a low to medium tem-
perature setting and apply heat to workpiece in
desired pattern. The nozzle will make straight or
curved cuts and will cut holes or recesses.
NOTE: Slight smoke and odors are normal and
are not harmful as long as you are working with
adequate ventilation. Cut at maximum
speed to avoid excess smoke development and
prevent the nozzle from overheating. Read the
safety instructions supplied with the
material you are cutting.
Soldering
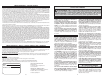
Removing Paint
Read safety instructions for removing paint before
proceeding with paint removal.
1. Begin work with low temperature setting.
2. Place nozzle approximately 1" away from work
surface.
3. Pass nozzle back and forth over a small area of
workpiece.
4. Gradually increase heat until paint starts to
blister, then remove heat.
5. Remove paint using a sharp-edged putty knife.
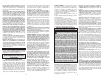
Creating Bends
Both variable temperature and dual temperature
heat guns are ideal for creating bends in plexiglass
that is used for guards and fi xtures.
1. To form a bend, use either a low or high tempera-
ture setting. When using a low temperature, hold
the heat gun close to the workpiece and pass the
nozzle back and forth slowly. When using a high
temperature, hold the heat gun further away
from the workpiece and pass the nozzle back
and forth rapidly.
2. Pass the nozzle over entire length of the surface
to be bent. Applying heat to only part of the
surface will make bending uneven.
Fig. 1
MAINTENANCE
WARNING To reduce the risk of injury,
always unplug your tool before perform-
ing any maintenance. Never disassem-
ble the tool or try to do any rewiring on
the tool’s electrical system. Contact a
MILWAUKEE service facility for ALL repairs.
Maintaining Tools
Keep your tool in good repair by adopting a regular
maintenance program. Before use, examine the
general condition of your tool. Inspect guards,
switches, tool cord set and extension cord for
damage. Check for loose screws, misalignment,
binding of moving parts, improper mounting, bro-
ken parts and any other condition that may affect
its safe operation. If abnormal noise or vibration
occurs, turn the tool off immediately and have the
problem corrected before further use. Do not use a
damaged tool. Tag damaged tools “DO NOT USE”
until repaired (see “Repairs”).
WARNING To reduce the risk of injury,
electric shock and damage to the tool, never
immerse your tool in liquid or allow a liquid
to fl ow inside the tool.
Cleaning
Clean dust and debris from vents. Keep the tool
handles clean, dry and free of oil or grease. Use
only mild soap and a damp cloth to clean your tool
since certain cleaning agents and solvents are
harmful to plastics and other insulated parts. Some
of these include: gasoline, turpentine, lacquer thin-
ner, paint thinner, chlorinated cleaning solvents,
ammonia and household detergents containing
ammonia. Never use fl ammable or combustible
solvents around tools.
Repairs
If your tool is damaged, return the entire tool to the
nearest service center.
ACCESSORIES
For a complete listing of accessories refer to your
MILWAUKEE Electric Tool catalog or go on-line
to www.milwaukeetool.com. To obtain a catalog,
contact your local distributor or a service center.
WARNING To reduce the risk of injury,
always unplug the tool before attaching
or removing accessories. Use only specifi -
cally recommended accessories. Others may
be hazardous.
1. Attach the soldering refl ector nozzle or hook
nozzle to the heat gun.
2. Deburr the pipe and joint using sandpaper or
steel wool.
3. To solder with either lead or non-lead solder, coat
the tip on both the copper pipe and the joint with
fl ux. Then slip the joint over the pipe.
4. Slip the accessory nozzle around the joint. With
the heat gun at a high temperature setting, apply
heat to the joint.
5. When the fl ux bubbles, add solder and position
heat gun so excess solder does not drip into the
heat gun.
Heat Shrinking
Fig. 2
Fig. 3
1. Attach the soldering refl ector nozzle or hook
nozzle to the heat gun.
2. To heat shrink tubing, use a low temperature
setting. Apply heat to the workpiece using a side
to side motion until tubing has shrunk. Remove
heat immediately.
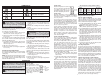
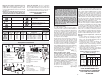
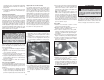
Cleaning Air Filters
Cat. No. 8986-20 and 8988-20 only
The air fi lters on these heat guns may be removed
for cleaning.
1. Unplug tool.
2. To remove the air fi lter, in-
sert a fl at screwdriver be-
tween the motor housing
and air fi lter and loosen
the air fi lter off of the back
of the tool.
3. Slide the air fi lter off the
back of the tool.
4. Remove the support pad from the air fi lter using
the screwdriver.
5. Clean any dust or debris off the air fi lter using
warm water and a brush.
NOTE: Allow the air fi lter to dry before reinstall-
ing.
6. To reinstall the air fi lter, slide the air fi lter onto
the intake vent grooves from the back end of the
tool. Allow the air fi lter to snap back into place.