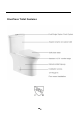
Mini Kong INSTALLATION INSTRUCTIONS for One Piece Toilet
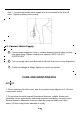
One-Piece Toilet Features 1 / 10
2 / 10
3 /10
4 / 10
TOOLS AND MATERIALS REQUIRED A. Water Supply Kit ( Not needed if replacing existing toilet) B. Adjustable Wrench C. Flathead Screwdriver D. Level E. Nut Driver or Socket Set F. Putty Knife G. Tape Measure Handling Toilets can be heavy! Please handle carefully – it may be a two-person job. If you have a one-piece toilet, support the bowl with one arm and the tank with the other. If you have a two-piece toilet, move the parts separately to avoid damaging them.
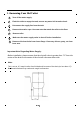
1. Removing Your Old Toilet 1 Turn off the water supply. 2 Flush the toilet to empty the tank, remove any water left in tank or bowl. 3 Disconnect the supply line from the tank. 4 Remove decorative caps. Unscrew nuts that attach the toilet to the floor. 5 Remove toilet. 6 Make sure the water supply valve is shut off before installation. 7 Remove old closet bolts from closet flange. Clean any old wax, putty, etc from base area.
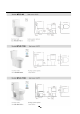
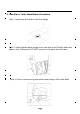
2. One Piece Toilet Installation Procedure Step 1. Install new floor bolts to the floor flange. Step 2. Attach flexible water supply line to the inlet of the fill valve and hand tighten only. At this point, DO NOT connect to the water shut-off valve. Step 3. Place a new wax ring around the water flange of the toilet bowl.
Step 4. Lower the toilet onto the closet bolts, so the bolts project through mounting holes in base of toilet. Using a rocking motion, press the bowl down to position the toilet onto the flange. Step 5. Install plastic cap washers, followed by metal washers and nuts onto the closet bolts. Tighten the bolts alternately until toilet is firmly seated on the floor. CAUTION: DO NOT OVERTIGHTEN NUTS, SEVERE DAMAGE MAY OCCURE. Step 6. Install the plastic cap covers.
Step 7. Connect the flexible water supply line (not included) to the shut off valve. Tighten coupling nuts securely. 3. Connect Water Supply 1 Connect water supply line (new or existing) between shut off valve and tank inlet water fitting. Tighten coupling nuts securely. NOTE: DO NOT OVERTIGHEN 2 Turn on supply valve and allow tank to fill until float rises to shut off position. 3 Check for leakage at fittings, tighten or correct as needed. CARE AND MAINTAINANCE DO NOT 1.
3. Do not let child play the toilet cover, to avoid hurting fingers and other accident. DO 1. Clean or wash it with neuter cleaners ( such as soap powder). And then dry it with clean fabric. 2. Open and close toilet seat cover tenderly. Toilet seat and cover both have the function of slow closing. 3. Wipe outside of the toilet gently with a damp cloth and blot dry with a soft towel. Make sure that the complete surface is cleaned and completely dry.