8928738 52" Five-Blade Dual Mount Ceiling Fan FF525BNSIL INSTALLATION INSTRUCTIONS READ AND SAVE THESE INSTRUCTIONS
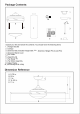
10 4 in Pull Chain (5) 10.) LED bulb(2*E26 9.
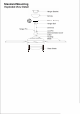
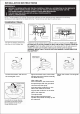
Standard Mounting Rubber Bushing
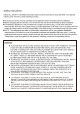
TO REDUCE THE RISK OF FIRE OR ELECTRIC SHOCK, DO NOT USE THIS FAN WITH ANY SOLID-STATE SPEED CONTROL DEVICE. TO REDUCE THE RISK OF FIRE, ELECTRIC SHOCK, OR PERSONAL INJURY, MOUNT TO OUTLET BOX MARKED ACCEPTABLE FOR FAN SUPPORT OF 15.9 KG (35 LBS) OR LESS AND USE MOUNTING SCREWS PROVIDED WITH THE OUTLET BOX TO REDUCE THE RISK OF PERSONAL INJURY,DO NOT BEND THE BLADE BRACKETS WHEN INSTALLING THE BRACKETS,BALANCING THE BLADES OR CLEANING FAN.DO NOT INSERT FOREIGN OBJECTS IN BETWEEN ROTATING FAN BLADES.
Loosen the screws and remove the rectangular cover. Tighten the blade screw with rubber washer,ensure the blades assembly into blade housing. After making the wire connections, the wires should be spread apart with the grounded conductor and the equipment-grounding conductor on one side of the outlet box and the ungrounded conductor on the other side of the outlet box. The splices after being made should be turned upward and pushed carefully up into the outlet box. Tighten the screws of rectangular cover.
1.Install the bulb(included) to the sockets. 2.Twist the glass shade to light panel in clockwise direction until glass shade is locked in place. Note: Please ensure the glass shade twisted in a right direction and locked in place. CAUTION: To Reduce The Risk Of Electric Shock, Disconnect The Electrical Supply Circuit To The Fan Before Installing Light Kit.
Hugger Mounting Rubber Bushing Rubber Bushing
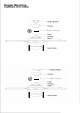
Pull Chain Pull Chain Wall Switch Wall Switch
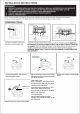
Loosen the screws and remove the rectangular cover. Canopy Rubber Bushing Install canopy into motor with screws. Tighten the blade screw with rubber washer,ensure the blades assembly into blade housing. After making the wire connections, the wires should be spread apart with the grounded conductor and the equipment-grounding conductor on one side of the outlet box and the ungrounded conductor on the other side of the outlet box.
1.Install the bulb(included) to the sockets. 2.Twist the glass shade to light panel in clockwise direction until glass shade is locked in place. Note: Please ensure the glass shade twisted in a right direction and locked in place. CAUTION: To Reduce The Risk Of Electric Shock, Disconnect The Electrical Supply Circuit To The Fan Before Installing Light Kit.
8928738 Ventilador de techo dual con cinco aspas de 52" (132 cm) FF525BNSIL INSTRUCCIONES DE INSTALACIÓN LEA Y GUARDE ESTAS INSTRUCCIONES
Contenido del paquete 10 Desembale el ventilador y verifique el contenido. Debe tener los siguientes artículos. 1.)Soporte para colgar 2.)Florón 3.)Juego de barral (incluye la bola para colgar, 4 in barral de 4 pulg. (10 cm), pasador para colgar y 4.)pasador de bloqueo) 5.)Cubierta del barral Pull Chain 6.)Interruptor de cadena 7.)Kit de montaje (5) 8.)Asta de ventilador (5) 9.)Conjunto del motor del ventilador 10.)Pantalla de vidrio LED bulb(2*E26 9.5W) 10.) 11.)Bombilla LED (2*E26 9.
Montaje estándar Standard Mounting Detalle de la vista despiezada Soporte para colgar Florón Buje de goma Rubber Bushing Bola para colgar Pasador para colgar Barral Pasador de bloqueo Cubierta del barral Collarín Carcasa Asta Pantalla de vidrio
Instrucciones de seguridad LEA TODA LA INFORMACIÓN DE SEGURIDAD Y LAS INSTRUCCIONES DE INSTALACIÓN ANTES DE COMENZAR LA INSTALACIÓN DEL VENTILADOR. GUARDE LAS INSTRUCCIONES. Se deben controlar todos los tornillos del ventilador y volver a ajustar antes de la instalación, si es necesario. Antes de cambiar la dirección del ventilador, apague el ventilador y espere que las astas se detengan completamente.
INSTRUCCIONESDE DEINSTALACIÓN INSTALACIÓN INSTRUCCIONES IMPORTANTE IMPORTANTE ANTES DE COMENZAR INSTALACIÓN DEL VENTILADOR, LEA ATENTAMENTE TODA INFORMACIÓN EN HOJA ANTES DE COMENZAR LALA INSTALACIÓN DEL VENTILADOR, LEA ATENTAMENTE TODA LALA INFORMACIÓN EN LALA HOJA SEPARADA "INSTRUCCIONES DE SEGURIDAD", ASÍ COMO LAS "INSTRUCCIONES DE INSTALACIÓN" EN LAS SEPARADA "INSTRUCCIONES DE SEGURIDAD", ASÍ COMO LAS "INSTRUCCIONES DE INSTALACIÓN" EN LAS SIGUIENTES PÁGINAS.
Interruptor inverso Meta la antena dentro del florón. Empuje el florón hacia arriba alineando los agujeros en la parte inferior con los tornillos en el soporte para colgar. Gire el florón para bloquearlo en su lugar, luego ajuste los tornillos para asegurarlo. Encienda el suministro eléctrico en la caja de fusibles o la caja del disyuntor. 1.Instale las bombillas (incluidas) en los portalámparas. 2.
Hugger Mounting Montaje al ras (sin barral) Detalle de la vista despiezada Soporte para colgar Florón Rubber Bushing Buje de goma Collarín Carcasa Asta Pantalla de vidrio Soporte para colgar Florón Buje de goma Rubber Bushing Collarín Carcasa Asta Pantalla de vidrio
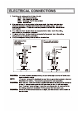
Conexiones eléctricas 1. Cuatro cables se conectan en la parte superior del ventilador. Negro: Alimentación "viva" para el ventilador. Azul: Alimentación "viva" para la luz. Blanco: "Común" para el ventilador y la luz. Verde: Cable de puesta a tierra 2. Si el ventilador y la luz se van a conectar al mismo circuito, los cables negro y azul se deben conectar juntos al cable negro en el techo usando una tuerca para cables para hacer la conexión.
INSTRUCCIONESDE DE INSTALACIÓN INSTALACIÓN INSTRUCCIONES IMPORTANTE IMPORTANTE ANTESDE DECOMENZAR COMENZARLA LAINSTALACIÓN INSTALACIÓNDEL DELVENTILADOR, VENTILADOR, LEA LEA ATENTAMENTE ATENTAMENTE TODA ANTES TODA LA LA INFORMACIÓN INFORMACIÓNEN ENLA LAHOJA HOJA SEPARADA"INSTRUCCIONES "INSTRUCCIONESDE DESEGURIDAD", SEGURIDAD",ASÍ ASÍCOMO COMO LAS LAS "INSTRUCCIONES "INSTRUCCIONES DE SEPARADA DE INSTALACIÓN" INSTALACIÓN" EN ENLAS LAS SIGUIENTES PÁGINAS. SI TIENE DUDAS, CONSULTE A UN ELECTRICISTA CALIFICADO.
Interruptor inverso Meta la antena dentro del florón. Empuje el florón hacia arriba alineando los agujeros en la parte inferior con los tornillos en el soporte para colgar. Gire el florón para bloquearlo en su lugar, luego ajuste los tornillos para asegurarlo. Encienda el suministro eléctrico en la caja de fusibles o la caja del disyuntor. 1.Instale las bombillas (incluidas) en los portalámparas. 2.
Guía de solución de problemas Si tiene dificultades para poner en funcionamiento un ventilador de techo nuevo, puede ser producto de un ensamblado, una instalación o un cableado incorrectos. En algunos casos, estos errores de instalación pueden ser por errores o defectos. Si experimenta fallas, lea esta Guía de solución de problemas. Si no se puede corregir un problema o si tiene dificultades en la instalación, llame a nuestro Departamento de Servicio al Cliente. PROBLEMA CORRECCIÓN SUGERIDA 1.
Kit de balance dinámico de las astas Vara para medir Balancear el peso Punto de medición Clip de plástico PREFACIO A veces, el ventilador de techo oscila durante el funcionamiento debido a la irregularidad de las astas o del soporte de las astas. Además, un ensamblado incorrecto en el sistema de montaje o cojinetes torcidos pueden causar problemas adicionales. Este kit de balance se puede usar para corregir los problemas de tambaleo. KIT DE BALANCE DINÁMICO PARA VENTILADORES DE TECHO 1.