
Installation Sheet


$
B
C
D
E
F
G
H
I
J
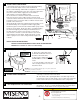
Recommended Tools & Materials
Items Included
(A) Screw Driver (B) Adjustable Wrench (C) Marker (D) Tape Measure (E) Level (F) Drill (G) Toilet Flange
(H) Wax Ring (I) T-bolts(2), nuts(2), washers(2) (J) Flexible Supply Tube (K) Wax Ring Seal Plate
(L) Fixing Screws(2), Decorative Caps(2), Cap Base(2) (M) Flange Connecting Brackets(2)
K
L
M
CAUTION PRODUCT IS FRAGILE:
Handle with care to avoid breakage and
possible injury.
Shut off water supply line to toilet. Flush toilet and remove all water from the bowl and tank using a sponge.
Disconnect the water supply from the tank.
Remove the tank from bowl, use a screw driver and adjustable wrench or socket wrench.
/RRVHQWRLOHWERZOűDQJHQXWVXQGHUEROWFDSV5HPRYHROGERZOE\FDUHIXOO\OLIWLQJLWRfIWKHűRRr.
&OHDQűDQJHDQGSOXJGUDLQZLWKDUDJWRSUHYHQWVHZHUJDVIURPHVFDSLQJ5HSODFHRUUHSDLULIUHTXLUHG
Remove Old Toilet
T-Bolts
Floor
Outlet
Flange
Wax Ring
Flange Seal Plate
T-Bolt Connection Nuts & Washer
Connection Bracket
for Attaching Toilet
to Floor Flange
Install Wax Ring Seal Plate
and Connection Brackets
Floor
Outlet
Flange
12” (305mm)
T-Connection
Bolts
1
A. Place two new T-bolts into the
slot on the toilet űDQJH.
B. Install the wax ring to the
underside of the seal plate, then press
the seal plate down evenly over the
T-bolts and onto the űRRr űDQJH.
C. Place the connection “L” brackets
onto the T-bolts, then attach the
washers and nuts to the T-bolt.
D. Tighten the assembly snug.
2
Install Water Closet Base
3
E. Place toilet bowl upside down on clean surface.
F. Install a bead of sealant or plumbers putty
around the outside foot base.
G. Now lift the bowl over the seal plate assembly
and lower the bowl into place aligning the űDQJe
connection holes with the connection brackets.
H. Firmly push the toilet down seating the
bowl horn into the rubber gasket of seal plate assembly.
I. Set the bowl in place by gently rocking back and
forth on the bowl rim. The “L” brackets should extend
up through the slots on both sides of the outlet horn.
J. With bowl ŰUPOy set, insert Ű[LQg screws into seat base,
slide connection screw and base into the űDQJe connection
holes and tighten on both sides of the bowl.
K. Snap decorative cap over connection screw
head.
Sealant or
Plumber Putty
Seal Plate Assembly
Flange
Connection
Holes
Note: Views in this illustration are for general representation
and may not necessarily deŰQHWKHH[DFWFRQWRXUVRIWKHSURGXFW
Outlet Horn
Decorative Cap Connection Screw Base
Install Water Closet Base
4348/4349
12/2015REV
-1-
&HUWLŰHGE\
R&TIAPMO