m_ MITSUBISHI THE BIG SCREENCOMPANY _
RISK OF ELECTRIC DO NOT OPEN CAUTION: SHOCK TO REDUCE THE RISK OF ELEC- TRIC SHOCK DO NOT REMOVE COVER (OR BACK). NO USER SERVICEABLE I"/_K I ,3 REFER SERVICING IIN,.blUr-. T,O QUAUEIED The Hghtnmg flasn with arrownea(] SERVICE PERSONNEL , , symDo_ w_min an equHa[era_ [nang_e ts th-t6naeo to alert the user of the presence of uninsulated "dangerous voltage" within the product's may be sufficient magnitude to constitute a risk of electric shock.
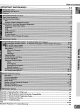
Table of Contents IMPORTANT SAFEGUARDS ............................................................................ 4-5 heR_ ....... ,30;;i_ i;3_iil;_i arlM =rlRLO i_a_uF _dCO I-ea_ N!il UeSC ;471; ;ii !i;! ili_ 491 _.ppendix A: Bypassing the V-Chip Lock ........................................................................................................... 55 _,ppendix B: High Resolution Input Connection 57 Compatibility ..................................................................
IMPORTANT Please read the following Always follow . . SAFEGUARDS safeguards all warnings for your TV and retain for future and instructions marked reference. on the television. Read, Retain and Follow All Instructions Read all safety and operating instructions before operating the TV. Retain the safety and operating instructions for future reference. Follow all operating and use instructions. Heed Warnings Adhere to all warnings on the appliance and in the operating instructions. 3.
IMPORTANT 12. SAFEGUARDS Continued Power Lines An outside antenna system should not be located in the vicinity of overhead power lines or other electric light or power circuits, or where it can fall into such power lines or circuits. When installing an outside antenna system, extreme care should be taken to keep from touching such power lines or circuits as contact with them might be fatal. 13.
Part I: Thank You A Note of Thanks from Mitsubishi... Thank you for choosing Mitsubishi as your premier home entertainment partner. The development team at Mitsubishi understands that our customers are not the average people: they demand and expect the very best. Hence, countless hours have been invested to produce a sophisticated product that we hope will meet all of your expectations.
Part I: Thank You Unpacking Your New TV Features Please take a moment to review the follow- Your new bigscreen television has many features that make it the perfect addition to your home entertainment system. Below we have highlighted a handful. ing list of items to ensure that you have received everything included: [] Remote Control [] [] [] [] [] (2) AAA Batteries (2) IR Emitter Cables _vs_6oT,gan_vs_7oTogo.
Part I1: Installation Front Control Panel Many remote control buttons are duplicated on the front control panel. These buttons are shaded in figures 1 and 2. Please see Remote Control Functions, pages 46-51, for an explanation of their functions. You may temporarily deactivate the buttons on the front control panel with the Front Button Lock feature, see Front Button Lock, page 39. A/V RESET O Figure 1. Front Control Panel for models VS-45609, VS-50609, VS-55609, and VS-60719.
Part I1: Installation E3ackPanel COMPONENT V I O D E O CABLE ANT-A LOOP-OUT P_OO ANT-B L A L U D (MONO) pb@@R I O DVD I_ IR EMITTERHOME THEATER (YPrPb) ®®-a AUDIO I INPUT INPUT FIXED/ VARIABLE OUTPUT [] Antenna (ANT-A, CABLE LOOP-OUT, ANT-B) ANT-A and ANT-B receive signals from VHF/UHF antennas or a cable system. LOOP OUT sends the ANT-A signal out to another component, such as a cable box or VCR.
Part I1: Installation How Connections Affect the PIP To see a picture in the PiP inset, you may need to select an input source. If the only input connected is ANT-A, then both the main picture and the PIP insert will be from that input source. If other video equipment is connected, you may be able to view these input sources as the PIP insert. When connecting your new Mitsubishi bigscreen, it is important to understand which main picture and PIP input sources can and cannot be used together.
Part I1: Installation Special Setups: VCR: Connect A/V Equipment (For System 4 Home Theater IR Control) the cables to the TV as directed on page 17, with the following exception: Connect the audio output connection to the appropriate input on the back of the A/V receiver (as shown in table 1).
Part I1: Installation Connecting an Antenna, Wall Outlet Cable, or Cable Box VHF A_mn_ Separate UH_ Amen_a UHF and VHF Antennas (Figure 1) Fi_Tw_nLe_d [] Connect the UHF and VHF antenna leads to the UHF/VHF combiner. [] Push the combiner onto ANT-A on the TV back panel. UHF/VHF combiners are not provided with the TV. They should be available at most electronic stores. [] _at_T_ _×_e_n_i An_ O_C_U_ TV back panel ...... ®® _®®_ ,,=® ®® ........ Im Figure 1.
Part I1: Installation Connecting a VCR ......... Antennas or Wall Outlet Cable (Figure 1) [] Connect the incoming cable to ANT-A on the TV back panel. [] Connect two coaxial cables as follows: [] One from LOOP-OUT on the TV back panel to ANTENNA IN on the VCR back panel. [] One from VCR back panel ANTENNA OUT to ANT-B on the TV back panel. [] Now complete figure 3, steps 1-2. Figure 1. Connecting cable.
Part I1: Installation Connecting an Audio Receiver Stereo Audio System T_ (Figure 1) ® @ ® [] Connect the audio cables from AUDIO MONITOR OUTPUT on the TV back panel to TV IN or AUX IN terminals on the back of the audio system. The red cable connects to the R (right) channel, and the white cable connects to the L [] [] (left) channel. Turn off the TV's speakers through the Audio/Video Settings Menu, page 41.
Part I1: Installation WARNING: Connecting a DVD Player DVD Player with Component Video (Figure 1) [] j DVD _ack Panel Figure 1. Connecting the DVD playe_ Connect the Component Video cables from Y/Cr/Cb or Y/Pr/Pb VIDEO OUT on the back of the DVD player to COMPONENT on the TV back panel, matching the correct components: [] YtoY [] CrorPrtoPr [] CborPbtoPb [] Connect a set of audio cables from AUDIO OUT on the back of the DVD player to COMPONENT AUDIO Input on the TV back panel.
Part I1: Installation Connecting the System 4 Home Theater IR Control Models VS-60719, VS-70709. (Figure 1) [] Connect the IR emitter to IR EMITTER [] HOME THEATER on the TV back panel. Place the IR emitter cable under or [] [] along the side of the A/V device. Place the IR lens directly in front of the A/V device's infrared signal receiver. Infrared signal receivers are usually behind the front translucent panel of the device. Place unused transmitters in an out-ofthe-way location.
Part I1: Installation Warning: Do not leave stationary or letterbox images on-screen for extended periods of time. Mix the types of pictures shown. Uneven picture tube aging is NOT covered by your warranty. The normal use of a TV should include a mixture of TV picture types. The most frequently used picture types should fill the screen with constantly moving images rather than stationary images or patterns.
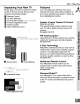
Part II1: Setup Programming the Remote Control: To Control Other A/V Products To Program the Remote to Control Other Brands of Audio and Video Products: (Figures 1-5) [] [] Move the slide switch at the top of the remote to the product you want to control. Press and hold the POWER button on the remote control. [] [] Enter the first three digit code listed for your equipment, and then release the POWER button on the remote control.
Part II1: Setup Programming the Remote Control: To Control Other A/V Products POWER ©ABL_DBS TV [] E DVD/LDP brand Codeto enter: Mitsubishi (DVD) Mitsubishi (LDP) Panasonic 003 016,017 250 Pioneer DVD (LDP) Sony Toshiba 252 (016, 017) 254 253 To reset to default code, enter 000 If your DVD code Js not listed here, please see page 62 fora complete listing, Figure 4. Programming the remote to control your DVD/ LDP.
Part II1: Setup Programming the Remote Control: To Activate the System 4 Home Theater IR Control Models VS-60719 and VS-70709 Activation of the System 4 Home Theater IR Control You can, with certian digital A/V receivers, set up the remote control to automatically select the correct audio input when you press the HOME THEATER button. At the same time, the TV will select the correct video input.
Part II1: Setup Programming the Remote Control: To Activate the System 4 Home Theater IR Control Models VS-60719 and VS-70709 Testing System 4 for Proper Setup [] [] [] Move the slide switch to the position you wish to test. Point the remote at the TV. Press and release the HOME THEATER button. If the audio portion has been properly setup, your A/V receiver will have changed to the appropriate input as indicated in table 1, page 15.
Part II1: Setup nll llll" Menu The Your TV has Mitsubishi's on-screen on-screen System exclusive I_11 ® operating system, which provides information for menu choices and changes (Figure 1). A picture (icon) will be highlighted when selected with the ADJUST arrows. The icon A square button indicates that your menu selections will be made on the current menu by selecting the square button and pressing ENTER. Figure 1.
Part II1: Setup Menu Screens (Overview) SETUP Menu (Figure 1) You can put channels in memory, enter the CLOCK submenu, and select the menu system to display in English or Spanish (EspaSol). Figure 1. Setup menu. CAPTIONS Menu (Figure 2) Display captions or text, and choose black or gray as the background color for the closed caption area. Figure 2. Captions menu.
Part II1: Setup Menu Screens (Overview) CHANNEL EDIT Menu (Figure 1) Use to customize the channel information for Ant-A and Ant-B. Manually add or delete channels from memory, name channels for Ant-A and Ant-B, or add your favorite channels to the SQV (Super Quick ViewTM)Iist. Figure ADVANCED FEATURES I. Channel Edit menu.
Part II1: Setup Setup Menu: Memorize Channels, Clock, and Language Memorize Channels (Figure 1) Figure 1. Memorize Channels menu. This selection memorizes the channels your TV can receive and skips the unused or weak channels. You can stop memorization at any time by pressing CANCEL. Channels memorized prior to pressing CANCEL will stay in memory. After channels are memorized, you may select memorized channels in ascending or descending order by pressing the CHANNEL button on the remote control.
Part II1: Setup Captions Menu: Closed Captions Captions Menu (Figure 1) Broadcasters can send either Standard or Text closed captioning. Standard closed captioning follows the dialogue of the characters on-screen and displays in a small section of the screen. Text closed captioning often contains information such as weather or news and covers a large portion of the on-screen program. Your TV can decode four different standard and four different text closed captioning signals from each TV station.
Part II1: Setup V-Chip Parent Lock Menu: V-Chip Lock V-Chip Lock (Figure 1) Figure 1. V-Chip Lock menu. The V-Chip Lock allows you to Block or Allow programs based upon rating signals sent by the broadcasting station. The TV comes from the factory with the V-Chip lock in the Off setting. You can turn the lock On within the V-Chip Menu. The factory preset is TV-PG, allowing only programs rated TV-PG or lower.
Part II1: Setup V-Chip Parent Lock Menu: V-Chip Lock Ant-A 002 KCBS V-Chip Signal Information (Figure 1) When provided by the broadcaster, V-Chip signal information can be displayed by press_ing the INFO button on the remote control. Rating guidelines are provided by broadcast stations. TV programs and made-for-TV movies can be blocked by the TV Rating and/or Categories signal. Made-for-theater and direct-to-video movies can be blocked Figure 1. V-Chip signal information. by the Movie Rating signal.
Part II1: Setup V-Chip Parent Lock Menu: V-Chip Hours/Lock V-Chip Hours/Lock By Time By Time (Figure 1) V-CHIP HOURS/LOCK BY TIME will allow you to activate the V-Chip or lock the entire TV during specific hours. V-Chip Start Time and V-Chip Stop Time (Figure 1) Figure 1. V-Chip Hours/Lock By Time menu. Select the times you would like the V-Chip to be Active. By setting the V-Chip Start Time and V-Chip Stop Time to the same time, the V-Chip will be active 24 hours a day.
Part II1: Setup Channel Edit Menu:Input, Channel, Memory, Name and SQV TM SQV (Super Quick View TM) Using The Menu Screen (Figure 1) SQV (Super Quick View TM) allows you to put together a list of your favorite channels from Ant-A and Ant-B. You can quickly look through the list using the SQV button. Once you have added a channel to the SQV memory, "SQV" will appear under the channel number any time the channel number is displayed on the TV screen. Figure 1. Channel Edit menu.
Part II1: Setup Advanced Features Menu: Timer Timer (Figure 1) The timer will automatically turn the TV on (if it is off) at the time you schedule and select. Figure 1. Advanced Features menu. Set Time Select the hour and minute, including AM or PM, when the TV is to turn on. Press A or • to slowly adjust the time. Press and hold A or • to quickly adjust the time. Figure 2. Timer menu. Timer Menu (Figure 2) The timer can be turned On or Off.
Part II1: Setup Advanced Features Menu: Convergence Convergence (Figure 1) Your Mitsubishi TV has three picture tubes which are aligned to properly converge the projected light beams on the screen. Each picture tube projects a single color of red, blue or green. During production, your TV was carefully adjusted to properly align these colors. As a special feature, you have the ability to adjust the red and blue light beams in reference to the fixed green light beam. This process is called convergence.
Part II1: Setup Advanced Features Menu: Advanced Convergence Special Features and Advanced Convergence (Figure 1) Figure 1. Advanced Convergence screen. After adjusting the Red Convergence and Blue Convergence, you can fine-tune your TV by adjusting the Red and Blue convergence at 64 individual points. Move the flashing bracket to a position needing adjustment by pressing A, V, <, or,. Press ENTER to select the position (flashing will stop). Move the Red or Blue line by pressing A, V, <, or,.
Part II1: Setup Audio/Video Settings Menu: AV Memory Reset, and Audio/Video Settings AUDIO/VIDEO SETTINGS menu (Figure 1) Each of the television's inputs has its own A/V memory. You can adjust each input's A/V memory in two ways. You can use the menu, or the remote control. A/V Memory Reset A/V Memory Reset will return the currently selected input's A/V memory to the factory settings. To reset an input's A/V memory, move to A/V Memory Reset, select the input you want to reset, and press ENTER.
Part II1: Setup Audio/Video Settings Menu: TV Speakers, and Audio Output TV Speakers (Figure 1) This selection will turn on or off the TV's internal speakers. You may select Off when sending the sound through a separate stereo system or surround sound A/V receiver. Figure 1. Audio/Video Settings menu. Audio Output (Figure 1) Select Fixed if your audio receiver or stereo system can be controlled with a remote.
Part II1: Setup A/V Setting Descriptions: Audio Audio Settings [] Bass enhances • Mono: Reduces background noise, and should be used when receiving a weak stereo audio signal. All audio will be played mono with this setting. or reduces low fre- quency sound. [] Treble enhances orreduces high frequency sound. [] Balance adjusts the level of sound between the left and right speakers. [] Surround creates simulated stereo and surround effects. Your choices are: • Off: No surround effects.
Part II1: Setup A/V Setting Descriptions: Video Video Settings [] Contrast provides a slider to adjust the white-to-black level. Low contrast shows a variety of shades in darker images, while high contrast shows darker images more uniformly black and makes colors appear more vibrant. [] Brightness provides a slider to adjust the overall brightness of the picture. [] Sharpness provides a slider to adjust the detail and clarity. [] Tint provides a slider to adjust the proportion of red to green.
Part IV: Operation Remote Control Functions: Overview Overview (Following page, figure 1) [] [] [] [] [] [] [] [] [] [] [] [] [] [] [] [] Slide Switch: Select A/V product to be controlled by the remote control. Numbers: Individually select channels or input information into TV. POWER: Turns power on and off for TV and other A/V products. SQV (Super Quick ViewTM): Scan through a memorized list of favorite channels. [] CANCEL: entries. [] MENU: Display I_L_III ®on-screen menu system.
Part IV: Operation Remote Control Functions: Care and Operation Operation Installing the Batteries: (Figure 2) [] Remove the remote control's back cover by gently pressing the ridged tab in the direction of the arrow and sliding off the cover. [] Load the batteries, making sure the polarities (+) and (-) are correct. For Best Results from the Remote Control: REW_£V pLAy [] [] Be within 20 feet of the equipment. Do not press two or more buttons at the same time unless instructed otherwise.
Part IV: Operation Remote Control Functions: Channel Selection and Sleep Timer _' Channel [] Selection Enter three numbers press 002). Sleep (for channel 2, or [] Press the channel number and ENTER Setting the Sleep Timer: [] [] (for channel 2, press 2, then ENTER). or [] Enter the channel number and wait four seconds. cally. Timer [] The TV will change automati[] [] Press SLEEP on the remote control.
Part IV: Operation Remote Control Functions: System 4 Home Theater IR Control Models VS-60719 and VS-70709 Requirements [] for Operation A/V devices connected as described on page 15. [] Cable Box connected as on page 16 or Cable Box with an S-Video output connected on page 19, Connecting an S-Video Device. [] TV connected to A/V receiver (TV Monitor Audio Out To A/V Receiver TV Input).
Part IV: Operation Remote Control Functions: Special Functions When your remote control has been Programmed to operate another manufacturer's product, the function performed on each layer can vary.
Part IV: Operation Remote Control Functions: Operation of PIP Changing PIP Inputs Press PiP INPUT to cycle through available inputs. To see which inputs can and cannot be used together, see How Connections Affect the PIP - Table 1, page 14. [] Changing PIP Channels Press PiP CH to scroll up and down through memorized channels on Ant-A, and Ant-B. Figure 1. PIP window sizes. Exchanging Program Images Press ENTER/EXCH to exchange the main picture and the PIP picture.
Part IV: Operation Warning: Do not leave stationary or letterbox images on-screen for extended periods of time. Mix the types of pictures shown. Uneven picture tube aging is NOT covered by your warranty. The normal use of a TV should include a mixture of TV picture types. The most frequently used picture types should fill the screen with constantly moving images rather than stationary images or patterns.
Z < Reset System Defaults Menu (Figure1) (1} 00 To access the Reset System Defaults menu screen, you must first be out of any active menu screen. You can do this by pressing the HOME button on the remote control. Press the MENU button followed by number buttons 1, 2, and then 3, on the remote control. This sequence will activate the Reset System Defaults menu screen. Pressing the ENTER button on the remote control will reset all option settings back to the factory defaults.
Appendix A: Bypassing the V-Chip Lock Appendix Bypassing O O "11 A: Bypassing the V-Chip Lock the V-Chip Lock After you set the lock, you need your passcode to view a V-Chip locked program, view the locked TV, cancel the lock, or enter the V-Chip lock menus. If you forget your passcode, you can view the locked TV without entering your passcode. This is done by pressing the number 9 and QV buttons on the remote m TV control at the same time, when your passcode is requested.
Appendix Component B: Component Input Connection Compatiblit Input Connection Compatability These inputs are compatible with component video signals from standard DVD players and other equipment sending a standard NTSC component video signal (480i). Input Levels and Timing with Component Video []Y [] Pr =l.
Appendix C: Remote Control Pr rammin A/V Receivers Mitsubishi ........ .............. Admiral .......... Aiwa ............ Denon .......... Fisher .......... Gerrard .......... Harman Kardon .... Jensen .......... JVC ............ Kenwood ........ Magnavox ........ Marantz ........ Mclintosh ........ Nakamichi ........ Onkyo .......... Optimus ........ Panasonic ........ Philips .......... Pioneer .......... Quasar .......... RCA ............ Sansui .......... Sharp .......... Sony ..........
Appendix D: Cleanin and Service Cleaning Service Normally, light dusting with a dry, nonscratching duster will keep your TV clean. Use care when cleaning your TV with any other product. If you want to gently wipe down your TV with a lightly moistened soft cloth, first turn off and unplug your TV. You can add a few drops of mild liquid detergent to the water for oily dirt.
Appendix E: Troubleshootin Problem The TV remote control does not work. Possible Solution • Check that the batteries are installed correctly • Check that the selected switch is set to "TV". • Be no further than 20 feet from the TV when using the remote control The TV takes several seconds to respond to channel commands • Press ENTER after a channel number to avoid delays. • Use the three digit number, i e 002 for channel 2 You cannot access a channel.
Index t! adding and deleting Advanced channels Features adjusting menu 37 (convergence) alignment (connecting) assistance 38-39 16 6, 22, 59 audio settings JV espaSol 29, 31 naming channels EXCH button on remote 46 naming inputs 26, 36 noise reduction 38-39 (convergence) antennas 36 E 42 36 (Video NR) 43 F front control panel 12 F Front Button Lock 39 passcode audio output 13, 30, 40-41 33, 35, 55 Picture-in-Picture (PIP) Demo Mode 39 G B Setup Operation games 21, 52
Index 480p (progressive DVD), 41, 61 720p, 61 960i, 41 ventilation, Sleep Timer, 52 46 33 Special 37 37 4, 63 Video Display, 41 sound (adjusting), Spanish, ratings and categories, signal information, Video Mute, 41 Video Settings, Functions, 47 54 SQV (Super Quick ViewTM), 35 stand, 4 STATIONARY WARNING, PICTURE 19, 23, 58 surface, 4, 63 surges, 5 3r" time (setting), 44-45 Timer (turn TV on), 39 Timer (Sleep), 52 treble, 46 Troubleshooting, TV speakers, 64 43 tJ unpacking, 9
Mitsubishi Pro'ection TV Limited Warrant MITSUBISHI PROJECTION TELEVISION LIMITED WARRANTY MITSUBISHI DIGITAL ELECTRONICS AMERICA, INC. ("MDEA') warrants to the original purchaser of this television that if purchased from an authorized MITSUBISHI Audio/Video Dealer, should it prove defective by reason of improper workmanship and/or material: a, Parts. The lenticular (i.e, front picture) screen and/or the DiamondShield TM is warranted against defects in materials and workmanship for a period of 30 days.