
Installation Guide


Barn Door Hardware Kit
ASSEMBLY INSTRUCTIONS
BARN DOOR HARDWARE KIT
ASSEMBLY INSTRUCTIONS
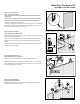
Step 13. OPTIONAL Track Joiner
Note: Track joiner sold separately. Designed to join (2)
tracks for wider opening applications.
®
www.millikenmillwork.com
Step 14. Stopper Installation
Slide the door closed and to correct position of both
stoppers. Using the provided Allen key, tighten into position
to complete the installation of the Barn Door Kit.
(X2)
Align the two tracks together. Position the track joiner on the
front face of the tracks, with the lip under the bottom edge. Use
the Allen key to fasten the four screws into place.
Step 13. OPTIONAL Track Joiner
Note: Track joiner sold separately. Designed to join (2) tracks for wider
opening applications.
Align the two tracks together. Position the track joiner on the front face of the
tracks, with the lip under the bottom edge. Use the Allen key to fasten the four
screws in place.
Step 14. Stopper Installation
Slide the door closed and to correct position of both stoppers. Using the
provided Allen key, tighten into position.
BARN DOOR HARDWARE KIT
ASSEMBLY INSTRUCTIONS
Step 13. OPTIONAL Track Joiner
Note: Track joiner sold separately. Designed to join (2)
tracks for wider opening applications.
®
www.millikenmillwork.com
Step 14. Stopper Installation
Slide the door closed and to correct position of both
stoppers. Using the provided Allen key, tighten into position
to complete the installation of the Barn Door Kit.
(X2)
Align the two tracks together. Position the track joiner on the
front face of the tracks, with the lip under the bottom edge. Use
the Allen key to fasten the four screws into place.
Image for bent strap shown
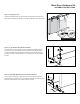
Step 15. Fill-in Plug
If your track has 2 holes on each end, it has been prepared for kit expansion.
Ask your supplier about a track joiner (sold separately) to expand your kit.
If you do not wish to add another kit, use the plugs supplied to ll the holes.
This will complete the installation of the Barn Door Kit.