
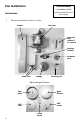
Installation Sheet

9
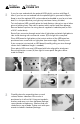
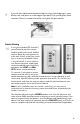
If your fan was ordered with the optioinal light kit, align slotted openings in glass
diffuser with small posts on inside edge of light plate. Push up and gently rotate
into place. There is no need to forcefully over-tighten the glass diffuser.
9
10
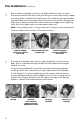
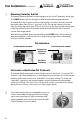
Device Pairing
If using the individual RF channel(s),
you will need to pair your remote
handset and/or wall control with the
receiver. Begin by turning power off
at the wall control, at the main switch
leg, or at the circuit breaker if there
is no wall control or on/off switch in
use. Switch the power supply back
on and immediately press and firmly
hold down the LIGHT and FAN
OFF buttons simultaneously for
10 seconds. If using both a remote
handset and wall control with a fan,
repeat these pairing steps with the second device. If using a handset or wall
control only, repeat the pairing steps again with that device. This “pushes out”
the Universal code from the receiver memory and will avoid interference from
any nearby controls set to the Universal channel.
Note: If your installation does not include a switch leg, you may need a
second person to execute the pairing steps described below immediately after
breaker is turned on.
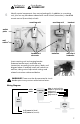
Test the pairing by pressing the SPEED+ button once. Your fan will pause and
make several subtle movements prior to achieving a normal spinning motion. If fan
does not respond, verify that power is on at the breaker and repeat pairing steps
above. If fan does respond as expected, press the FAN OFF button, wait for fan to
come to complete stop and then test pairing of second transmitter (if applicable).