
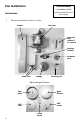
Installation Sheet

If your fan was ordered with the optional LED light kit, continue with Step 2
here. If your fan was not ordered with the optional light kit, proceed to Step 3.
Keep in mind, the optional LED can be ordered and added to your fan at a later
date. It is also possible that your light may have been factory installed.
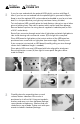
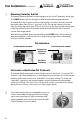
To install optional LED, carefully place fan body (bottom side up) on top of either
piece of packing foam. Take care to protect wires and fan body from damage.
Remove bottom cap from fan using wrench supplied in hardware pack (or with
a 5/16” socket drive).
Route 2-pin connector through center hole of light plate and attach light plate to
tabs inside housing with countersink screws (2) from light kit screw pack.
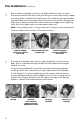
Place LED board on light plate so that cutout notches of the LED board are
positioned over screw holes on light plate (near outer edge). Carefully insert
2-pin connector into terminal on LED board (carefully pulling on wires through
center shaft if additional length is needed).
Place plastic LED cover over LED board with holes aligned for attachment.
Secure with button screws (3) from light kit screw pack. Set glass diffuer
aside for Step 9.
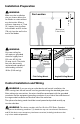
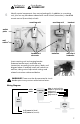
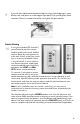
Carefully place fan on packing foam or work
surface, bottom side down. Be sure fan is
positioned so it will not fall. Using carriage bolts,
washers and acorn nuts from hardware package,
secure blades to blade arms. Washers and nuts
should be on top of blade. Tighten nuts with open
wrench included in hardware package.
2
3
5
WARNING
See Page 2
POWER OFF
Circuit Breaker