
Installation Sheet

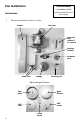

Fan Installation (continued)
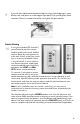
6
canopy
reinstall
half-ball with
stopper pin and
tighten set screw
hanging
bracket
place fan in
bracket
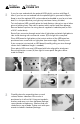
Remove down rod stopper screw from fan body and loosen collar set screw.
Also remove half-ball from down rod by loosening set screw and removing stopper
pin, setting aside for Step 5. Run lead wires from fan body through selected down
rod and fit down rod into fan body collar, taking care not to pinch or damage wires.
Align holes in down rod with hole in collar and reinstall stopper screw, tightening
firmly. Also firmly tighten collar set screw against down rod.
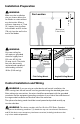
Note: If ceiling height allows, a longer down rod will improve air flow performance.
However, blades must be at least 7 feet above the floor.
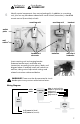
Run lead wires through center hole of canopy and gently set canopy on fan
body. Then run lead wires through half-ball, reinstall stopper pin and tighten
half-ball set screw.
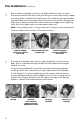
Using screws provided with junction box, securely attach hanging bracket
to ceiling junction box. Junction box must be visibly marked as “Acceptable
for Fan Support.” It is recommended that the flat washers and lock washers
from the hardware pack be used for added security. Lift fan to ceiling and set
half ball in the hanging bracket so that the ridge on the edge of the hanging
bracket is seated in the slotted channel in the half ball.
4
5
remove stopper
screw and loosen
set screw
remove half-ball and
stopper pin
reinstall stopper
screw and tighten
set screw