
Gas Heater User Manual


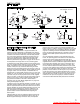


To Install (Figure 5)
1. Remove and discard the motor tie down strap and the
shipping block beneath the belt tension adjusting screw
(Not used on all models.)
2. Adjust motor adjusting screw for a belt deflection of
approximately 3/4" with five pounds of force applied midway
between the sheaves (refer to Figure 6a). Since the belt
tension will decrease dramatically after an initial run-in
period, it is necessary to periodically re-check the tension.
Excessive tension will cause bearing wear and noise.
3. The blower bearings are lubricated for life; however, before
initial unit operation the blower shaft should be lubricated at
the bearings with SAE 20 oil. This will reduce initial friction
and start the plastic lubricant flowing.
4. Make electrical connections according to the wiring
diagram.
5. Check rotation of the blower. Motor should be in clockwise
rotation when facing motor pulley. If rotation is incorrect,
correction should be made by interchanging wiring within
the motor. See wiring diagram on the motor.
6. The actual current draw of the motor should be determined.
Under no condition should the current draw exceed that
shown on the motor rating plate.
7. It is the installers responsibility to adjust the motor sheave
to provide the specified blower performance as listed on
pages 18 & 19 for blower settings different from the factory
set performance. The drive number on the unit may be
identified by referring to the Power Code number on the
serial plate of the unit (see page 26 for model number
nomenclature) and matching that number with those shown
on page 25. From the listing, the drive number can be
determined.
8. Blower sheave and motor sheave should be measured to
assure correct drive is on unit. Refer to page 26 for drive
sizes.
B
lower Adjustments
Following electrical connections, check blower rotation to
assure blow-through heating. If necessary interchange wiring to
reverse blower rotation. Start fan motor and check blower
sheave RPM with a hand-held or strobe-type tachometer. RPM
should check out with the speeds listed in Performance Data
shown on pages 18 and 19. A single-speed motor with an
adjustable motor sheave is supplied with these units. If blower
fan speed changes are required, adjust motor sheave as
follows:
N
OTE: Do not fire unit until blower adjustment has been made
or unit may cycle on limit (overheat) control.
1.
Shut-off power before making blower speed adjustments.
Refer to Determining Blower Speed on page 7 and to
Performance Date on pages 18 and 19 to determine
proper blower RPM.
2. Loosen belt and take belt off of motor sheave.
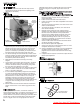
3. Loosen set screw on outer side of adjustable motor sheave
(see Figure 6).
4. To reduce the speed of the blower, turn outer side of motor
sheave counterclockwise.
5. To increase the speed of the blower, turn outer side of
motor sheave clockwise.
6. Retighten motor sheave set screw, replace belt and
retighten motor base. Adjust motor adjusting screw such
that there is 3/4” belt deflection when pressed with 5
pounds of force midway between the blower and motor
sheaves (see Figure 6a). Since the belt tension will
decrease dramatically after an initial run-in period, it is
necessary to periodically re-check the tension to assure
continual proper belt adjustment.
7. Check to make certain motor sheave and blower sheave
are aligned. Re-align if necessary.
8. Re-check blower speed after adjustment.
9. Check motor amps. Do not exceed amps shown on motor
nameplate. Slow blower if necessary.
10. Check air temperature rise across unit. Check temperature
rise against values shown in Performance Tables on
pages18 and19 to assure actual desired air flow is being
achieved.
11. If adjustments are required, recheck motor amps after final
blower speed adjustment.
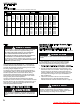
8
TOWARD MOTOR
SET SCREW
ADJUSTABLE HALF
OF SHEAVE
3/4" DEFLECTION
WITH 5# FORCE
INSTALLATION
Figure 6
Motor Sheave Adjustment
Figure 6a
Belt Tension Adjustment
Figure 5
Blower Model
THREADED ROD MOUNTING
BRACKETS ON BLOWER ASSEMBLY
MOTOR
MOUNTING
BRACKET
BLOWER
SHEAVE
BLOWER
HOUSING
MOTOR
ADJUSTMENT
SCREW
MOTOR SHEAVE
Heater Parts from ACF Greenhouses