
Installation Manual
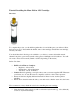


Tutorial: Installing the Moen 1200 or 1225 Cartridge
Overview
To complete the project, you should first gather the tools and all the parts you will need. Next,
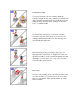
the basic steps are to disassemble the handle, remove the cartridge, reinstall the new cartridge,
and test your water.
You should have the following tools available to you before you start: adjustable wrench,
channel-lock pliers, open-ended wrench, safety glasses, flashlight, and screwdrivers. You will
also need to have a hex wrench (7/64th or 3/32nd, depending on the faucet).
Before You Start…
Skill Level & Time to Complete
o Beginner - About 1 hour
o Intermediate - About 30 minutes
o Advanced - About 15 minutes
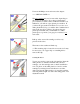
Caution: Before beginning your repair, always turn your water supplies OFF. Then turn
your faucet on to be sure the water is completely off and to relieve water pressure.
Faucet models have slightly different instructions. Please review each step before
installing.
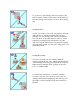
If there are no shutoffs under the sink, you would need to shut the water off to the home.
We recommend to always flush the valve before installing the new cartridge:
Clean the inside of the valve body with a soft bristled nylon brush (e.g. old toothbrush),
to remove any mineral buildup.