
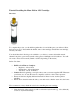
Installation Manual


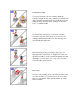


The next step will send a lot of water through the open valve. Use bowls or similar
devices to redirect water from the open valve back to the sink or tub. You may also
want to put a towel over the open valve to collect the water.
Then, turn on the water supply lines to flush clean water through the open valve. This
will push debris up and out of the unit.
Steps
If you are replacing a cartridge in faucet type A continue
to step 2a.
If you are replacing a cartridge in faucet type B continue
to step 3a.
If you are replacing a cartridge in faucet type C continue
to step 4a.
If you are replacing a cartridge in faucet type D continue
to step 5a.
If you are replacing a cartridge in faucet type E continue
to step 6a.
If you are replacing a cartridge in faucet type F continue
to step 7a.
Disassembly
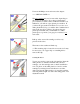
To remove the cartridge from your faucet assembly, first
use a flat-headed screwdriver to carefully pry the cover
from the handle. Using a Philips screwdriver unscrew the
handle screw.
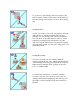
Pull the handle off from the faucet and pull the limit stop
off. Remove the washer from the cartridge and use pliers
to remove the retaining clip. Pull the stemp up on the old
cartridge to relieve any pressure in the faucet.