
Owner`s manual


FILTER INSTALLATION / REPLACEMENT
1. The filter needs to be replaced when the Filter Life Indicator Light begins to
flash red. A flashing amber light indicates less than 8% filter life remaining.
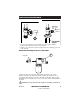
2. Turn off water pressure by closing the Stop Valve located next to the Filter
Life Indicator Module (12). Turn lever of stop valve to form a 90° angle with
the hose. Open position of stop valve shown below.
CAUTION: The Stop Valve must be closed before removal of filter.
3. Next, turn the AquaSuite faucet
handle to the full ‘ON’ position for
several seconds to relieve any
remaining water pressure, then
turn back ‘OFF’.
4. Rotate the filter (13) by moving
the arrow from the locked position
until it comes to a complete stop
in the unlocked position.
5. Pull the filter down and out of the
Filter Mounting Bracket. It is
normal for a small amount of water
to drip from the mounting bracket
when the filter is removed.
6. Remove new filter from packaging
and install by reversing steps 4
and 5 above.
7. Turn on water pressure by opening
the Stop Valve.
8. Turn the AquaSuite faucet lever to
the full ‘ON’ position for several
seconds to confirm proper
operation of the filter and turn
back ‘OFF’.
CAUTION: Air pressurization of
the filter occurs once the stop
valve is opened following a
new filter installation. Make
sure to relieve the pressure in
the system by opening up the
AquaSuite faucet valve after
you open the stop valve on the
Filter Life Indicator Module.
Locked Position
Unlocked Position
Filter Life
Indicator Light
AquaSuite
Faucet
INS412A
10
HELPLINE: 1-877-DRINK-H2O
(1-877-374-6542)
Stop valve