
OWNER'S OPERATION AND INSTALLATION MANUAL VENT-FREE HEARTH HEATER BTU/Hr


6 49D0090
49D0090 7
ASSEMBLY
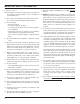
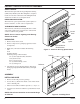
INSTALLING LOGS
NOTE: For easier installation, lay heater on its back.
1. Slide screen up to remove.
2. Remove log from inside of base. Discard protective packag-
ing.
3. Gently slide log on log retaining pin on base assembly (see
Figure 3). The log should t rmly against bottom of log
retaining pin.
4. Place front log in front of burner and behind burner shield.
5. Reattach screen.
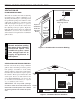
Figure 3 - Installing Logs
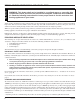
ATTACHING BRASS FRONT TRIM TO
FRONT PANEL
If any part or parts are missing, contact dealer where you bought
the heater.
1. Remove brass trim from protective packaging. Remove two
(2) 90°-angled mounting brackets and two (2) 90°-angled
shims.
2. Lay trim on the oor face down. Line up the corners with the
top trim at the top and the side trims on the sides.
3. Slide one (1) 90°-angled bracket (with attached screws) and
one (1) 90°-angled shim in the outside corner slot where the
top and side trims meet. Next, slide another bracket and shim
to the inside corner slot. See Figure 4.
4. Hold the corners together securely. Tighten screws on both
brackets with at head screwdriver. Make sure the corners
are ush and there are no spaces.
5. Repeat steps 2 through 4 for other side trim.
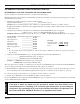
7. Place the assembled trim on front of heater cabinet. Attach
on top and sides with four brass screws included in hardware
package. See Figure 5.
Figure 4 - Assembling Bras Trim
Figure 5 - Attaching Brass Trim to Heater
WARNING: Always have burner shield
and screen in place before operating
heater. This prevents excessive
temperatures on heater.
Failure to position the parts in
accordance with these diagrams or
failure to use only parts specifically
approved with this heater may result in
property damage or personal injury.
WARNING
Side
Brass Trim
Set
Screws
Adjusting
Plate
Top Brass
Trim
Slot
Shim
Slot
Mitered
Edges
Assembled
Brass Trim
Screws
Screws
Back
Log
Front
Log
Pins
Burner
Shield