
Manual Subwoofer BRW-10

9
© Monitor Audio 2006 BRW-10 Rev4
Positioning/Initial Set Up
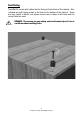
The BRW-10 should now be sited in the most suitable position, preferably not directly in
the corner of a room as this may cause excessive bass boom. Once a desirable position is
achieved it is important to check if the cables are long enough to reach comfortably
without being under tension. Leave the BRW-10 unplugged until the installation
procedure is completed. The optimal control settings will depend entirely on your system
configuration. For initial trials setthe controlsas follows:
Volume control Should be set tominimum
Frequency control Should be set tothe minimum position (40Hz)
Phase control Should be set tozerodegrees
Powerswitch Should be set to‘Auto’
Input connections can be madeat this stagebeforethe power is connectedto the BRW-10.
Never connector disconnectthe RCA input lead connection withthe BRW-10 switchedon.
Set Up
Once the input cablesare connected and the controls are set in accordance with the initial
set-up procedure above, the BRW-10 can be connected to the mains power supply and
switched on. Donot play any music at this stage.With the Power Mode Switch inthe ‘Auto’
position,the unitshould remain in standby until a signal isreceived.
Play a variety of music/ film excerpts starting at a very low volume level, increasing to an
average listening levelonce you are sure everything isworking correctly.Check the backof
the BRW-10, the LED indicator should now indicate it is ‘ON’. Please now follow the
bulletedinstructions below:-
If using the crossover frequency control please adjust in accordance
with the tableon page7 furtherfine-tuningmay be required.
The Phase Control can now be set ref. See page 7 for information on
this function
The volume control can now be set to finish the set-up procedure. It is important to try a
variety of music and film excerpts with which you are familiar in order to obtain the
optimumoverall settings.