Set Up Guide and Product Manual roksan.
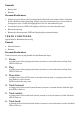
FRONT CONTROLS 4 REAR CONNECTIONS 4 REMOTE 6 OLED DISPLAY 6 SET UP OPERATION 7 VOLUME CONTROL 7 Controls 7 Process & Indicators 7 INPUT SELECTION 8 Controls 8 Process & Indicators 8 TRACK FUNCTIONS 8 Control 8 Process & Indicators 8 OLED DISPLAY LIFE EXTENSION Process & Indicators SPECIFICATIONS 9 9 10
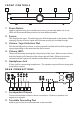
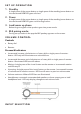
FRONT CONTROLS N O P Q R 1. Power Button Used to wake the amp from standby and return it to standby when not in use. LED’s will illuminate different colours to show different status. 2. Screen This displays the input. The selected input will be displayed on the screen. When changing inputs, all other inputs will illuminate as they are scrolled through. 3.
3. Phono Input Connect the output from the turn table to the Attessa Streaming Amplifier 4. Analogue 1 Input Connect and analogue source 5. Analogue 2 Input (music sense) Connect a second analogue input. WHAT IS MUSIC SENSE?? 6. Pre-Out/ Subwoofer Connect to a power amplifier or subwoofer. 7. Coax/Optical SPDIF Inputs Connect digital sources by eaither coaxial or optical connection 8.
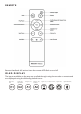
REMOTE Remote feedback: All actions have the remote LED flash on and off.
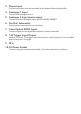
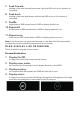
S E T U P O P E R AT I O N 1. Standby A single press of the power button or single press of the standby/power button on the remote and RGB LED goes solid red. 2. Power A single press of the power button or single press of the standby/power button on the remote and RGB LED goes a solid orange colour. 3. Load/warm up phase Roksan logo to appear when product goes into power mode. 4. BLE pairing mode: During set up mode via the app the BLE passkey appears on the screen.
Controls • Rotary dial • Remote Process & Indicators • Selecting input: Rotary dial is pressed and held while user rotates either clockwise & anti-clockwise when selecting. When using the remote the input arrow buttons change the input. OLED will highlight the icon for that selected input. • Connected to input: OLED will display a solid icon for the selected input. • Bluetooth pairing: • Bluetooth disconnected: OLED will display disconnected status.
7. Seek forward: holding of the track forward button and right dual LED to be on for duration of command. 8. Seek back: holding of the track back button and left dual LED to be on for duration of command. 9. Shuffle: single press of SRR remote button. OLED to display shuffle icon. 10. Repeat all: double press of SRR remote button. OLED to display repeat all icon. 11. Repeat once: triple press of SRR remote button. OLED to display repeat once icon.
S P E C I F I C AT I O N S Power Amplifier Power output into 8 Ohm: 75 WRMS, Both Channels Driven THD+N <0.1% Power output into 4 Ohm: 150 WRMS Single Channel Driven THD+N<0.1% THD+N: <0.01% (1 kHz, 2 channels, 1 W @ 8 Ohms) Amplifier Type: Class AB Gain: 29 dB Channel Separation: > 90 dB @ 1 kHz & > 60 dB @ 10 kHz Channel Matching: Better than 0.
Designed and built in Great Britain. Roksan.com Info@roksan.com Version 1. 2020 Roksan 24 Brook Road, Rayleigh, Essex SS6 7XJ, UK +44 (0)1268 798900 info@roksan.com roksan.