
Product Manual

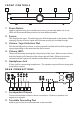
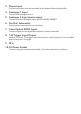
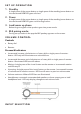
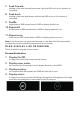
Table Of Contents

FRONT CONTROLS
N O P Q R
1. Power Button
Used to wake the amp from standby and return it to standby when not in use.
LED’s will illuminate different colours to show different status.
2. Screen
This displays the input. The selected input will be displayed on the screen. When
changing inputs, all other inputs will illuminate as they are scrolled through.
3. Volume / Input Selection Dial
This dial will adjust the volume, or when pressed and held will scroll through the
inputs depending on the direction the dial is turned.
4. Volume LED’s
These will illuminate showing the volume level of the amp. When at max volume
level the haptics will vibrate and the volume bar will ash. When at minimum
volume level the haptics will vibrate and the Mute icon will be displayed.
5. Headphone Jack
3.5mm jack for connecting headphones. The speaker output will mute along with
the preamp outputs.
REAR CONNECTIONS
13
1 3
54 6
2
7 8 9
10
1. Loudspeaker Outputs
Connect loudspeaker cables to these connections. Positive to positive and
negative to negative
2. Turntable Grounding Post
Used to ground the tone arm attached to the turntable