Radius series Radius series O w n e r s Radius s e r i M a n u a l 3G e s R adius
Contents Contents 1 Introduction 2 Set Up and Positioning 2 Radius One 2 Radius 200 2 Positioning - Front Speakers 3 Positioning - Surround Speakers 3 Optimum Speaker Placement 4 Fixing the Radius 225/ Radius One to a Wall 5 Radius 270 Feet and Spikes 6 Specifications 7 Owner Information 8 monitoraudio.
Introduction Congratulations and thank you for your purchase of the Radius Series loudspeakers. We are confident they will provide years of enjoyment and pleasure as only high quality components have been used throughout. Please follow this user manual carefully as it contains important information about positioning and set up procedures. For further advanced information please refer to our web site at: www.monitoraudio.
Positioning - Front Speakers The centre channel should be the first speaker positioned in a home theatre room, and such that the tweeter is directed towards the listener’s ear. The centre channel’s job is to anchor dialogue and other on-screen sounds to the screen. Typically, as much as 60% of a movie soundtrack comes through the centre channel. The centre channel can be placed either above or below the TV screen, and as close as possible.
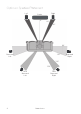
Optimum Speaker Placement Left Right Centre 0° 22° 30° 90° Surround Left 110° 135° 150° Rear Surround Right Rear Surround Left 4 Radius Series Surround Right
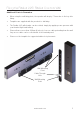
Fixing the Radius 225/ Radius One to a Wall Additional Points to Remember • When using the wall fixing plate, the speaker will drop by 7.5mm due to the key hole fixing. • Templates are supplied with the products to aid fixing. • The Radius 225 grille badge can be rotated, simply by applying some pressure with your thumb/ finger and turning. • Please allow no more than 100mm (4 inches) of excess cable protruding from the wall. Any excess cable can be coiled inside of the terminal panel.
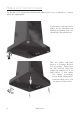
Radius 270 Feet and Spikes The Radius 270 is supplied pre-installed with rubber feet for use on hard floors, or when spikes are inappropriate. If using spikes, first remove the rubber feet by simultaneously twisting and pulling them out, revealing the threaded inserts. Take the spikes and twist them in a clockwise direction in to the plinths. Ensure they are fully inserted, stand the cabinet up and place it in it’s final location.
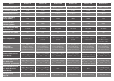
Radius 45 Radius 90 Radius 200 Radius 225 Radius 270 Radius One Frequency Response 120Hz – 20 KHz 80Hz – 35 KHz 60 Hz – 35 KHz 80Hz – 35KHz 50Hz – 35KHz 90Hz – 35KHz Sensitivity (1W@1M) 87dB 83dB 86dB 87dB 87dB 87dB Nominal Impedance 8 Ohms 8 Ohms 6 Ohms 6 Ohms 6 Ohm 6 Ohms Power Handling Single (RMS) 25W 75W 100W 100W 100W 75W System Power Handling (RMS) 50W 100W 100W 150W 150W 100W Recommended Amp Requirements 15-50 W 30-100 W 40-150W 40-150W 40-150W 30-100W
Owner Information Product Details Model ................................................................. Product Serial No ................................................ Date of Purchase ................................................ Dealer Details Dealer Name ..................................................................................................................... Address ........................................................................................................................
Monitor Audio Ltd. 24 Brook Road Rayleigh, Essex SS6 7XJ England Tel: 01268 740580 Fax: 01268 740589 Email: info@monitoraudio.co.uk monitoraudio.com Designed and Engineered in the UK Made in China. © 2013.
m MONITOR AUDIO® design for sound IMPORTANT SAFETY INSTRUCTIONS GB- SAFETY INSTRUCTIONS FR - CONSIGNES DE SECURITE IT- ISTRUZIONI PER LA SICUREZZA DE - SICHERHEITSANW EISUNGEN ES- INSTRUCCIONES DE SEGURIDAD PT- INSTRU<;OES DE SEGURAN<;A NL- VEILIGHEIDSINST RUCTIES CH- ~~~B~ RU - V1HCTPYKL4V1V1 no TEXHV1KE 6E30nACHOCTV1 RU - YCnOBV151 rAPAHTV1V1 SPEAKERS
RE-CYCLING 1. 2. 3. 4. Please read these instructions. Please keep these instructions. Heed all warnings. Follow all instructions. 5. 6. Do not use this apparatus with water. Clean only with a dry cloth. Great care and attention has gone into the materials chosen to produce your Monitor Audio loudspeakers. A gentle wipe with a dry, clean cloth is all that is required to remove any dust. Treat them as you would a fine piece of furniture because that is how they have been designed.
GUARANTEE AND SERVICE CLAIMS UNDER THIS GUARANTEE To validate your warranty please visit www.monitoraudio.com within 30 days of purchase. When you register online you’ll gain free entry to our monthly prize draw! What’s more you’ll be the first to hear about the great things happening at Monitor Audio, including new products and events! This equipment has been fully tested prior to dispatch from the factory.
We, Monitor Audio Ltd. 24 Brook Road Rayleigh Essex SS6 7XJ England ENGLISH EN6100-3-3: 01.95 Electro magnetic compatibility (EMC) – Part 3: Limits – Section 3: Limits of voltage fluctuations and flicker in lowvoltage supply systems for equipment with rated current up and including 16 Ampere per phase. EC Declaration of Conformity Signed by: 12 Declare in own responsibility, that the Monitor Audio products described in this manual is in compliance with Technical Standards/ Council Directives: Name: D.
m MONITOR AUDIO® monitoraudio.com Monitor Audio Ltd. 24 Brook Road Rayleigh, Essex SS6 7XJ England Tel: +44 (0)1268 740580 Fax: +44 (0) 1268 740689 Email: info@monitoraudio.co.uk .web: www.monitoraudio.co m Designed in the United Kingdom © 2012.