9 H K P \ Z 9H KP \ Z owners manual
Thank you for your purchase of the Radius 380 or 390 subwoofer, which has been designed and constructed using quality systems and materials to provide years of enjoyment, reliability and pride of ownership. Music is and should be a natural enhancement of life. It stimulates the imagination, changes your mood, helps you relax, and provides endless hours of entertainment. At Monitor Audio we pride ourselves in attempting to make the listening experience as close as possible to the original ‘music’ production.
Positioning/Initial Set Up Leave the subwoofer unplugged from the mains until the installation procedure is completed. The subwoofer should now be sited in the most suitable position, preferably not directly in the corner of a room as this may cause excessive bass boom. Once a desirable position is achieved it is important to check if the cables are long enough to reach comfortably without being under tension.
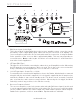
ENGLISH Amp Panel & Controls 4 3 INPUT 2 TRIGGER VOLUME . . . 12V R FREQUENCY . LFE 5 220 - 240V~ . 50 Hz 120 Hz MIN 1 8 BASS PHASE MODE AUTO MUSIC . . 7 IMPACT . . . . 6 MOVIE ON . 9 MAX ON 10 AC110-120V ~ 50-60Hz AC220-240V ~ 50-60Hz 200 W FUSE: 110-120VAC T6.3AL/250VAC FUSE: 220-240VAC T3.15AL/250VAC L 110 - 120V~ OFF 10a POWER 11 Intertek 3100294 DESIGNED IN THE UK, MADE IN CHINA 1.
. Volume Control This control allows the level or volume to be adjusted in order to achieve a balanced overall sound. To use this facility you will need to play a selection of familiar music or film excerpts. Start with the volume at minimum and increase the level control until a balanced sound is established. If using an AV processor or AV receiver amplifier, the system can be adjusted by the test tone function within the set-up features.
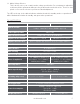
The LED on the top of the cabinet indicates whether the unit is in standby mode or operational. It will be illuminated red when in standby, and green when operational. Specification Radius 380 System Format Radius 390 Active sub-woofer system – Auxiliary Bass Radiator (ABR) loading.
Trouble Shooting Should you experience any technical, or set-up problems with your subwoofer please check the Trouble Shooting guide below: My subwoofer will not turn on/ no power. s Is the LED illuminated on the top of the unit? If not, check your mains lead is properly connected both at the subwoofer and at the mains outlet. Also check the fuse of the amplifier and mains plug (where fitted). s Is the LED red? If so, you have power going to the unit.
ENGLISH Owner Information Product Details Model ………………………………….. Product Serial No ………………………………….. Date of Purchase …………………………………… Dealer Details Dealer Name ……………………………………………………………………………………………. Address ………………………………………………………………………………………………… Town, Post code, Country ……………………………………………………………………………. e-mail address ………………………………………………………………………………………… Monitor Audio reserves the right to alter specifications without notice. monitoraudio.
Monitor Audio Ltd. 24 Brook Road Rayleigh, Essex SS6 7XJ England Tel: +44 (0)1268 740580 Fax: +44 (0)1268 740589 Email: info@monitoraudio.co.uk Web: www.monitoraudio.com Designed in the United Kingdom Version 1.
m MONITOR AUDIO® design for sound IMPORTANT SAFETY INSTRUCTIONS GB- SAFETY INSTRUCTIONS FR- CONSIGNES DE SECURITE IT- ISTRUZIONI PER LA SICUREZZA DE- SICHERHEITSANWEISUNGEN ES- INSTRUCCIONES DE SEGURIDAD RU- 111HCTPYKW111111 no TEXHII1KE 6E30nACHOCTII1 PT- INSTRUCOES DE SEGURANCA NL- VEILIGHEIDSINSTRUCTIES CH- ~~~B~ SUB WOOFERS
WARNING • TO PREVENT FIRE OR SHOCK HAZARD, DO NOT USE THIS PLUG WITH AN EXTENSION CORD, RECEPTACLE OR OTHER OUTLET UNLESS THE BLADES CAN BE FULLY INSERTED TO PREVENT BLADE EXPOSURE • TO PREVENT FIRE OR SHOCK HAZARD, DO NOT EXPOSE THIS APPLIANCE TO RAIN OR MOISTURE • TO PREVENT ELECTRIC SHOCK, MATCH WIDE BLADE PLUG TO WIDE SLOT AND FULLY INSERT.
IMPORTANT SAFETY INSTRUCTIONS 1. 2. Read these instructions. Keep these instructions. 3. Heed all warnings. 4. Follow all instructions. Do not use this apparatus with water. Clean only with a dry cloth. Great care and attention has gone into the materials chosen to produce the product. A gentle wipe with a dry, clean cloth is all that is required to remove any dust. Treat it as you would a fine piece of furniture because that is how they have been designed. Do not block any ventilation openings.
RE-CYCLING Correct Disposal of Waste Electrical and Electronic Equipment (WEEE) by User in Private Households in the EU. This symbol on the product or · accessories indicates that they must not be disposed of with your household wastes throughout the EU. To prevent possible harm to the environment or human health from uncontrolled waste disposal, recycle it responsibly to promote the sustainable reuse of material resources.
GUARANTEE AND SERVICE CLAIMS UNDER THIS GUARANTEE To validate your warranty please visit www.monitoraudio.co.uk within 30 days of purchase. The equipment should be returned in its original packaging to the original supplier where possible, or to any other authorised Monitor Audio dealer. If it is not possible to return the equipment by hand, then it should be sent carriage prepaid via a reputable carrier. If the original packing is not available replacement packaging can be purchased from Monitor Audio.
EN61 00-3-3: 01.95 Electro magnetic compatibility (EMC) - Part 3: Limits - Section 3: Limits of voltage fluctuations and flicker in low-voltage supply systems for equipment with rated current up and including 16 Ampere per phase. EC Declaration of Conformity We, Monitor Audio Ltd. 24 Brook Road Rayleigh Essex SS6 7XJ England Signedby: 10 Declare in own responsibility, that the Monitor Audio products described in this manual is in compliance with Technical Standards/ Council Directives: ~ Name: D.S.
m MONITOR AUDIO® monitoraudio.co.uk Monitor Audio Ltd. 24 Brook Road Rayleigh, Essex SS6 7XJ England Tel: +44 (0) 1268 7 40580 Fax: +44 (0)1268 7 40589 Email: info@monitoraudio.co.uk Designed in the United Kingdom © 2010. Version 1.