
Owner's Manual


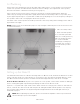
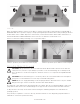

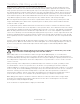
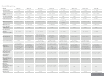
Table Of Contents

Silver Series4
AV Positioning
Please refer to the illustrations below for the ideal angles and positions of each speaker in your surround
system. The speakers should be distanced from the wall according to the requirements of the speaker,
which are listed in the 2-Channel Positioning section (page 3).
If the sound is too bass heavy or there is bass boom from the room when playing music (without a
subwoofer), try moving the loudspeakers slightly further away from the wall(s). If this is not possible, then
try the supplied port bungs. In a system with a subwoofer try adjusting the crossover frequency settings for
the speakers and/or sub or changing the subwoofer’s position.
The Silver centre channel speaker should be positioned so that it is pointing at the viewing position and at
approximate ear height.
NOTE: Images below are for illustrative purposes only. If using the Silver FX please refer to the next section
for further information.
1. Side surround speakers
2. Rear surround speakers
A 7.1 surround system will
make use of side (position 1)
and rear speakers (position
2) to create a full 360°
soundstage, if setting up a
5.1 system you can place
your surrounds in position
(1) or (2).
Setting up the Silver FX
The Silver FX features Di-Pole or Bi-Pole listening modes. In Bi-Pole mode, the driver and tweeters are all in
phase. In Di-Pole mode one of the tweeters is out of phase to the other tweeter and main driver to create
the diffused sound. The FX speakers should be wall mounted approximately 2 feet above ear height.
Di-Pole/ Bi-Pole switch: When part of 5.1 systems as a rear speaker, set the switch to Bi-Pole. Although
there is nothing wrong with experimenting and trying the switch in the Di-Pole mode.
If part of a 7.1 system with 1 pair of FX’s set the switch to Di-Pole. If using 2 pairs of FX’s for side and rear
effects, set them all to Di-Pole mode and swap the left and right handed side FX speakers over, keeping
the rear FX speakers handed correctly (matching left and right with the front left and right channels) as
illustrated on page 5.
NOTE: Before adjusting any switches, please ensure that the amplifier is at the very least turned
off. This will help to protect the amplifier.
90°-90°
110°-110°
135°-135°
150°-150°
0°
30°-30°
22°-22°
2
1 1
2