Design Guide with Installation Instructions Double-Drawer ZIDI240 ZIDS240 monogram.
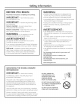
Safety Information BEFORE YOU BEGIN: WARNING: Read these instructions completelg and carefullg. • Double-DrowerRefrigerotors oredesignedtobe built-in only. They connotbe used free-stonding. IM PORTANT - Sove these instructions for Iocol inspector's use. IMPORTANT Use this opplionce onlyforitsintendedpurpose. • Immediotely repoir or reploce electricol service cords thot become froyed or domoged. - Observeollgoverning codes ond ordinonces.
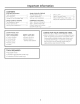
Important Information CONTENTS Design Guide (for ZIDI240} Important Information Step 3, Level .................................................. 7 The Installation Space .............................. 5 Tools, Hardware ........................................ 3 Product CleQrances.................................... 5 Step 4, Connect Power ............................ 8 Parts Required .............................................. S Step 5, Slide Product into Cutout ........8 Side-bg-Side Installotions .....
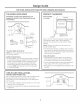
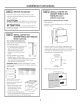
Design Guide FOR MODEL ZIDS240 THE INSTALLATION WITH STAINLESS STEEL DRAWERS AND SPACE IMPORTANT: Double-Drawer Refrigerators designed to be built-in only. They cannot free-standing. HANDLES PRODUCT CLEARANCES are be used When installed in a corner: / Countertop Ik Double-Drawer --_/'22"min. / 34-1/4" to 34-3/4" Clearance forDoor Opening 2-1/2"min. Allow 2-1/2'* min. clearance between Double-Drawer and adjacent cabinet, wall or other appliances. Allow 22" min.
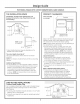
Design Guide FOR MODEL ZIDI240 THE INSTALLATION WITH CUSTOM SPACE IMPORTANT: Double-Drawer Refrigerators designed to be built-in onlg. Theg cannot free-standing. DRAWER PANELS AND HANDLES PRODUCT CLEARANCES ore be used When installed in a corner: / CounteRop 11,, Double-Drawer Z-,,"23-1/8"min. / Clearance forDoor Opening 2-1/2"min. 23-3/4"Min ] 3:1j4 NOTE: Handles not supplied.* to 34-3/4" 24-7/8''_ __ 23-3/4......
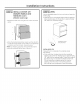
Installation ISTEP11 REMOVE Instructions ISTEP 2 1INSTALL CUSTOM 314" PACKAGING • Remove corner blocks and foam drawer stops. • Remove all packing material, tape and protective plastic coverings. DRAWER PANELS AND HANDLES (CONT.) (ZIDI240 model onlg) CAUTION: Small objects area choke hazard for children. Remove and discard any parts not used. Instell custom drawer panels end hendles: • Open drawers. ATTENTION : ,espetits objets peuvent • Remove 2 screws holding each trim; lift trims off.
Installation ISTEP21 INSTALLCUSTOM3/4" DRAWER PANELS AND HANDLES ICONT.I (ZID1240 model onlgl • Reinstall the side trims using the trim screws removed earlier. Instructions ISTEP 31 LEVEL Use an adjustable wrench to turn and raise or lower the leveling legs. • Measure floor to countertop height inside the opening. Adjust leveling legs until the product is approximately 1/8" less than countertop height.
Installation ISTEP41CONNECT POWER • Connect power cord plug to a properly grounded receptacle. • Check to make sure power is on by opening a drawer to see if interior light turns on. • The interior fan runs all the time except when a drawer is open. See the Owner's Manual for further explanation of the fan. Instructions ISTEP61SET TEMPERATURE CONTROLS • The temperature controls are preset. Refer to the Owner's Manual for more information. Allow 12-24 hours for the temperature to stabilize.