
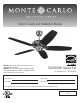
Installation manual


© 2011 Monte Carlo Fan Company
4/20/2012
3
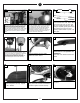
Before you begin installing the fan, Switch power off
at Service panel and lock service disconnecting means
to prevent power from being switched on accidentally.
When the service disconnecting means cannot be
locked, securely fasten a prominent warning device,
such as a tag, to the service panel.
1
Warning-Risk of fire, electric shock, or person-
al injury. The fan in this box may be either
directly supported from a structural framing
member of a building and/or may be mounted
to an outlet box marked acceptable for fan sup-
port of of 31.8kg (70 lbs) or less. Most outlet
boxes commonly used for the support of lummi-
naires may not be acceptable for fan support
and may need to be replaced. Consult a quali-
fied electrician if in doubt.
2
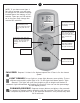
OUTLET BOX METHOD
Secure mounting plate directly to a joist from
the buliding structure via the two knock out
holes on the outlet box. Use only the appropri-
ate wood screws and washers included with
your fan. Caution: Wood screws must go
through into the building joist.
5
Outlet box
Mounting
Plate
Wood
Screws
BUILDING STRUCTURE METHOD
Remove the 6 screws attaching the Mounting
neck the mounting plate. Retain the 6 screws
for re-assembly.
4
Install the mounting Plate to approved fan
brace and box combination use only the hard-
ware provided with the fan brace and box.
6
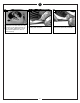
FAN BRACE AND BOX METHOD
Remove Safety bar from mounting bracket by
loosing screws, sliding bar to side, and lifting it
off the 2 screws.
3
Remove the keeper pin and cotter pin.
9
Lift mounting neck to mounting Plate and align
screws.
7
Secure mounting neck to the mounting plate
with 6 screws to become a complete mount-
ing bracket.
8