IMPORTANT SAFETY INSTRUCTIONS WARNING - WHEN USING ELECTRIC PRODUCTS, THESE BASIC PRECAUTIONS SHOULD ALWAYS BE FOLLOWED: 1. Read all the instructions before using the product. 2. Do not use this product near water - for example, near a bathtub, washbowl, kitchen sink, in a wet basement, or near a swimming pool or the like. 3. This product, in combination with an amplifier and headphones or speakers, may be capable of producing sound levels that could cause permanent hearing loss.
TABLE OF CONTENTS 6 OVERVIEW 8 UNPACKING & INSPECTION 8 SETUP & CONNECTIONS 9 ABOUT SUBHARMONICON 10 INTRODUCTION 10 10 11 A BRIEF HISTORY UNDERSTANDING SUBHARMONICS UNDERSTANDING POLYRHYTHMS 12 EXPLORING YOUR SUBHARMONICON 13 15 17 CREATING A SEQUENCE PLAYING YOUR SEQUENCE UNDERSTANDING TUNING SYSTEMS AND TEMPERAMENT 18 PANEL CONTROLS & FUNCTIONS 18 21 23 23 24 25 26 28 30 31 38 39 40 THE OSCILLATORS THE MIXER THE FILTER THE AMPLIFIER (VCA) THE ENVELOPE GENERATORS (EG) TEMPO THE SEQUENCE
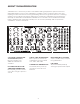
OSCILLATORS RHYTHM GENERATORS PAGE 30 Dividing the tempo creates a new rhythm. Each of the four rhythm generators can drive one or both sequencers. Combine rhythms for exciting polyrhythms. TEMPO & TRANSPORT SEQUENCER PAGE 26 Sequencer 1 controls VCO 1 (and its subs). Sequencer 2 controls VCO 2 (and its subs). Each sequencer has four tunable steps.
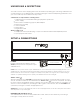
UNPACKING & INSPECTION Check the contents of the shipping carton. Be careful when unpacking your new Moog Subharmonicon so that nothing is lost or damaged. We recommend saving the carton and all packing materials in case you ever need to ship the instrument for any reason. Subharmonicon ships with the following items: 1. Subharmonicon Semi-Modular Analog Polyrhythmic Synthesizer 2. Power Supply 3. DIN Socket to 3.5mm Plug (Type A) MIDI Adapter 4. Patch Sheet Overlays 5. Owner’s Manual 6. Patch Cables 7.
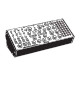
ABOUT SUBHARMONICON Subharmonicon is an intensely creative semi-modular analog polyrhythmic synthesizer that uses mathematical ratios to tune its four subharmonic oscillators, and to control the timing of its four rhythm generators. Because these tuning and timing values are integer-derived, there is something uniquely coherent about how patterns and phrases created using Subharmonicon blend together musically.
INTRODUCTION A BRIEF HISTORY Throughout the 1960s and 70s, groundbreaking artists like Herb Deutsch, Wendy Carlos, and Keith Emerson were looking for new ways to explore electronic sound, and found themselves collaborating with electronic instrument pioneer Bob Moog to create the instruments of their dreams. If we set our clocks back to the 1930s, we find a similar situation.
UNDERSTANDING SUBHARMONICS (Continued) Fortunately, electronic circuits can create subharmonics quite easily.
EXPLORING YOUR SUBHARMONICON If you are new to synthesizers, or if you just want a deeper understanding of your new instrument before you get started, join us for a quick hands-on Subharmonicon tour. Knowing what to expect as you explore the controls will make it easier to achieve your musical goals. You can also begin by following some of the patch examples (beginning on page 45) and tweaking them to suit your own taste.
EXPLORING YOUR SUBHARMONICON (Continued) ADDING IN A SUBHARMONIC OSCILLATOR Rotate the SUB 1 LEVEL knob clockwise and you will hear the sound of the first subharmonic oscillator associated with VCO 1 mixed in with the sound of VCO 1. With the SUB 1 FREQ knob all the way clockwise, VCO 1 and SUB 1 are playing in unison. As you rotate the SUB 1 FREQ knob slowly counter-clockwise, you will hear the pitch of SUB 1 step through the available undertones.
EXPLORING YOUR SUBHARMONICON (Continued) CREATING A SEQUENCE (Continued) TUNING STEP 1 Step 1 is now selected, and the LED indicator located under the STEP 1 knob will be lit. As you listen, rotate the STEP 1 knob to set a pitch for Step 1 of your sequence. ADVANCING TO STEP 2 Press the NEXT button to advance to Step 2 of the sequence. The LED indicator located under the STEP 2 knob will be lit. As you listen, rotate the STEP 2 knob to set a pitch for Step 2 of your sequence.
EXPLORING YOUR SUBHARMONICON (Continued) PLAYING YOUR SEQUENCE Press the blinking EG button so that it remains lit. This releases the envelope generators from their held state, so that each step of the sequencer will now trigger the EGs. Now, press the PLAY button. Your sequence will begin to play. ADJUSTING THE TIMING Rotate the TEMPO knob to see how the sequencer and rhythm generator tempos are affected.
EXPLORING YOUR SUBHARMONICON (Continued) EXPLORING THE FILTER As your sequence continues to play, you can rotate the CUTOFF and RESONANCE knobs and listen to how changing the filter settings can affect the timbre of your sequenced sound. The VCF EG AMT knob defines how much effect the VCF Envelope Generator (VCF EG) will have on the filter settings. By turning the RESONANCE knob toward maximum and experimenting with the CUTOFF knob, you can coax the filter to “chirp” as it approaches a self-resonant state.
EXPLORING YOUR SUBHARMONICON (Continued) SUMMARY In this exploration of your Subharmonicon, we have used only one VCO, one subharmonic oscillator, one sequencer, and two rhythm generators — working with each to become familiar with how they contribute to your overall sound. This is only scratching at the surface of the sound design potential and rhythmic phrases that are possible within this instrument once all of its oscillators, sequencers, and rhythm generators are dialed up.
PANEL CONTROLS & FUNCTIONS THE OSCILLATORS In the synthesizer world, the primary role of an oscillator is to generate sound. Oscillators can be assigned a wave shape to determine the initial timbre of the sound, oscillators can be tuned to specific frequencies, and an oscillator can be played — its pitch varied by a control voltage source such as a keyboard or sequencer. Each voltage controlled oscillator (VCO 1 and VCO 2) is equipped with two subharmonic oscillators.
THE OSCILLATORS (Continued) OSCILLATOR 1 PARAMETERS (Continued) SUB 2 FREQ (VCO 1) The pitch or frequency of SUB 2 (the second subharmonic oscillator of VCO 1) is derived from the initial frequency (ƒ) of VCO 1. The SUB 2 frequency is equal to the initial pitch of VCO 1, divided by a whole number integer value from 1 to 16. As you rotate the SUB 2 FREQ knob, you are actually selecting the integer value used.
THE OSCILLATORS (Continued) OSCILLATOR 2 PARAMETERS (Continued) SUB 1 FREQ (VCO 2) The pitch, or frequency of SUB 1 (the first Subharmonic Oscillator of VCO 2) is derived from the initial frequency (ƒ) of VCO 2. The SUB 1 frequency is equal to the initial pitch of VCO 2, divided by a whole number integer value from 1 to 16. As you rotate the SUB 1 FREQ knob, you are actually selecting the integer value used.
THE OSCILLATORS (Continued) SHARED OSCILLATOR PARAMETERS Quantizing focuses the continuous sweep of an oscillator into stepped voltages that, in the case of Subharmonicon, generate either a 12-tone or 8-tone division of the octave (with just or equal temperaments). Learn more about tuning systems and temperament on page 17. When the Quantize function is engaged, rotating the VCO 1 FREQ knob or the VCO 2 FREQ knob will select steps of the scale, as defined by the current Quantize setting.
THE MIXER (Continued) SUB 1 LEVEL (VCO 1) This knob sets the level of SUB 1 — the first subharmonic oscillator associated with VCO 1. Rotating the knob clockwise raises the level; rotating it counterclockwise lowers the level. SUB 2 LEVEL (VCO 1) This knob sets the level of SUB 2 — the second subharmonic oscillator associated with VCO 1. Rotating the knob clockwise raises the level; rotating it counter-clockwise lowers the level. VCO 2 LEVEL This knob sets the level of the VCO 2 signal.
THE FILTER The combined output signal from the mixer is internally wired to the input of the filter. Subharmonicon relies on a Voltage Controlled Filter (VCF) to dynamically shape the timbre of a sound by selectively removing frequencies above the Filter’s Cutoff Frequency. This low-pass filter is of the famous Moog ladder type. NOTE: Technically, this is a four-pole low-pass ladder filter providing 24 dB of attenuation per octave above the Cutoff Frequency.
THE ENVELOPE GENERATORS (EG) An envelope generator creates a control voltage that changes in value over time. Subharmonicon contains two envelope generators, each with an Attack stage and a Decay stage. The first EG adds control to the Cutoff Frequency of the VCF, or filter; the second EG adds control to the output level of the VCA. VCF EG The VCF EG produces a time-variant control voltage that modulates the setting of the VCF Cutoff Frequency.
THE ENVELOPE GENERATORS (EG) (Continued) VCA DECAY The VCF DECAY knob determines how much time is required for the Decay stage of the VCA EG to fall from the level specified by the VOLUME knob to zero, from 5 milliseconds to 10 seconds. When a trigger is received, the VCA EG will complete the Attack stage, and then proceed to the Decay stage. When a gate is received, the VCA will complete the Attack stage and hold at the maximum level until the gate ends, at which point the Decay stage will begin.
THE SEQUENCERS Subharmonicon contains two identical sequencers. Each sequencer features four individual steps. Each step includes a variable tuning knob and an LED to indicate the current active step. Sequencer 1 is tied internally to OSC 1 and the subharmonic oscillators associated with OSC 1, and Sequencer 2 is tied internally to OSC 2 and the subharmonic oscillators associated with OSC 2. In order for a sequencer to play, it must receive clock information from at least one of the rhythm generators.
THE SEQUENCERS (Continued) SEQ 1 ASSIGN (VCO 1) (Continued) SUB 2: When this button is engaged (lit), the output of Sequencer 1, as defined by the positions of the four STEP knobs, will modify the integer value of the SUB 2 FREQ knob. When this button is off (unlit), SUB 2 will continue to play using the setting of the SUB 2 FREQ knob, maintaining a constant harmonic relationship to VCO 1.
THE SEQUENCERS (Continued) SHARED SEQUENCER PARAMETERS The setting of the SEQ OCT function is shared by both Sequencers; it cannot be set individually. SEQ OCT This function specifies the octave range available for each of the STEP knobs in the sequencers. There are three values for this parameter. Repeatedly pressing the SEQ OCT button will cycle through the available options, with an LED indicating the current selection.
TRANSPORT CONTROLS (Continued) TRIGGER (Continued) If the EG button is Off (unlit), the TRIGGER button behaves as a gate, and the envelopes are held to their maximum levels (based on their current settings) as long as the TRIGGER button is held down. When the TRIGGER button is released, the Decay phase of the EGs will begin, allowing an extra degree of control over the EG.
TRANSPORT CONTROLS (Continued) EG (Continued) HELD: Briefly hold the EG button until it begins to blink to select the Held setting. When the EG button is blinking, the VCF EG and VCA EG are held open at their maximum values until the EG button is pressed once again. With playback stopped (PLAY button unlit), the NEXT button can be used to advance to the next sequencer step.
THE PATCHBAY True to its semi-modular nature, Subharmonicon is equipped with an extensive patchbay that allows creative connections to other electronic music modules and Eurorack synthesizer systems. These convenient patch points also allow the creation of new control and signal pathways within Subharmonicon itself. Subharmonicon contains a total of 32 patch points. Of these, 17 are inputs, identified by normal text on the panel.
THE PATCHBAY (Continued) ROW ONE (Continued) VCO 1 PWM INPUT Connect a control voltage to this input to modulate the Pulse Width of VCO 1 and of the SUB 1 and SUB 2 subharmonic oscillators associated with VCO 1. In order to hear the effect, the Square wave must be selected using the VCO 1 WAVE switch. A connection made here overrides the internal connection (subharmonic oscillator sawtooth 1) used to control PWM with the VCO 1 WAVE switch in the center position.
THE PATCHBAY (Continued) ROW TWO (Continued) VCA INPUT Connecting a control signal to this input will raise or lower the output of the VCA, or more simply, the volume. The control signal connected here is summed with the output control signal of the VCA EG. CV INPUT: 0V to +8V ROW THREE VCO 2 INPUT This input accepts a 1-volt/octave control signal to modify the frequency of VCO 2. The value of this signal is summed with the value set by the VCO 2 FREQ knob and the individual Sequencer 2 STEP knobs.
THE PATCHBAY (Continued) ROW FOUR VCO 2 OUTPUT The audio output of VCO 2 is available at this jack. AUDIO/CV OUTPUT: 10V peak to peak VCO 2 SUB 1 OUTPUT The audio signal of VCO 2, Subharmonic Oscillator 1 is available here. AUDIO/CV OUTPUT: 10V peak to peak VCO 2 SUB 2 OUTPUT The audio signal of VCO 2, Subharmonic Oscillator 2 is available here.
THE PATCHBAY (Continued) ROW FIVE (Continued) RESET INPUT A trigger signal received here will reset the sequencers to Step 1, and will reset the rhythm generators to their initial phase or starting point. If the PLAY button was lit when the trigger was received, the sequencers will begin again on the next clock pulse. If the PLAY button was unlit when the trigger was received, the sequencers will not restart until the PLAY button is pressed again. A gate signal received here will act as a Hold function.
THE PATCHBAY (Continued) ROW SIX (Continued) RHYTHM 3 INPUT A control signal connected to this input sets the timing of Rhythm Generator 3 by controlling the value of the RHYTHM 3 knob, thereby selecting the integer value (1-16) used to divide the current tempo. RHYTHM 3 knob should be centered for the best range.
THE PATCHBAY (Continued) ROW SEVEN (Continued) SEQ 2 CLK OUTPUT A clock signal based on the tempo of Sequencer 2 is available here. CV OUTPUT: 0V to +5V ROW EIGHT MIDI IN INPUT MIDI information is received via this jack using the five-pin DIN socket to 3.5mm MINI jack (MIDI Type A) adapter included with your Subharmonicon. Specifically, Subharmonicon can receive master clock (TEMPO) information, note data, and various CC (Control Change) messages via MIDI (see MIDI Operations table on page 44).
USING SUBHARMONICON TO CLOCK YOUR DFAM Use a patch cable to connect the Subharmonicon CLOCK output jack to the DFAM ADV/CLOCK input jack. This will allow Subharmonicon to serve as the clock for both units. TIP: You can also clock DFAM by using the Subharmonicon TRIGGER output, or the SEQ 1 CLK and SEQ 2 CLK outputs to clock DFAM with a polyrhythm. SUBHARMONICON DFAM Before you press the Subharmonicon PLAY button, press the RUN/STOP button on your DFAM.
SYNCING SUBHARMONICON TO YOUR MOTHER-32 Use a patch cable to connect the Mother-32 ASSIGN output jack to the Subharmonicon CLOCK input jack. This will allow Mother-32 to serve as the clock for both units. NOTE: Setting the ASSIGN output jack to CLOCK is described on page 44 of the Mother-32 manual. SUBHARMONICON MOTHER-32 Before you press the Mother-32 RUN/STOP (REC) button, press the PLAY button on your Subharmonicon.
USING SUBHARMONICON AS A EURORACK MODULE Your Subharmonicon can be removed from its case and easily installed into a Eurorack system as a 60HP module. Before doing this, it is important to note that Subharmonicon draws a maximum of 360mA from a +12V rail. It does not use the -12V rail at all. Make sure there is enough headroom on the +12V rail in your system to power the Subharmonicon.
GLOBAL PARAMETERS These parameters affect the overall Subharmonicon operation. FINE TUNE Using the Fine Tune mode, the overall pitch of your Subharmonicon can be adjusted by ± 50 cents (one-half semitone up or down). This allows Subharmonicon to be matched to your other equipment, a particular piece of gear, an out-of-tune track, etc. The default value is zero.
MIDI OPERATIONS In addition to receiving MIDI clock information, Subharmonicon can also respond to the following MIDI CC (Control Change) messages. MIDI note data received by Subharmonicon is referenced as an offset from the note C4 (middle C). Rotating the VCO 1 FREQ knob and/or VCO 2 FREQ knob fully counter-clockwise will place the frequency of each oscillator at C4, so that MIDI note data received by Subharmonicon will be received unchanged.
MIDI OPERATIONS Parameter VCO 2 SUB 1 Frequency (Continued) MIDI CC# 105 Default Range Remarks 0 0 - 7 = Integer Value 16 8 - 15 = Integer Value 15 16 - 23 = Integer Value 14 24 - 31 = Integer Value 13 32 - 39 = Integer Value 12 40 - 47 = Integer Value 11 48 - 55 = Integer Value 10 56 - 63 = Integer Value 9 64 - 71 = Integer Value 8 72 - 79 = Integer Value 7 80 - 87 = Integer Value 6 88 - 95 = Integer Value 5 96 - 103 = Integer Value 4 104 - 111 = Integer Value 3 112 - 119 = Integer Value 2 120 - 1
MIDI OPERATIONS Parameter Play (MIDI Transport) Rhythm Generator Logic MIDI Channel (Continued) MIDI CC# Default SysEx ON Range Remarks OFF; ON SysEx files can be found at www.moogmusic.com 113 0 0 - 63 OR / 64 - 127 XOR OR logic advances the sequencer every time a clock is received from one or both Rhythm Generators. XOR logic only advances the sequencer when just a singular clock is true — if both Rhythm Generators are true, the sequencer will not advance.
PRESETS Your Subharmonicon has a 100% analog signal path and, as a result, each unit has subtle sonic differences due to component tolerances that make it unique. Two different units set the same way may sound slightly different, which is normal. Due to Subharmonicon’s analog nature and mathematically derived functions, small derivations in knob placement can make a big impact on the sound of your patch.
SLIP & FALL SLIP & FALL NOTES: Sequencer pitches are suggestions; adjust to taste. POINT ZERO POINT ZERO NOTES: Tune SEQ 1 and SEQ 2 to desired pitches. Tune all Subharmonic Oscillators to desired interval. Adjust VCF ATTACK for length of filter sweep.
THREE HANDS ON THE WHEEL THREE HANDS ON THE WHEEL NOTES: Sequencer pitches are suggestions; adjust to taste. BATERIA BATERIA NOTES: Kick drum tuning is controlled via filter CUTOFF. Adjust VCF DECAY and EG AMT knobs for different kick drum flavors.
SPIRAL WAYS SPIRAL WAYS NOTES: Tune sequencers to desired pitches. Tune SUB VCO 1 FREQ 1 to a Fifth. Tune SUB VCO 2 SUB 2 to a Major 3rd. Adjust VCF ATTACK for crescendo depth. STAR-GATE STAR-GATE NOTES: Tune SEQ 1 and SEQ 2 to desired hi-octave pitches. For percolating clusters, adjust the RHYTHM 2, RHYTHM 3, and RHYTHM 4 SEQ 2 knob rates. Adjust VCA DECAY for unique universal rhythmic clusters.
POLY ROCK POLY ROCK NOTES: Tune SEQ 1 and SEQ 2 to desired pitches. Tune SUB OSC 1, 2, 3, and 4 to desired chord shapes. Patch CLOCK OUT to VCA IN for “drums.” CLOUD PATH CLOUD PATH NOTES: Open VCO 1 LEVEL first. Tune SEQ 1. Open VCO 2 LEVEL. Tune SEQ 2. Turn volume back down. Repeat tuning for all SUB OSC; tune to desired intervals. Turn volume to zero. Reset and play sequence. Slowly increase volumes of VCO 2 LEVEL and then all Sub levels.
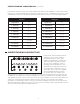
PRESET NAME: NOTES: PRESET NAME: NOTES: 50
PRESET NAME: NOTES: PRESET NAME: NOTES: 51
PRESET NAME: NOTES: PRESET NAME: NOTES: 52
PRESET NAME: NOTES: PRESET NAME: NOTES: 53
PRESET NAME: NOTES: PRESET NAME: NOTES: 54
PRESET NAME: NOTES: PRESET NAME: NOTES: 55
OSCILLATOR 1 VCO 1 SUB 1 RHYTHM 1 SUB 1 VCF EG RHYTHM 2 VCA EG RHYTHM 3 OSCILLATOR 2 VCO 2 RHYTHM 4 SUB 1 SUB 1 SIGNAL FLOW
SPECIFICATIONS ANALOG SOUND ENGINE SOURCES: VCO 1, SUB 1, SUB 2 / VCO 2, SUB 1, SUB 2 FILTER: Self-Oscillating Ladder Filter, Low-Pass, 4-Pole (-24 dB/Octave) ENVELOPES: VCA EG (Attack, Decay); VCF EG (Attack, Decay) ANALOG SEQUENCERS (x2) STEPS: 4 Steps per Sequencer, selectable Quantization CLOCK: Driven by any and all of the Rhythm Generators RHYTHM GENERATORS (x4) RHYTHM: Derived by dividing the Tempo by an integer value (1-16) CLOCK: 20 BPM to 3,000 BPM (Beats Per Minute; 1 Pulse Per Quarter-note), M
SERVICE & SUPPORT INFORMATION MOOG’S STANDARD WARRANTY Moog warrants its products to be free of defects in materials or workmanship and conforming to specifications at the time of shipment. The Warranty Period is one year from the date of purchase. If, in Moog’s determination, it has been more than five years since the product shipped from our factory, it will be at Moog’s discretion whether or not to honor the warranty without regard to the date of the purchase.
Moog Music Is An Employee-Owned Company Located In Asheville, NC 60