
User Manual

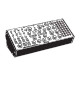


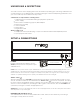
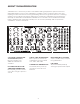
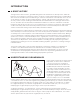
Table Of Contents

8
Check the contents of the shipping carton. Be careful when unpacking your new Moog Subharmonicon
so that nothing is lost or damaged. We recommend saving the carton and all packing materials in case
you ever need to ship the instrument for any reason.
Subharmonicon ships with the following items:
Subharmonicon Semi-Modular Analog Polyrhythmic Synthesizer
Power Supply
DIN Socket to 3.5mm Plug (Type A) MIDI Adapter
Patch Sheet Overlays
Owner’s Manual
Patch Cables
Registration Card
What you will need:
Headphones with a 1/4” TRS plug, or a 1/4” TS instrument cable and an amplified speaker
A properly wired AC outlet
1.
2.
3.
4.
5.
6.
7.
1.
2.
Power Supply
Amplifier or Headphones
UNPACKING & INSPECTION
SETUP & CONNECTIONS
POWER
Plug the included power adapter into the
12VDC power jack on the rear panel of your
Subharmonicon.
NOTE: There is no power switch on your Subharmonicon. Once connected to the power supply, the unit is On.
Subharmonicon is an analog instrument and should be allowed a few minutes to warm up before use. In cases
where it has been left in a cold car overnight, for example, it may take even longer for the oscillator tuning to
stabilize. For optimized tuning do not operate your Subharmonicon in direct sunlight.
AUDIO OUT /
With the Subharmonicon VOLUME knob turned all the way down (counterclockwise), plug one end
of a 1/4” instrument cable into the Subharmonicon AUDIO OUT / jack on the rear panel. Then plug
the other end into an amplified speaker or mixing console input. This jack can also be used with a set
of mono or stereo headphones, providing the same signal to each ear. Now, raise the VOLUME knob
(clockwise) to bring the sound to an appropriate level.
WARNING: Do not use a TRS (balanced) cable for line output applications, as this will cause phase cancellation
and can produce a very weak signal.
KENSINGTON SECURITY SLOT
Your Subharmonicon can be securely attached to a desk, stand, or other fixture by connecting a
Kensington security device to this slot.