VST-AU Little Phatty Editor™ 2.1.0 User Manual Windows XP, Vista, Windows 7 (32 & 64 bit) OSX 10.5, 10.6, 10.
VST-AU Little Phatty Editor™ 2.1.
Introduction Thank you for choosing the Moog Music VST-AU Little Phatty Editor™. The VST-AU Little Phatty Editor™ (referred to in this manual as 'Editor') is a real-time MIDI Synth Editor that allows you full control of every parameter of the sound on the Moog Music Little Phatty™ and Slim Phatty™ synthesizers (referred to in this manual as 'Synth') running the latest OS 3.12.680 or above. With it, you can view, manage and edit all your Patches with detail on the computer, visually.
Installation This product includes an installer which will help you with the installation of the product. Please follow the detailed instructions below to install and register your License Key to begin using the software product. Windows users: 1. Be sure to read this User Manual before you begin using this product. It contains detailed information regarding the MIDI setup procedures required to successfully connect to your computer and synthesizer. 2. Run the installer file.
MIDI Setup Assumptions It is assumed that the user is familiar with the basic functionality of the hardware synthesizer, its User Manual and the basic concept of MIDI itself. Without this knowledge, utilizing the Editor may be a bit more challenging to set up and use properly. By familiarizing yourself with the synthesizer manufacturers User Manual, this User Manual, and having a basic understanding of MIDI, you should be able to get up and running in a short amount of time.
1. Open the DAW host. In the DAW host MIDI setup (typically found under 'Preferences') disable the port that you are using to connect the Synth to the Editor. (ex. port 8). 2. Using a Virtual MIDI Cable (MIDI Yoke, Maple MIDI or LoopBe for Windows, it's free. Use 'Audio MIDI Setup' app on Mac and create a virtual device, also free). Make sure the VMC is installed and working properly first! 3. Using a MIDI Routing app (MIDI-Ox for Windows, it's free. Use 'Audio MIDI Setup' app on Mac, also free).
Setup Example for Ableton Live 8 To setup the Moog Music VST-AU Little Phatty Editor™ for Ableton Live 8: 1. First be sure to open the 'Preferences' dialog and deactivate the MIDI ports you will be using to connect the Synth to the Editor. Be sure to check your Host's VST Instrument plug-ins folder to make sure the Editor got installed there properly. Also make sure the License Key and Preferences files are copied to the same folder as the plug-in. 2. Open Ableton Live 8. Create an Empty Project. 3.
Notes on DAW Host Automation If you want to turn knobs on the synth and have these knob movements recorded as automation of the plug-in parameters, you’ll need to use your DAW to map MIDI from the knobs to the plug-in parameters, the same as you would map a generic MIDI knob controller to the parameters of any other plug-in. The Editor’s knobs will automatically send the correct MIDI CCs out to the synth, but associating CCs coming in from the synth to these same knobs is a mapping function of your DAW.
Working With the VST-AU Little Phatty Editor™ About Sound The VST-AU Little Phatty Editor™ is a plug-in that deals only with MIDI data. As a result the VST-AU Little Phatty Editor™ makes no sound of its own. It is not an emulation software synth. The sound comes from the actual hardware synth itself, which is what you want (pure analog hardware generated sound, but with plug-in control). Connect your Synth to your audio card inputs as you normally would and use the Host to manage the audio tracks.
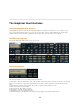
The Graphical User Interfaces Using The Graphical User Interface The graphical user interface of the VST-AU Little Phatty Editor™ is designed for maximum ease of use, giving you easy access to all of the parameters right on one screen. You are also able to rename, modify and browse the Patches right inside the Editor itself. All controls are handled via either a slider, knob, combo box, button or text edit box. The Main User Interface The VST-AU Little Phatty Editor™ main screen (not to scale)...
8. RAND button - Click to randomize the Patch. 9. PATCHES button - Opens the 'Patch Manager' view (see 'Patch Manager' section). 10. SETUP button - Opens the 'MIDI Setup' view (see 'MIDI Setup' section). 11. MON button - Opens the 'MIDI Monitor' view (see 'MIDI Monitor' section). MIDI Setup To access the 'MIDI Setup' view, click the 'MIDI Setup' button. The 'MIDI Setup' view allows you to connect and control the MIDI data coming into and out of the Editor and Host.
Host MIDI Setup The top portion of the screen is for the 'Host' MIDI IN and Out data path. This is data that comes from and goes to the DAW Host. MIDI port selection is achieved in the Host's MIDI setup. Host MIDI In (data from Host): The left portion is the Host MIDI In'. This is data that comes from the Host into the Editor.
The MIDI Monitor To access the 'MIDI Monitor' view, click the 'MIDI Monitor' button. The 'MIDI Monitor' allows you to view all MIDI data that is coming into or out of the Host and Editor. By default the view will show MIDI In/Out data from the Editor MIDI data path. You can switch between Host and Editor MIDI In and MIDI Out views independently. The colors of messages are related to the color coding found in the 'MIDI Setup' diagram. The 'Clear' button will clear the data in that view.
The Patch Manager To access the 'Patch Manager' view, click the 'Patch Manager' button. The 'Patch Manager' allows you to load and save Patches and Banks as .FXB/.FXP files. The 'Patch Manager' also allows you to view and organize your Patches and Banks the way you like. Patch slots allow you to rename and organize your Patches by simply dragging and dropping them to another slot in either Swap, Copy, or Move mode.
recommended that you use only the 'Patch Manager' to load and save .FXB/.FXP files, as some Hosts may add data to the header of the file and this may corrupt the interpretation of the file when reloading it. The Patch Randomizer The Patch randomizer allows you to easily create randomly generated Patches. Note that randomization applies to the currently selected Patch and will overwrite the existing Editor Patch data. The randomized Patch will also be sent to the Synth.
This allows you to listen to Patches from the Editor while still preserving your original Patches that reside in the Synth. If you wish to store the Patch data the Editor sent the Synth, then store it on the Synth by using the Synths 'write' function (refer to the Little Phatty manual for information on how to store a Patch). Using the Patch Manager The 'Patch Manager' is the easiest way to work with Patches. For more information refer to the 'Patch Manager' section of this manual.
1. Make sure the Synth and Editor are connected bidirectionally. 2. Open the 'MIDI Setup' view and set the 'Editor MIDI Out' 'Program Change' to 'On'. 3. Now, when you change patches in the Editor, the Editor will be 'receiving' the patches directly from the Synth. 4. Simply scroll through patches to build your bank in the Editor. 5. Be sure to turn ' Program Change' to 'Off' when you are finished.
Mode Note On/Off Velocity Aftertouch Poly Pressure Pitch bend Modulation Continuous Controller (+NRPN) Program Change System Common System Real-time System Exclusive x o o o o o o o o x x o x o o o o o o o o x x o Omni mode note numbers 0-127 0-127 0-127 0-127 0-127 0-127 0-127 0-127 x = no o = yes For a full list of the parameters and their value ranges, please refer to the Little Phatty User Manual. Legal Information License Agreement 1.
2. Licensee acknowledges that this is only a limited nonexclusive license. Licensor is and remains the owner of all titles, rights, and interests in the Software. 3. This License permits Licensee to install the Software on more than one computer system, as long as the Software will not be used on more than one computer system simultaneously. Licensee will not make copies of the Software or allow copies of the Software to be made by others, unless authorized by this License Agreement.