
Operation Manual

4
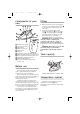
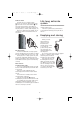
Components of your
iron
⁄ Variable steam button
¤ Shot of steam button
‹ Spray button
› Filling hole with cap
fi Spray nozzle
fl Soleplate
‡ Temperature control dial with indicator
· Water tank (Illuminated on certain models)
‚ Life long anti-scale (certain models only)
„ Temperature indicator light (red)
‰ Graduated filling beaker
 Auto shut-off indicator light (certain
models only)
Before use
Note: The steam facility should only be
used on garments which are suitable for
ironing at the 2 and 3 dot settings.
When ironing with the steam facility at the
2 dot setting, the steam output should be set
at the lower end of the steam range (see
variable steam section).
Textiles and clothes are supposed to
carry ironing instructions. If they don’t you
should follow the fabric guide on page 3, but
be sure to test the temperature by ironing the
hem of the garment or similar area first.
If you turn the control dial down from a
hot setting to a cooler setting, wait until the
iron temperature has stabilised before you
continue ironing.
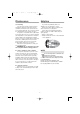
Filling
1 Make sure that the iron is not plugged in
and then set the variable steam control ⁄
to the ‘0’ position before filling the iron
with water.
2 Lift up the fill cap and fill the water
through the filling hole › into the water
tank ·, using the beaker provided. A
After filling replace the fill cap. In hard
water areas the use of distilled or
demineralised water is recommended.
WARNING: Never use battery topping
up fluid or water containing any
substances like starch, or sugar, or
defrosted water from a refridgerator.
3 Always pour out the remaining water after
use.
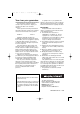
WARNING: When filling your iron with
tap water always use the beaker
provided. Never fill directly under the
tap.
Tank capacity
Model 40701 - Advise 400ml
Models 40707 and 40711 - Advise 350ml
Temperature control
Plug in the iron and switch on. Set the
temperature control dial B to the
temperature required, but don’t start ironing
immediately.
⁄
¤‹
›
fi
fl
‡
·
‚
„
A
400
300
350
‰
Â
40701 rev 1 13/2/06 10:55 AM Page 4