
Instructon Booklet


10
• “Does not pick-up”/ “Motorised floor-brush
r
unning slow or soon stops”
Check for hairs/fibres that may be wrapped
a
round the rotating brush-bar.
IMPORTANT: Remove the brush bar as described
on page 7. Fine hairs or fibres may be caught
u
nseen in the ends of the brush bar. Carefully
remove the hairs and re-fit the brush bar.
• “Does not pick-up” / “Suction of handheld
cleaner has reduced”
In addition to emptying the dust canister, it is very
important that the filters inside the handheld
cleaner are regularly and thoroughly cleaned. See
page 9 for details of how to access and clean the
filter.
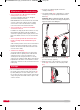
• “Does not pick-up from the floor but the floor
brush is rotating and the handheld has good
suction”
Switch off the product, remove the motorised floor
brush and check for blockages in the connector
between the motorised floor brush and the main
vacuum cleaner body.
• “Product not charging”
Check the indicator light
(12)
on the front of the
handheld cleaner is glowing red to indicate that
charging is in process. If the indicator is not
showing red, check: a) the product is correctly
seated on the charging cradle; b) the mains plug is
fully fitted into the mains socket and the socket is
switched on. If these are OK, check the fuse in the
mains plug.
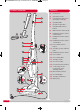
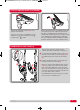
1.
Fit the handheld vacuum cleaner
(13)
back into
the cavity on the main vacuum cleaner body
(7)
by firstly sliding the suction end into place over
the suction hole in the main vacuum cleaner body
cavity, then push the handle end in to place until
a click is heard.
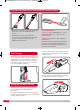
2
.
Insert the assembled upright unit into the
c
harging cradle
(
16)
.
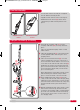
3
.
The upright handle
(4)
is collapsible for compact
s
torage by pressing the upright handle release
button
(6)
.
W
ARNING: When locking the handle, keep this
area clear. Be careful not to trap your fingers or
a
ny loose items of clothing etc
.
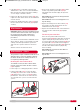
4.
Place the tools onto the accessory holder
(17)
(see ‘Tool storage’, page 8).
5.
Wrap the power cord around the cord storage
hooks
(19)
on the back of the charging cradle
(16)
.
Storage
Maintenance - troubleshooting
VC732007MUK Rev1.qxp_Instruction Book 25/08/2015 15:13 Page 10