User Guide BMC9012 BMC9022D Broadband Media Center
Copyright © 2004 Motorola, Inc. All rights reserved. No part of this publication may be reproduced in any form or by any means or used to make any derivative work (such as translation, transformation or adaptation) without written permission from Motorola, Inc. Motorola reserves the right to revise this publication and to make changes in content from time to time without obligation on the part of Motorola to provide notification of such revision or change.
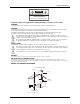
Safety and Regulatory CAUTION RISK O F ELECTRIC SHOCK DO NOT OPEN CAUTION: TO REDUCE THE RI SK OF E LECTRIC SHOCK, DO NOT RE MOVE COVER (OR BACK). NO USE R-S ERVICEABLE PARTS INSI DE . REFER SERVICING TO Q UALIFIED SERVICE PERSONNEL. Graphical symbols and supplemental warning markings on the back of the terminal WARNING TO PREVENT FIRE OR SHOCK HAZARD, DO NOT EXPOSE THIS APPLIANCE TO RAIN OR MOISTURE.
Motorola BMC User Guide Usage Warnings Avoid Damaging Your Television or Other AV Equipment Do not use with certain televisions or equipment. Some televisions can be damaged if certain interactive television services or functions are used, such as tickers and online video games that can remain static on your screen.
Table of Contents Table of Contents Introduction ........................................................................................................... 2 BMC Features .................................................................................................................................. 2 BMC Diagrams................................................................................................................................. 3 Front View ...................................................
Motorola BMC User Guide Chapter 1 Introduction The Motorola Broadband Media Center (BMC) family of products delivers digital video and audio, plus a whole new experience in interactive cable television. Finding what you want to watch and watching it when you want has never been easier. The BMC is simple to set up and easy to operate. The BMC9022D extends all its features to a second TV in your home. This guide introduces you to the features and setup of your BMC.
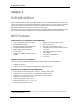
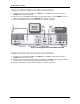
Introduction BMC Diagrams The following illustrations identify the controls on the BMC. Slight variations may exist between these illustrations and your model.
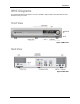
Motorola BMC User Guide Chapter 2 Installation This chapter describes how to install the BMC and verify the installation. The chapter also contains information to help you successfully disconnect, move, and reconnect the cable connections between the BMC and the TV. When connecting the BMC, make sure all coaxial connections are "finger-tight"—secure, but not so tight they cannot be undone with your fingers.
Installation Equipment Required Video cable (Composite, S-Video, Component (YPrPb) or DVI-D) for TV/Monitor Audio cable (Stereo Analog, Digital Coaxial, or Optical) for TV and/or audio system Use the best connection supported by your TV, monitor, or audio system. See the wiring diagrams starting on page 6 for reference. BMC Connection Procedure The installation scenarios described in this section apply to all BMCs, including the BMC9012 and the BMC9022D.
Motorola BMC User Guide Digital Video/Digital Audio Connection 1. Connect one end of the DVI-D cable to the DVI-D port of the BMC and the other end to the DVI-D In port of the TV or receiver. 2. Attach one end of the S/PDIF audio cable to the appropriate optical or coaxial S/PDIF port of the BMC and attach the other end to the S/PDIF in port of the TV or receiver. 3. Follow the instructions under "Installation Wrap-Up," starting on page 10.
Installation Figure 5: DVI-D digital video with stereo audio Component Video/Digital Audio Connection 1. Connect component video cables from the Y, PB, and PR outputs on the BMC to the Y, PB, and PR inputs on the TV or receiver. 2. Attach one end of the S/PDIF audio cable to the appropriate optical or coaxial S/PDIF port of the BMC and attach the other end to the S/PDIF in port of the TV or receiver. 3. Follow the instructions under "Installation Wrap-Up," starting on page 10.
Motorola BMC User Guide 2. Attach one end of the stereo audio cables to the Left (L) and Right (R) audio outputs of the BMC and the other end to the respective L and R inputs of the TV or receiver. 3. Follow the instructions under "Installation Wrap-Up," starting on page 10. Figure 7: Component video with stereo audio S-Video/Stereo Audio Connection 1. Connect one end of the S-Video cable to the S-Video port of the BMC and the other end to the S-Video In port of the TV or receiver. 2.
Installation Composite Video/Stereo Audio Connection 1. Attach one end of a composite video cable to the video (V) output of the BMC and the other end to the Video In port of the main TV or receiver. 2. Attach one end of the stereo audio cables to the Left (L) and Right (R) audio outputs of the BMC and the other end to the respective L and R inputs of the TV or receiver. 3. Follow the instructions under "Installation Wrap-Up," starting on page 10.
Motorola BMC User Guide Installation Wrap-Up 1. Verify that all cable connections are tight and secure, all coaxial connections are finger-tight and properly seated, and that all RCA-style plugs are fully seated. 2. Ensure that nothing blocks the vents of the BMC or other equipment. 3. Plug the TV power cord into the wall outlet. 4. Attach one end of the power cable to the BMC Power port and plug the other end into the wall outlet.
Installation Video Configuration If you switch between composite/S-video and component/DVI-D input connections, do the following before proceeding: Hook up the new cables WHILE KEEPING THE EXISTING CABLES CONNECTED. If the new connection requires a different TV input, do not change it until step 4. 1. Press the MOXI button on the remote to bring up the Moxi Menu. 2. Go to Settings and choose Video Output. 3. Bring one of the following settings into center focus, and then press OK to select it.
Motorola BMC User Guide Video Settings Definitions p and i Designations In video resolution settings, the "p" and "i" designations stand for "progressive" and "interlaced." These terms are used to describe how a TV picture is displayed on the screen. Video Resolution Formats 720p and 1080i are High Definition (HD) formats. 480p and 480i are Standard Definition (SD) formats. 480i is roughly equivalent to a normal analog TV picture.
Moxi Remote Chapter 3 Moxi Remote The Moxi remote allows you to access, control, and enjoy the many features of your Media Center. You can also use this remote as the primary remote for many brands of TVs and audio devices. Instructions in this chapter show you how. Refer to the Moxi Viewer's Guide for explanations of the buttons. Your cable operator may provide a different remote. If your remote does not look like the one pictured here, refer to the manual your cable operator provided with the remote.
Motorola BMC User Guide Programming by Search 1. Turn on the TV or receiver you want the remote to control. 2. On the Moxi remote, press and hold the MOXI and OK buttons simultaneously, until the LED light on the top of the remote blinks twice. 3. Using the number buttons on the remote, press 9 9 1 0 for TV, or 9 9 1 1 for audio receiver. The LED light blinks twice. 4. Press the Mute button. If this mutes the device, go to step 5.
Moxi Remote TV Brand Manufacturer Code TV Brand Manufacturer Code Fujitsu Futuretech 0179, 0683 0180 Funai GE Gibralter 0017, 0030 GoldStar Goodmans Grundig Haier Harley Davidson Harvard Havermy 0360 0037 0768 0179, 0043 0180, 0068 0093 Gradiente Grunpy Hallmark Harman/Kardon Hauppauge Hitachi InFocus Innova JBL JVC Jensen KMC 0736, 0738, 0741, 0752 0037 0054 0053, 0036, 0069, 0160, 0169, 0182 0050 0106 Infinity Inteq JCB Janeil KEC KTV Kamp Kaypani Kloss LG 0216 0052 0024, 0046, 0078 0056
Motorola BMC User Guide TV Brand Manufacturer Code TV Brand Manufacturer Code Pilot Portland Prism Proton Pulsar RCA Pioneer Princeton Proscan Proxima Quasar RadioShack 0038, 0166, 0172, 0679 0685, 0700, 0717 0047, 0747 0734, 0735, 0737, 0742, 0743 0250, 0051, 0165, 0055, 0219, 0650 0047, 0154, 0165, 0180, 0030, 0178, 0056, 0039, 0032, 0409, 0747 Rhapsody 0183, 0185, 0216 Rosen SKY Sampo 0030, 0039 0039, 0092 0051 0178, 0003, 0031, 0052, 0466 0017 0047, 0018, 0029, 0038, 0090, 0135, 0254, 0278, 0
Moxi Remote Audio/Video Receiver Codes Receiver Brand Manufacturer Code Receiver Brand Manufacturer Code ADC Adcom Aiwa 3531 3002, 3304, 3319, 3616 4089, 4405, 3121, 3125, 3158, 3162, 3189, 3249, 3284, 3301, 3361, 3544, 3601, 3745, 4188, 4243, 4321, 4388, 4641 4390 3403 3687 4390 3702 3049 3531, 3690 ADS Admiral Akai 3375, 4157 3182 3076, 3115, 3151, 3224, 3450, 4255 Arcam Audio Authority Audiotronic B&K Bang & Olufsen Bose Carver Alco Audio Access AudioSource Audiovox BK Bondstec Capetronic 3195
Motorola BMC User Guide Receiver Brand Manufacturer Code Receiver Brand Manufacturer Code Onkyo 3100, 3119, 3135, 3137, 3144, 3380, 3838, 3842, 4298 Optimus Orient Power Panasonic 3744 4518, 3039, 3309, 3367, 3389, 4288, 4316, 4763, 4764 3549, 3895, 4124, 4238 3479 Outlaw Audio Panor 4023, 3042, 3177, 3181, 3186, 3219, 3229, 3286, 3440, 3531, 3622, 3670, 3690, 3738, 3744, 3754, 3797, 3801, 3803, 3849, 4074 4109 3350 Parasound Philco Pioneer Penney Philips 3044, 3195, 3201, 3449 4089, 4189, 42
Visit our website at: www.motorola.