Operation Manual
Manuals
Brands
Motorola Manuals
Media Player
BMC9022
1
2
3
4
5
6
7
8
9
10
Introduction
3
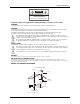
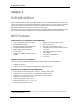
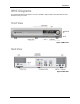
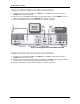
BMC Diagrams
The following illustrati
ons identify the controls
on the BMC. Slight variati
ons m
ay exist between these
illustrations and your model.
Fr
ont View
Figure 1: BMC Front
Back View
Figure 2: BMC Back
1
...
...
5
6
7
8
9
...
...
23